


How to Choose a Car Amplifier

You're probably looking at an amplifier listing that promises huge peak wattage, several channels, and a price that seems too good to ignore. Then you compare it with your factory speakers, aftermarket subwoofer, or the cramped space beneath your seat and realize the important questions aren't printed in large type. Will the amplifier deliver clean power at the speaker's actual impedance? Will it stay stable when the wiring load drops? Can it work with the signal your factory radio produces?
Learning how to choose a car amplifier means looking past the box and checking the complete system. RMS power, impedance, channel layout, amplifier class, DSP features, wiring, ventilation, and physical fit all affect the result. The amplifier with the biggest number isn't automatically the one that will sound cleanest or work reliably in your vehicle.
Table of Contents
- Decoding Power Ratings and Impedance
- Selecting the Right Channel Configuration
- Comparing Amplifier Classes and Efficiency
- Prioritizing DSP and Modern Integration Features
- Planning the Installation and Wiring Budget
- Final Verification Before You Buy
Decoding Power Ratings and Impedance
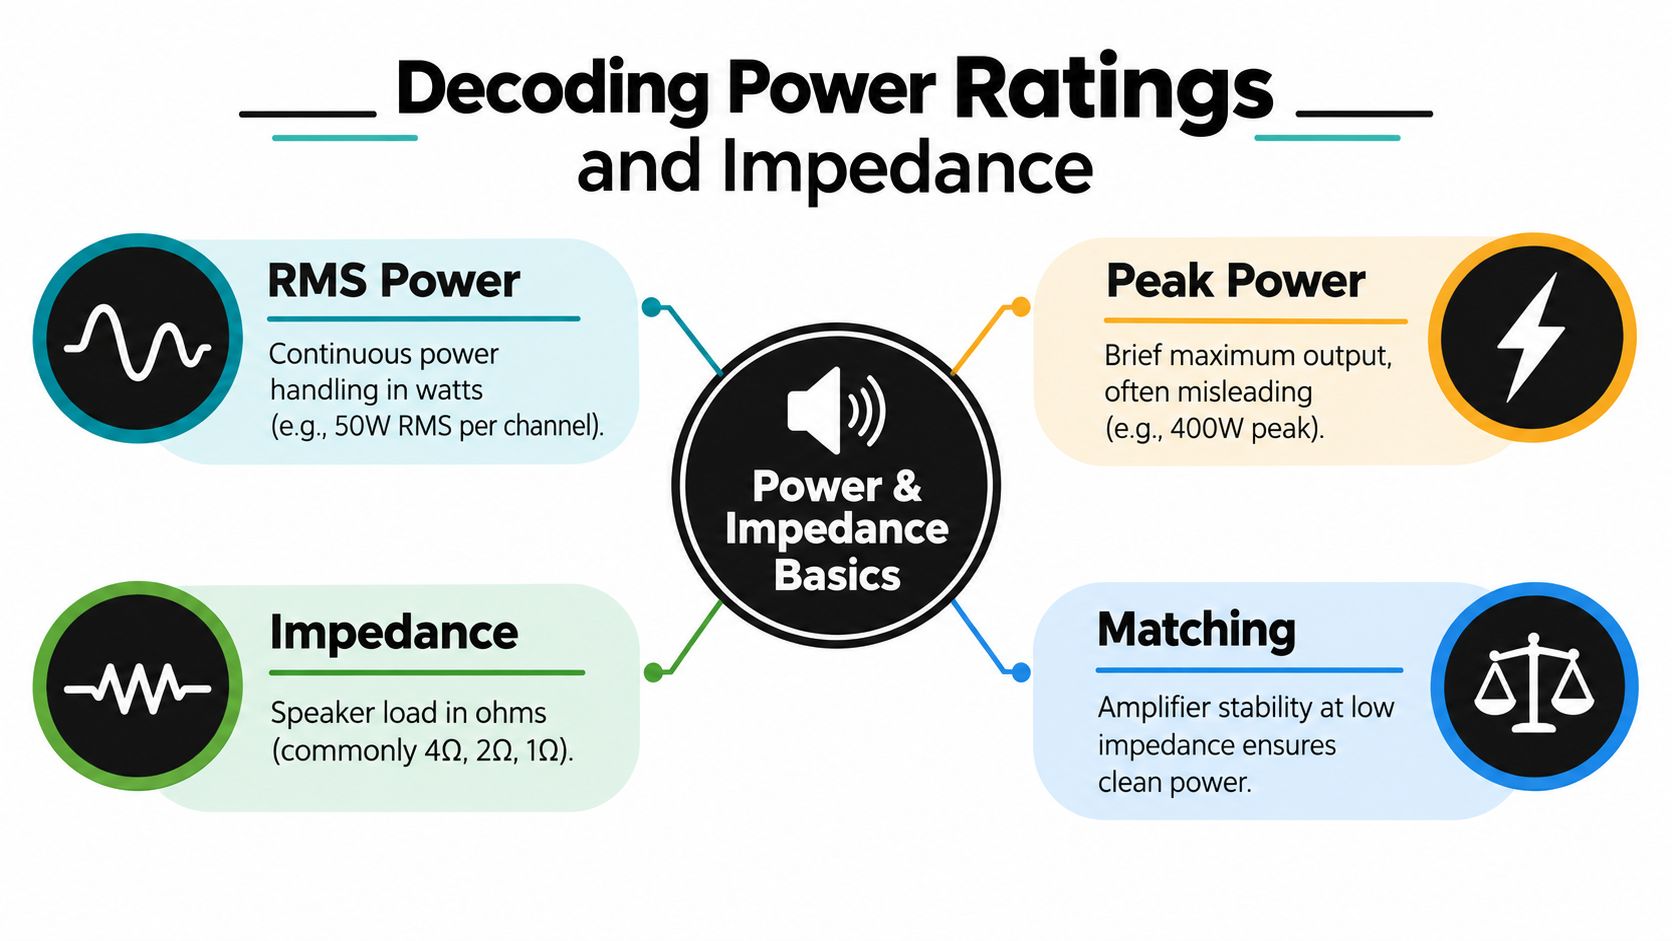
A large wattage figure can hide the mismatch that causes weak output, clipped sound, or overheating. Peak power describes a brief maximum under specific conditions. It does not show what the amplifier can deliver continuously while music plays, so use RMS power as the starting point.
Industry guidance commonly places amplifier output within about 75% to 125% of the speaker's RMS rating. For a speaker rated at 60 watts RMS, a practical target is roughly 45 to 75 watts RMS per channel at 4 ohms. The Crutchfield amplifier shopping guide explains the power-matching approach and shows how ratings should be compared.
Read the rating under the right conditions
A specification only has meaning when its test conditions are visible. Check each part of the line:
- RMS output: Use the continuous figure when matching amplifier power to speakers.
- Impedance: Confirm whether the rating applies at 4 ohms, 2 ohms, or another load.
- Distortion: A power figure measured at 1% or less total harmonic distortion gives a more useful comparison than an unqualified peak claim.
- Voltage: Many standardized ratings use a 14.4V DC supply, creating a consistent reference point.
- Bridged output: Combining two channels can increase available power, but it also changes the minimum speaker load.
One amplifier may be rated at 60 watts x 2 at 4 ohms, 75 watts x 2 at 2 ohms, or 150 watts bridged at 4 ohms. These figures describe different operating conditions, not conflicting claims. The Crutchfield examples of amplifier ratings at 4 ohms, 2 ohms, and bridged illustrate how the same unit can carry several valid power ratings.
Impedance is where installations go wrong
Impedance, measured in ohms, is the load presented to the amplifier. A lower load can produce more output, but it also demands more current and creates more heat. The amplifier must be designed for that load, and the final wired impedance matters more than the speaker's nominal label.
Check every wiring choice before connecting power. Bridged channels, parallel voice coils, or combinations involving factory and aftermarket speakers can drop the load below the amplifier's safe limit. An amplifier rated for 4 ohms is not automatically safe at 2 ohms, and a 2-ohm-stable model is not necessarily suitable for a 1-ohm configuration. The CEA-2006 measurement guidance describes consistent testing with a 14.4V supply, a 4-ohm load, and 1% or less THD, providing a clearer baseline than inflated peak figures.
Write down the speaker's RMS rating, voice-coil configuration, and final impedance. Then find the amplifier's RMS output at that exact load. Verify the manual's minimum impedance before choosing a bridged or parallel connection. Ignore the peak number until the continuous match and load stability are confirmed.
Practical rule: The amplifier must remain stable at the final wired load, not merely at the impedance printed beside its first power figure.
Selecting the Right Channel Configuration
Channel count should follow the speakers you're powering, not the size of the amplifier chassis. A channel is an independently amplified output, so the first question is simple: how many speaker groups need dedicated power, and will a subwoofer receive its own channel or share a bridged pair?
A mono amplifier is built for a single subwoofer channel. It makes sense when the factory or aftermarket speakers already have adequate power and the upgrade is focused on bass. A mono design also keeps the subwoofer load separate from the front-stage tuning, which makes the system easier to control.
A 2-channel amplifier works well for a pair of front speakers, or it can be bridged for a single subwoofer when the amplifier and speaker load are compatible. Bridging is not a free power upgrade. It changes the electrical demand seen by each amplifier channel, so the manual's bridged impedance requirement matters before any speaker wire is connected.
Match the layout to the build
A 4-channel amplifier is often the most flexible choice for a basic speaker upgrade. It can power front and rear speakers independently, or it can run the front speakers while the second pair of channels is bridged for a compatible subwoofer. That arrangement can work in a daily driver, but it leaves less independent control than a dedicated 4-channel plus mono-amplifier setup.
A 5-channel amplifier combines full-range speaker channels with a dedicated subwoofer channel in one chassis. It can simplify wiring and save installation space, especially when the vehicle has limited room. The trade-off is that a single chassis may provide less upgrade flexibility than separate amplifiers if you later want substantially more subwoofer output or independent processing.
| System plan | Practical amplifier direction | Main trade-off |
|---|---|---|
| Factory speakers with added bass | Mono amplifier | Keeps the upgrade focused on the subwoofer |
| Front component speakers only | 2-channel amplifier | Limited expansion unless you plan carefully |
| Front and rear speakers | 4-channel amplifier | Provides independent speaker channels |
| Front speakers plus a subwoofer | 4-channel with compatible bridging, or separate mono and 2-channel units | Bridging requires careful impedance verification |
| Full speaker and subwoofer system | 5-channel or separate amplifiers | One chassis is simpler, separate units offer more flexibility |
Plan for the next change
Future-proofing doesn't mean buying the largest amplifier available. It means leaving a sensible path for the equipment you're likely to add. If the vehicle may receive a subwoofer later, running appropriate power and signal wiring during the first installation can avoid removing trim panels again.
For a serious front-stage system, separate amplification often makes tuning and troubleshooting easier. A 4-channel amplifier can handle mids and highs while a mono amplifier handles bass, but the electrical system, mounting space, and signal routing must support both. A smaller, correctly matched system will outperform a larger system assembled without a channel plan.
Comparing Amplifier Classes and Efficiency
The amplifier class determines how much electrical energy becomes speaker output and how much turns into heat. That difference becomes obvious under a seat, in a crowded trunk, or inside a compact vehicle with limited airflow. It also matters when the electrical system has little spare capacity, including electric vehicles where unnecessary heat and energy use are harder to ignore.
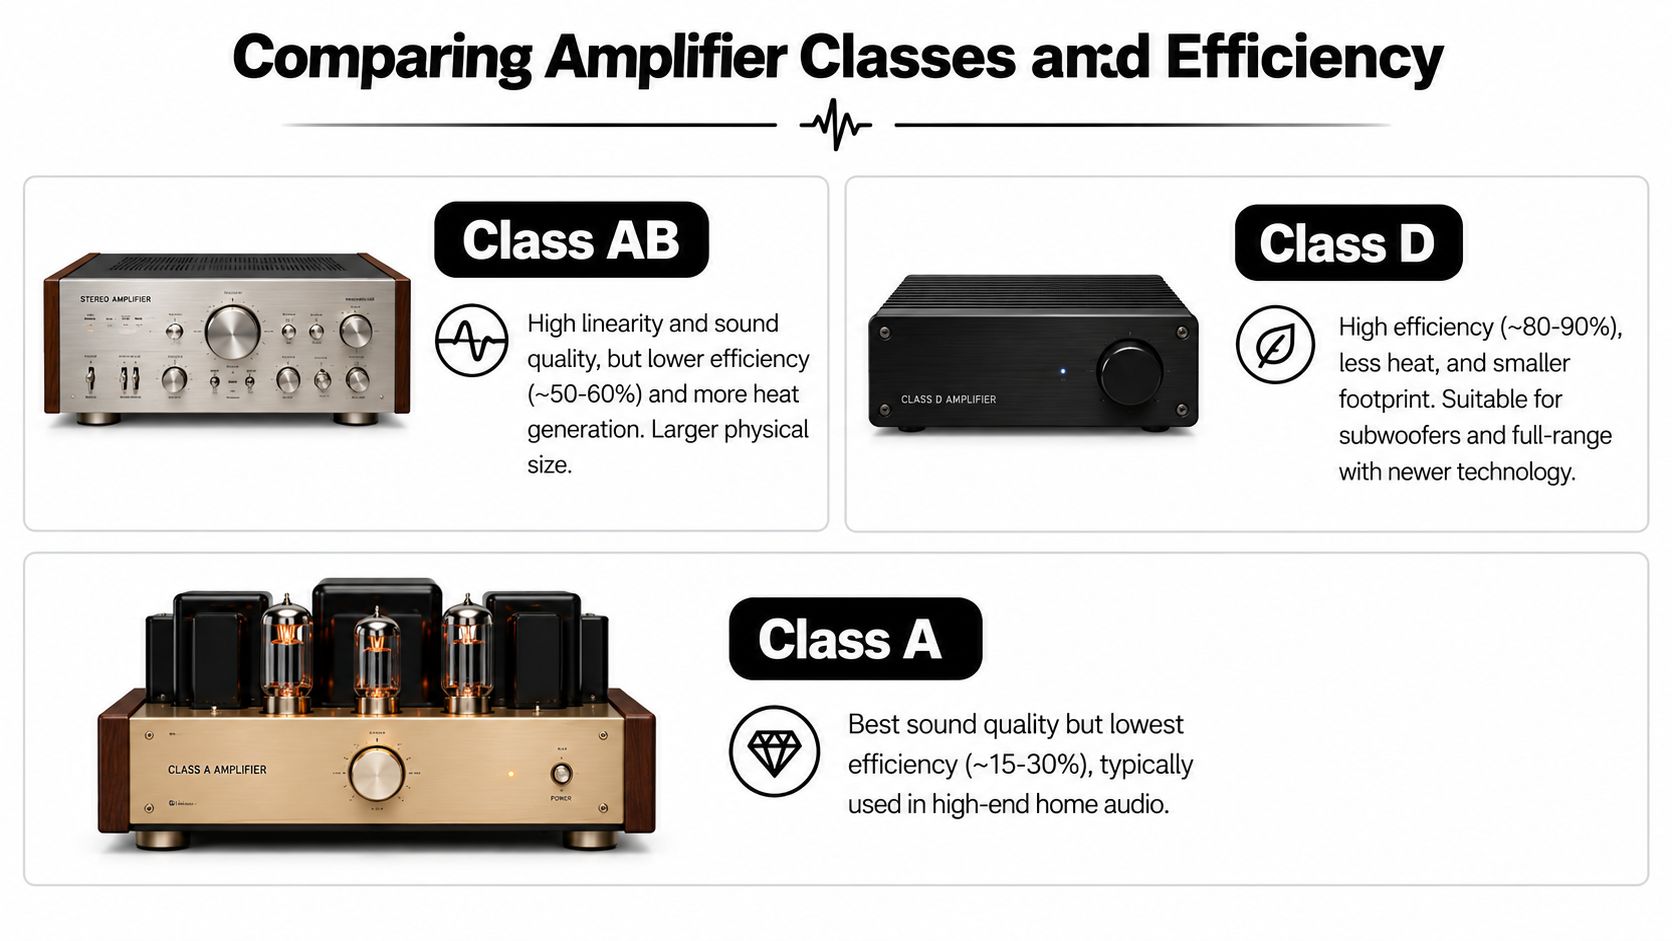
Class-AB amplifiers have long been chosen for their linear operation and full-range performance. They remain suitable for a well-ventilated installation built around conventional speaker amplification. The trade-off is higher heat production and greater electrical demand than many modern Class-D designs. That can mean a larger mounting area, more airflow, and closer attention to placement.
Class-D amplifiers switch their output devices rapidly, converting electrical energy more efficiently. Early designs developed a reputation for compromising sound quality, but that assumption is a poor buying shortcut for current full-range models. A well-designed Class-D amplifier can deliver clean output in a compact chassis, which makes it practical for subwoofers, tight mounting locations, and systems with substantial power demands.
Efficiency changes the installation
Modern car-audio guidance places Class-D conversion efficiency in the area of 80% to 90%, compared with roughly 50% to 65% for legacy Class-AB designs, as shown in this efficiency figures for Class-D versus Class-AB car amplifiers. These figures describe conversion efficiency, not identical sound quality or output in every vehicle. The installation consequence is straightforward: for a similar task, the more efficient design generally creates less waste heat and demands less current.
Choose the class according to the job:
- Subwoofer duty: Class-D is usually the practical choice because bass amplification benefits from efficient operation and compact packaging.
- Full-range speakers: A current Class-D model can perform well when its noise performance, processing options, and tuning controls suit the system.
- Tight mounting location: Check efficiency and ventilation instead of assuming Class-AB will sound better.
- High-demand system: Evaluate current draw, charging capacity, fuse protection, and heat management as one installation problem.
A Class-AB amplifier still fits a carefully ventilated full-range system. Rejecting it automatically is unnecessary, but choosing it only for a reputation for warmth is just as weak. The amplifier's actual design, measured specifications, mounting environment, and final tuning determine the result. Impedance stability also matters, since a wiring mistake or a speaker load below the amplifier's rated limit can create excess heat, trigger protection, or cause failure regardless of the amplifier class.
Prioritizing DSP and Modern Integration Features
More wattage won't fix a poor signal. If a factory radio applies equalization, rolls off bass as volume rises, separates frequencies across multiple channels, or uses vehicle-specific processing, a new amplifier may make those problems louder.
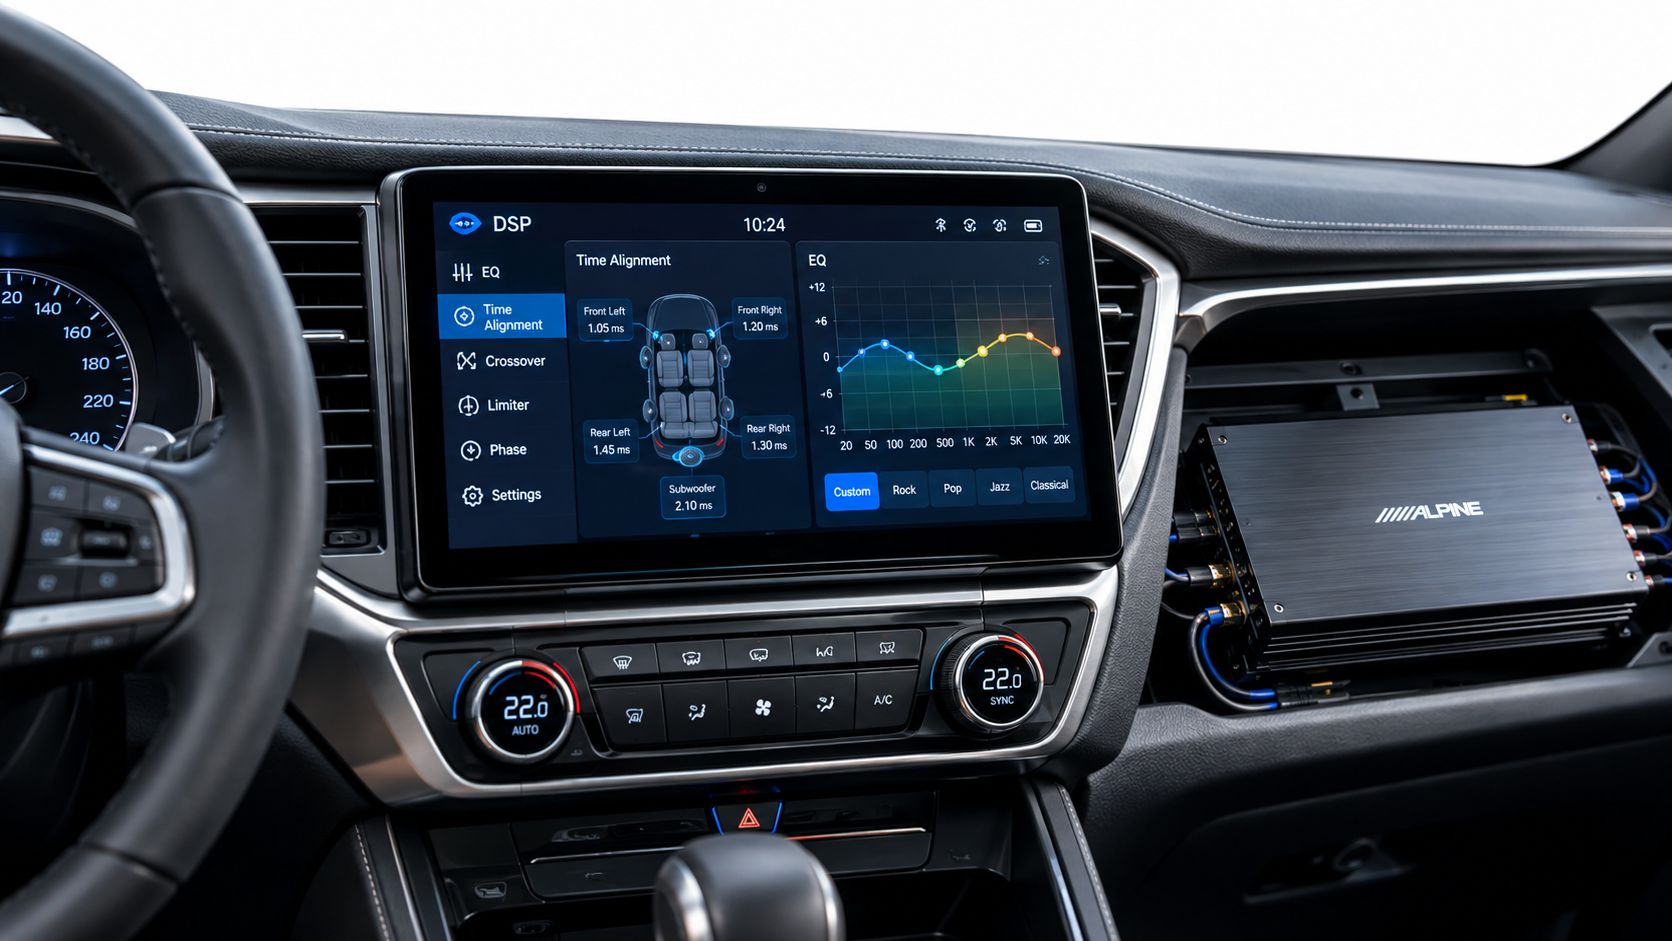
DSP, or digital signal processing, gives the installer control over the signal before amplification. Useful features include time alignment, crossover adjustment, equalization, phase control, and signal summing. Signal summing is particularly important when a factory system sends different frequency ranges through separate outputs. The installer can combine those ranges into a usable signal instead of feeding the amplifier only the narrow portion available from one factory channel.
OEM integration comes before raw output
Factory-head-unit upgrades often need more than RCA inputs. Look for high-level inputs, input summing, load detection, automatic turn-on, and the ability to retain factory volume controls and warning tones. The right interface can let the original infotainment system remain in place while the amplifier and speakers receive a cleaner, better-managed signal.
Recent market coverage projects that DSP and active noise cancellation will have adoption above 40% in new passenger cars launched globally during 2025–2026, according to this motor vehicle amplifier market analysis. The same coverage says 4-channel amplifiers are already present in about 60% of new passenger cars, with over-the-air firmware appearing in a small but growing share of OEM amplifiers. These are projections and market observations, not a reason to buy a specific product. They do show why modern amplifier selection increasingly involves software, integration, and system tuning.
A basic amplifier can be perfectly suitable for a clean aftermarket head unit and straightforward speaker load. A factory system with complex processing deserves a different evaluation.
This video gives a visual look at the type of interface and tuning workflow involved:
A powerful amplifier connected to an incomplete factory signal is still an incomplete upgrade.
Planning the Installation and Wiring Budget
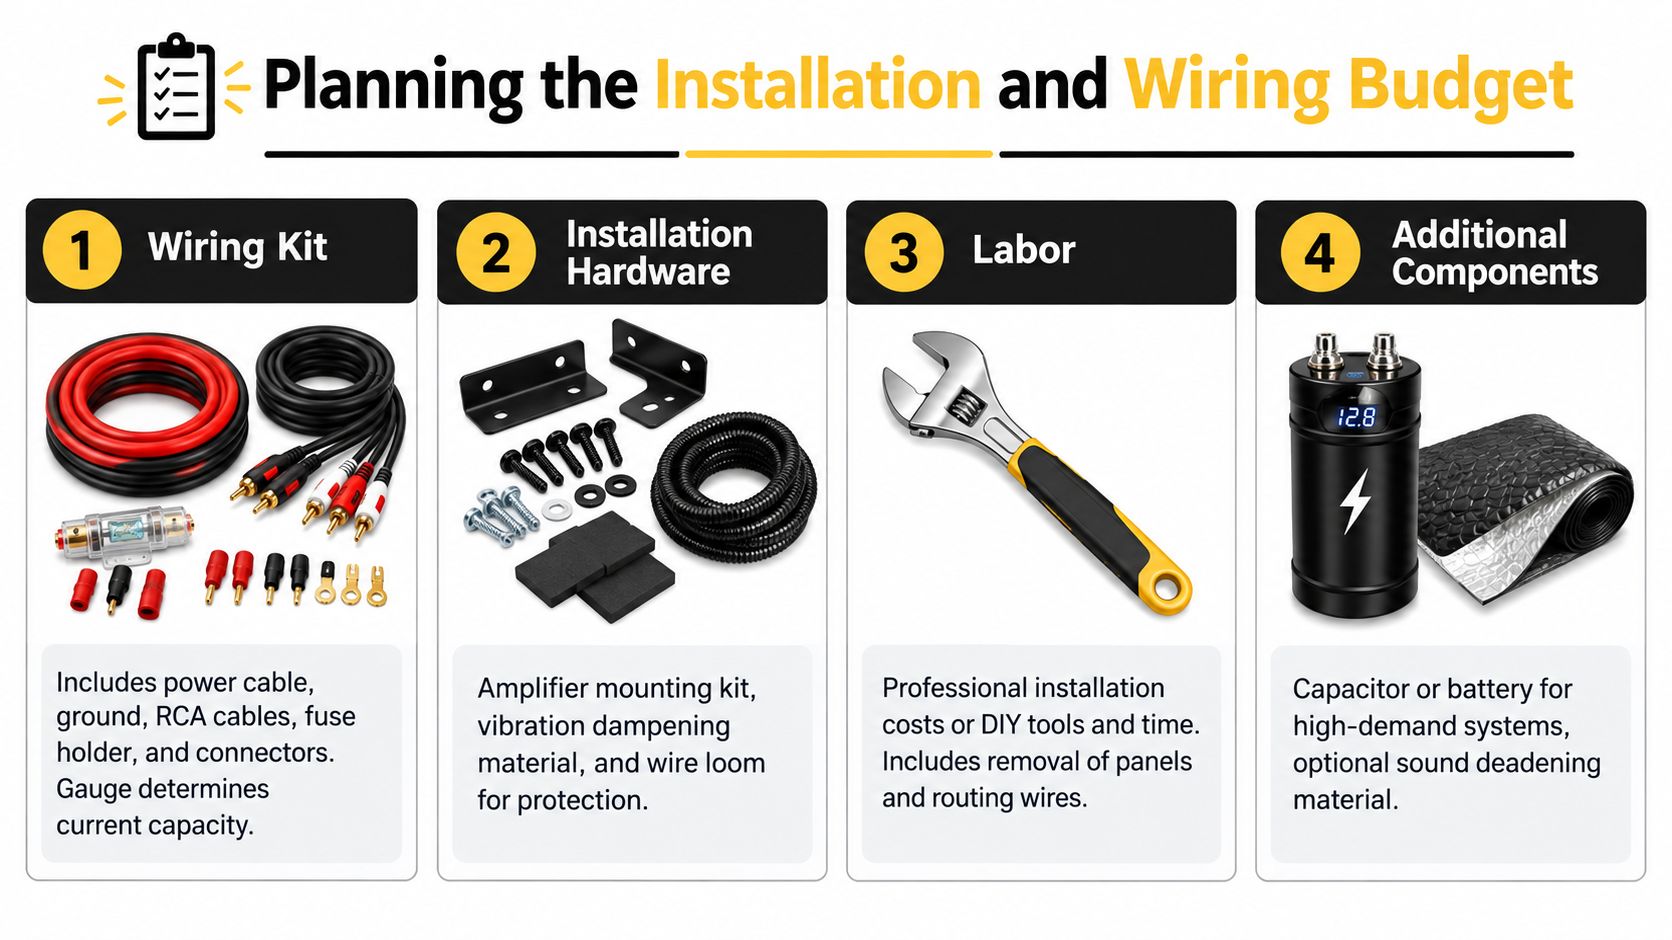
The amplifier is only one part of the installation. The final system also needs power cable, ground cable, fuse protection, signal wiring, speaker wire, connectors, mounting hardware, and a location that can shed heat. If the vehicle has a complicated factory system, the labor may include panel removal, signal testing, interface programming, and tuning.
Start with the amplifier's installation manual. Don't select wire size by guesswork or by the appearance of the cable. The amplifier's current demand, cable length, fuse recommendation, and installation route determine the appropriate power and ground conductors. Use quality oxygen-free copper cable where specified, protect the power cable near the battery with the correct fuse, and secure the cable so it can't rub against sharp metal.
Treat grounding as part of the amplifier
A weak ground can create noise, voltage drop, intermittent shutdowns, or heat. Keep the ground connection short, attach it to solid vehicle metal, remove paint and corrosion at the contact point, and tighten the terminal securely. Don't rely on a random seat bolt if it doesn't provide a clean electrical connection.
Signal and power cables also need sensible routing. Running RCA cables beside a high-current power cable can increase the chance of noise, although vehicle design and cable quality affect the result. Keep connections protected, label both ends of every cable, and leave enough service slack to remove the amplifier without cutting wires.
A professional install may also require custom brackets, trim fabrication, sound deadening, an enclosure, or integration hardware. DIY work can reduce labor expense, but only if you have the tools and the confidence to remove interior panels without damaging clips, airbags, or wiring. A clean installation includes more than making music play.
Use this planning list before buying:
- Wiring kit: Confirm that it includes power cable, ground cable, fuse holder, signal cables, terminals, and protective loom.
- Mounting hardware: Check for brackets, fasteners, ventilation clearance, and vibration control.
- Signal interface: Verify whether the factory radio needs a line-output converter, high-level input, DSP, or vehicle-specific integration module.
- Electrical capacity: Ask whether the battery, charging system, and existing wiring can support the amplifier's current demand.
- Labor and tuning: Include panel removal, cable routing, gain setting, crossover setup, and final testing.
A capacitor isn't a substitute for correctly sized wiring, a sound ground, or an adequate charging system. If the lights dim, the amplifier enters protection, or voltage falls under load, diagnose the electrical system rather than masking the symptom with another accessory.
Final Verification Before You Buy
A product page can appear compatible until the amplifier is on the garage floor and the terminal block will not accept the planned cable. Check the physical and electrical details before ordering. A return is inconvenient, while reworking an installed system takes more time and can damage panels or wiring.
Start with the speaker load. Draw every voice coil, parallel connection, series connection, and bridged channel on paper, then calculate the final impedance seen by the amplifier. A single speaker's nominal impedance does not describe the load after multiple speakers or coils are combined.
Run the pre-purchase checklist
- Confirm RMS output: Match continuous amplifier output to the speakers' RMS handling at the exact impedance you will use.
- Verify minimum stability: Read the manual for the lowest safe load in stereo and bridged operation. A lower load can cause overheating, protection mode, or component failure.
- Check dimensions: Measure the mounting area, including height, cable bend radius, ventilation space, and access to controls.
- Inspect terminals: Confirm that power, ground, speaker, and signal terminals accept the planned cable and connectors.
- Check turn-on control: Determine whether the amplifier uses a traditional remote lead, signal sensing, or a vehicle-specific interface.
- Confirm signal compatibility: Make sure it accepts the head unit's output and can handle factory equalization or channel separation.
- Review tuning tools: Check for crossovers, gain controls, phase adjustment, time alignment, equalization, and software support where the vehicle requires them.
- Plan protection: Follow the manufacturer's fuse location and rating guidance, and protect every cable where it passes through metal.
- Test the upgrade path: Decide whether the amplifier leaves room for another subwoofer, additional speakers, or a separate DSP.
Gain is not a volume control. Set it for the source signal and amplifier sensitivity, then use suitable crossover points and listening tests to keep the system out of clipping. Bass boost needs restraint. Raising a narrow frequency range can increase electrical demand quickly without improving the rest of the system.
Before paying, confirm the wiring diagram against the amplifier's rated load in every operating mode. This catches the hidden impedance drop that basic buying guides often miss, especially when dual voice coils are wired in parallel or channels are bridged. Modern factory systems also deserve a signal check. A compact amplifier with DSP and reliable OEM integration may suit the vehicle better than a higher-rated unit that cannot accept the factory signal cleanly.
The final decision should balance clean RMS power, safe impedance behavior, installation fit, signal compatibility, and future serviceability. A lower-powered system installed with sound grounding and a safe load will be more satisfying than an oversized amplifier connected carelessly.
Audio Jam Inc helps drivers choose and install car amplifiers, speakers, subwoofers, DSP equipment, and factory-integration solutions for real vehicles, with products available through its Audio Jam Inc showroom and online store. Visit the site to review compatible equipment or arrange an installation that includes wiring, mounting, system tuning, and final impedance verification.













