

Single DIN CarPlay Fit Guide for Tight Dashboards

The usual advice for buying single-DIN CarPlay is to check the radio slot, choose a screen, and order the receiver. That skips the checks most likely to stop the installation: usable space behind the dashboard, clearance in front of it, and compatibility with the factory wiring. A receiver that fits the opening can still be the wrong receiver for your car.
Start with the vehicle, not the feature list. A successful upgrade should sit securely, leave essential controls accessible, retain the functions you need, and connect to your phone without turning every drive into a troubleshooting session.
Table of Contents
- Single-DIN Sizes and What Fits Your Dash
- Screen Designs, Swing Arc and Driving Safety
- Vehicles Where Single-DIN Still Makes Sense
- Wired or Wireless CarPlay and Which Connection to Choose
- Wiring and Factory Controls You Must Keep
- Confirm Fit and Integration Before You Buy
Single-DIN Sizes and What Fits Your Dash
A single-DIN CarPlay receiver is a replacement head unit built for the standard single-DIN radio slot, with Apple CarPlay providing navigation, calls, messages, music, and voice control. Single-DIN describes the mounting format, not the touchscreen's size or the connection method.
CarAudioNow's dashboard sizing guide describes single-DIN openings as approximately 180 × 50 mm, or 7 × 2 inches, compared with 180 × 100 mm, or 7 × 4 inches, for double-DIN openings. The comparison below separates that nominal opening from the receiver body and the space you need.
| Measurement | Single-DIN | Double-DIN | What to check on your vehicle |
|---|---|---|---|
| Opening width | About 180 mm (7 in) | About 180 mm (7 in) | Measure the front face width of the existing radio opening |
| Opening height | About 50 mm (2 in) | About 100 mm (4 in) | A single-DIN opening limits the height of a flush, fixed-face installation |
| Chassis size | Typically 178 × 50 mm, as described in Rungrace's installation guide | Use the receiver's chassis drawing, not its screen dimensions | Confirm the body fits behind the trim without forcing |
| Cavity depth | Measure the actual cavity | Measure the actual cavity | Check rear clearance, including plugs and cable bends, before ordering |
The dashboard's decorative opening may not be the mounting opening. A factory radio can sit inside a shaped bezel, use side brackets, or occupy a larger enclosure that needs a vehicle-specific dash kit. Measure with the relevant trim removed rather than measuring only the visible face.
Measure the space the receiver will occupy
Use a tape measure, a flashlight, and a straightedge laid across the intended mounting plane. Don't push a metal measuring tool into an energized radio cavity or probe unidentified connectors.
- Measure the opening. Record its clear width and height, noting any lips, screw tabs, or trim edges that narrow the usable space.
- Measure usable depth. Measure from the mounting plane to the nearest obstruction behind it. Check across the cavity, because a duct or bracket may intrude on only one side.
- Map the obstructions. Note wiring bundles, brackets, ducts, and places where rear connectors would land. Photograph anything that's hard to describe.
Compare those measurements with the receiver's installation drawing, including connector locations. A chassis can clear a duct while its USB plug or antenna connector cannot. Leave a natural bend in the cables rather than crushing them behind the receiver.
Practical rule: Measure the cavity before ordering. The slot tells you about the front opening, not the available installation depth.
A shallow chassis can make the job easier, but it doesn't eliminate the need for secure mounting. Don't remove structural supports or reshape ductwork just to make a receiver slide into place.
Screen Designs, Swing Arc and Driving Safety
| Screen design | Depth needed | Screen position | Best fit | Main risk |
|---|---|---|---|---|
| Fixed face | Shallow to moderate, verified against the model drawing | Flush in the opening | Compact dashes with little rear space | Smaller display area |
| Floating screen | Enough for the chassis, connectors, and display mounting assembly | Raised above or outside the face | Older dashes with clear space around the mounting location | Can block vents, controls, or sightlines |
| Motorized flip-out | Allow for the motorized mechanism; verify the actual chassis depth | Extends outward and pivots | Vehicles where the full arc clears vents and shifter | Moving screen can strike controls or cabin items |
A shallow body doesn't automatically mean an unobtrusive screen. MarketIntelo's car-stereo market discussion identifies fitment beyond the approximately 50 mm-high single-DIN opening, including cavity depth, wiring clearance, and screen movement.
The screen styles below use cabin space differently.
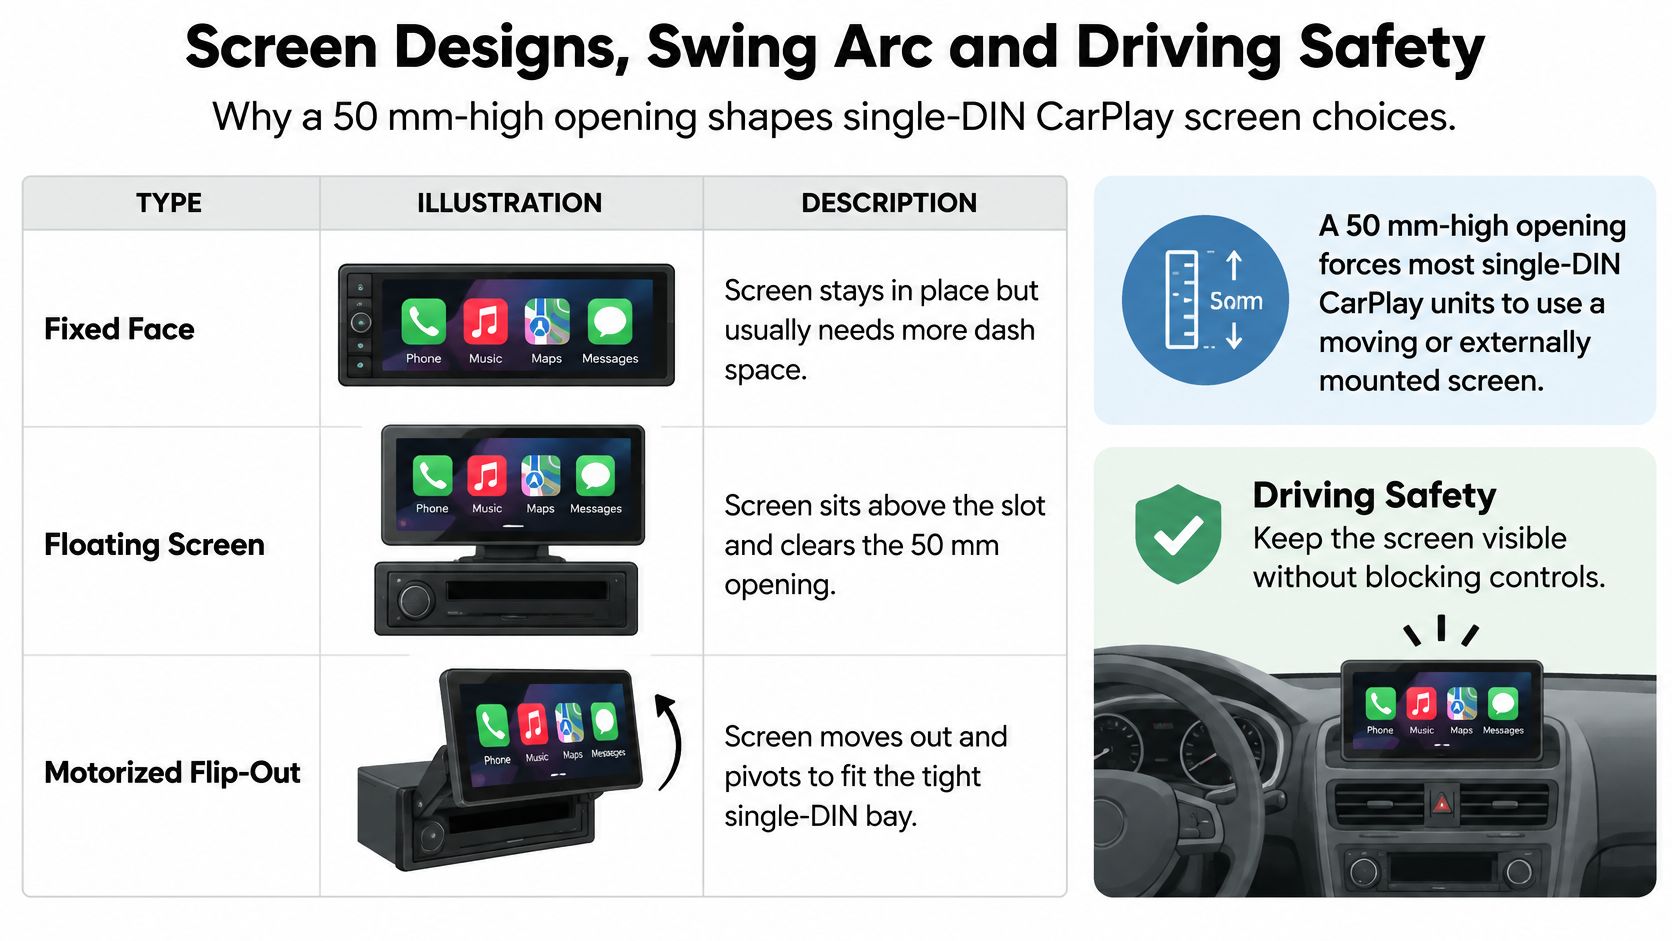
For a compact dashboard, a small fixed-face display may preserve access to nearby switches. Confirm that the particular receiver supports CarPlay, rather than assuming every compact color display does. The trade-off is less room for maps and touch targets.
A floating display makes sense in an older dashboard with an uncluttered area around the radio. For example, the Alpine Halo9 iLX-F509 Digital Receiver | 9" Touchscreen & CarPlay Unit uses a floating touchscreen with adjustable vertical mounting positions and viewing angles. Those adjustments help position the display, but they aren't proof that it clears your vehicle's controls.
A motorized flip-out can suit a cabin where the display can extend without hitting the shifter or vents. Check both the deployed position and every point along its travel. A screen that clears when open may still strike a protruding knob while opening.
Test movement and seated usability
Make a cardboard template from the manufacturer's overall monitor dimensions, not just its advertised diagonal. Hold it at the proposed mounting position and simulate the movement shown in the installation drawing.
- Check the full arc. Include extension, pivoting, and retraction, not merely the final screen angle.
- Check cabin clearance. Turn the steering wheel, move the shifter while safely parked, and reach every HVAC and hazard control.
- Check cable routes. Keep the USB lead and external microphone cable away from moving mechanisms, sharp edges, and airbag deployment paths.
Use the accompanying video as a visual reference, then verify clearances in your own cabin.
The NTSB's distracted-driving guidance urges infotainment designs that limit driver distraction while the vehicle is moving. Keep setup, text entry, and other attention-heavy tasks for when you're parked; voice control isn't permission to stop watching the road.
Finish with a seated test in daylight. Check glare, reach, whether the backup-camera picture is readable, and whether the receiver can restrict distracting functions in motion. A smaller, well-positioned display can be a better installation than a larger screen that hides essential controls.
Vehicles Where Single-DIN Still Makes Sense
Say a base-trim pickup has a conventional radio, no factory touchscreen, and a dashboard that won't accept a taller receiver without cutting the bezel. The owner wants phone navigation and hands-free calls, not a redesigned interior. A single-DIN CarPlay installation is worth investigating because it can use the existing radio location while changing how the driver accesses phone functions.
That doesn't mean every older truck is an easy installation. A column shifter, closely spaced vents, or a radio mounted low in the dashboard can make screen placement awkward. The right format preserves the cabin's useful features rather than sacrificing them to the touchscreen.
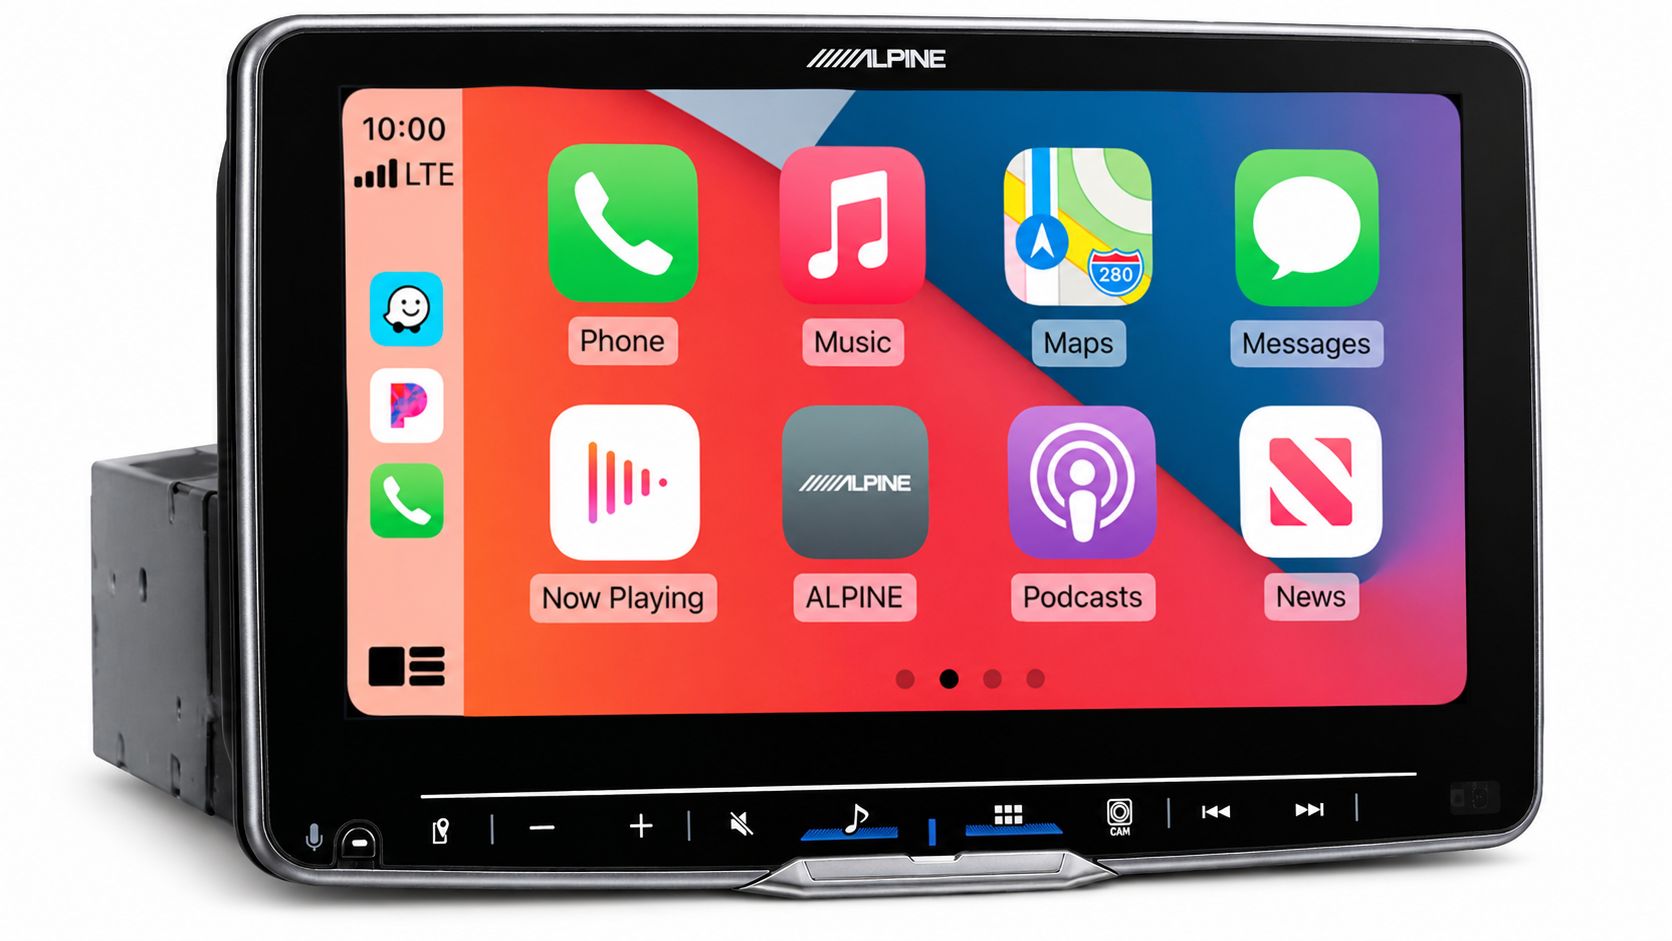
The product image illustrates an externally mounted display, where the screen occupies space outside the radio opening.
Match the upgrade to the vehicle's purpose
Older Honda, Toyota, and General Motors vehicles are sensible candidates when their existing radio layout supports replacement. Compact dashboards deserve particular attention to screen reach: a display squeezed into a low opening may be difficult to read without looking away from the road.
Classic restorations raise another question: How reversible should the installation be? A replacement trim panel and adapter harness are preferable to cutting an original bezel or factory loom. If preserving the dashboard matters more than having a large display, accept that constraint before choosing equipment.
Owners planning several electrical upgrades should coordinate them rather than treat each as an isolated job. If remote start is also on your list, Quick Keys' Arctic Start remote start installation guide is a separate resource to review while planning that work. Don't treat remote-start wiring instructions as a substitute for the radio's vehicle-specific wiring information.
Use this self-check to decide whether to investigate the format:
- Factory integration: Does the vehicle lack the smartphone functions you want?
- Radio location: Is the usable mounting opening single-DIN?
- Dashboard limits: Would a conventional double-DIN installation require unwanted alteration?
If those answers are yes, single-DIN is a reasonable starting point. It's a route to investigate, not a guarantee that any receiver bearing that label will work.
Wired or Wireless CarPlay and Which Connection to Choose
| Connection | How it works | Network needs | Best for |
|---|---|---|---|
| Wired CarPlay | The iPhone acts as USB host; audio, video, and control travel over the cable | Data-capable USB cable and a receiver supporting USB role swapping | A direct connection and straightforward troubleshooting |
| Wireless CarPlay | Bluetooth handles discovery and pairing, then the active session moves to Wi-Fi | Receiver hardware explicitly supporting wireless CarPlay | Cable-free convenience |
| Bluetooth-only hands-free | Bluetooth calling and audio streaming | Bluetooth | Basic calls and audio, not the CarPlay interface |
Choose wired if you value a direct connection and don't mind plugging in. Choose wireless if cable-free use matters and the receiver explicitly supports wireless CarPlay. Neither choice fixes poor installation or an incompatible phone connection.
A wired connection gives you a useful diagnostic advantage: you can test the phone, cable, and receiver port directly. Wireless removes the daily plug-in step, but adds pairing and network settings to the troubleshooting process. Startup behavior still needs checking on the actual receiver rather than assuming every wired model starts faster.
What the receiver must actually support
In wired operation, the receiver must support USB role swapping, allowing it to operate as a USB device while the iPhone acts as host. A USB socket that charges a phone isn't necessarily a CarPlay data port.
Apple's CarPlay engineering presentation describes wireless operation using Bluetooth for initial connection tasks before moving the session to Wi-Fi, with approximately 25 megabits per second throughput and a recommended Wi-Fi Alliance-certified 5 GHz 802.11ac access point. That access point is part of the receiver's wireless implementation, not an instruction to buy a separate router.
Bluetooth calling alone therefore doesn't equal wireless CarPlay. Look for explicit wired and wireless compatibility statements in the receiver documentation. For the everyday trade-offs, our wireless CarPlay versus wired CarPlay comparison helps distinguish connection convenience from the receiver's other features.
Troubleshoot without replacing parts blindly
For an intermittent wireless connection, begin with the phone settings before removing the dashboard.
- Bluetooth and Wi-Fi: Make sure both are enabled on the iPhone.
- Automatic joining: Confirm the phone can automatically join the CarPlay network.
- Direct USB test: If the receiver supports wired CarPlay, connect with a known-good data cable to its designated CarPlay port.
- Cable routing: Avoid loose extensions and pinched leads behind the trim.
A successful wired test helps narrow a wireless problem, but it doesn't prove every receiver function is fault-free. Test reconnection after shutting the vehicle down and restarting it, with the phone you'll use.
Keep an accessible USB connection even if you prefer wireless. It gives you a practical fallback without pulling the radio back out.
Wiring and Factory Controls You Must Keep
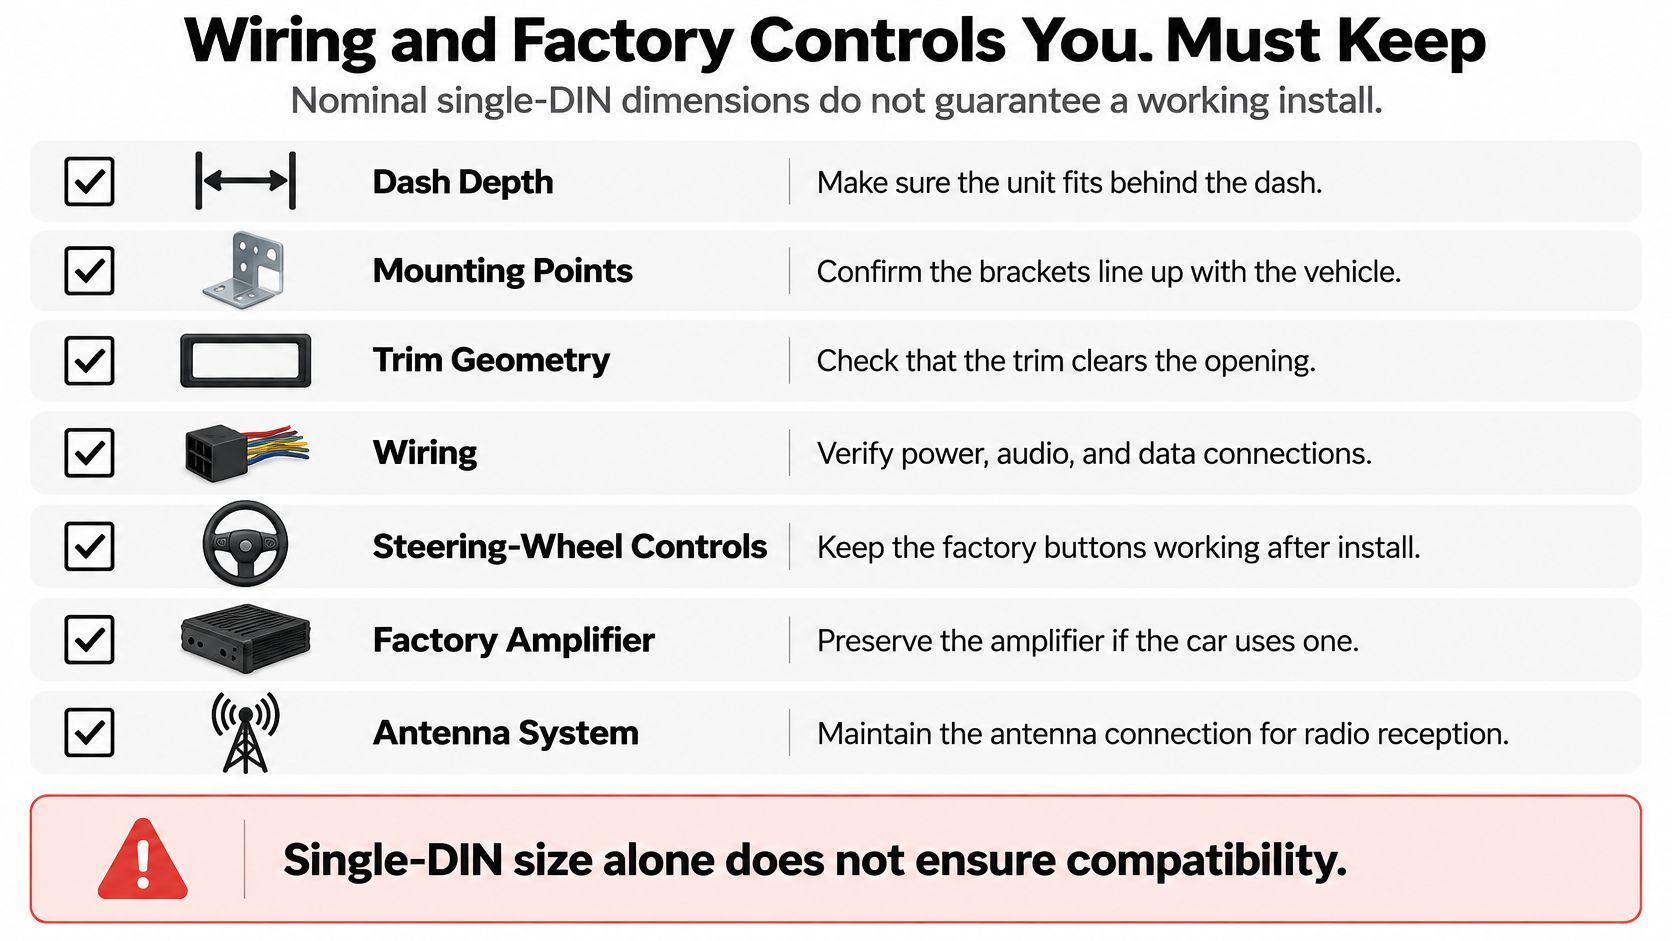
Before buying the receiver, build a factory-function checklist for the exact vehicle and trim. Physical fit and electrical integration are separate approvals.
- Accessory power: Confirm how the replacement radio receives its switched-power or retained-accessory-power signal.
- Illumination: Identify the dimming connection or interface support so the display behaves appropriately at night.
- Reverse trigger and camera: Verify both the reverse signal and camera compatibility, including any required adapter.
- Steering-wheel controls: Match the vehicle, receiver, and control interface.
- Factory amplifier: Confirm the required audio signal type and amplifier turn-on method.
- Antenna system: Identify the connector adapter and whether antenna amplification needs power.
- Mounting and trim: Check the dash kit, brackets, fasteners, and clearance around the finished bezel.
The checklist below separates the main installation checks from the receiver's nominal size.
Identify the signals before matching adapters
Start by following the vehicle's service procedure for safe radio removal and electrical isolation. Use plastic trim tools where appropriate, keep removed fasteners organized, and photograph the factory connectors and the back of the cavity before changing anything.
Next, compare the factory harness plug with the vehicle wiring diagram. Identify accessory power, illumination, reverse signaling, antenna connections, steering-wheel controls, and speaker or amplifier signals. Some functions travel through a vehicle data interface rather than a dedicated wire, so don't assume an absent wire means an absent function.
Only then list the functions the original radio handles. A factory camera may need more than a plug adapter, and a factory amplifier may require a different connection from a basic speaker-level harness. Don't connect wires solely because their colors look similar.
Match each required function to a documented harness or interface before ordering the receiver. A connector that physically plugs in isn't proof that it retains the features you need. Our steering-wheel control adapter guide explains that particular integration point in more detail.
Assemble and test before closing the dash
Build connections on the adapter harness rather than cutting the vehicle loom when a suitable adapter is available. Use the connection method specified for the equipment, insulate exposed conductors, and support modules so they can't rattle or pull on terminals.
Temporarily secure the receiver and test power behavior, every speaker, radio reception, steering-wheel buttons, illumination, and camera switching before reinstalling the trim. Test retained accessory behavior through the normal key-off and door-opening sequence where applicable.
Installation checkpoint: Don't use the receiver's mounting screws to pull it against a trapped harness. Remove it and reroute the wiring.
A shallow chassis gives the harness more room, but the installer still has to arrange that space deliberately. Keep connectors serviceable and cables clear of brackets, ducts, and moving display parts.
Confirm Fit and Integration Before You Buy
Order only when you can identify the receiver's mounting arrangement, demonstrate its display clearance, choose the intended phone connection, and account for the factory functions you're keeping. An unresolved camera adapter or uncertain rear clearance is a reason to pause, not something to solve after the delivery arrives.
The most useful next step is to send an installer a vehicle-specific fitment package. Include the year, make, model, and trim, along with clear photographs of the dashboard opening and the back of the radio cavity. Add your measurements and the exact receiver model under consideration.
Ask for a decision on the whole installation
Your message should say what must remain functional, not just which screen you want. Include factory steering-wheel buttons, an amplified audio system, and an existing camera if fitted. Mention any screen-position concern that your parked-car template test revealed.
The trim solution deserves its own confirmation. Our guide to radio dash kits for cars explains the mounting and finishing parts to consider, while Solana EV's guide to add Apple CarPlay to older cars provides broader upgrade context if you're still deciding whether radio replacement suits the vehicle.
- Request a fitment decision: Can this exact receiver be installed without unwanted dashboard alteration?
- Request an integration match: Which harnesses, interfaces, and mounting parts are required to retain your listed functions?
That turns a generic product enquiry into a check against the actual vehicle. A useful answer identifies any unresolved condition before you buy, rather than just confirming that the receiver is labeled single-DIN. Verified fit protects both the purchase and the dashboard.
Audio Jam Inc offers CarPlay and Android Auto integration, car audio equipment, and professional installation in Delaware. Visit Audio Jam Inc with your vehicle details, dash photos, and receiver shortlist to discuss a single-DIN installation that fits your cabin and retains the functions you need.