


Lift Kit Installation Guide for Trucks and Jeeps

Professional lift kit installation typically costs USD 800 to USD 5,000 and takes 4 to 16 hours, depending on the kit type and vehicle. This guide helps you decide whether your project is a realistic DIY job or one you should hand to a qualified shop.
You're probably looking at a truck or Jeep in the driveway, a lift kit still in its boxes, and a plan to make the vehicle sit higher before the weekend is over. The tempting part is the hardware. The difficult part starts after the wheels go back on, when suspension geometry, brake-line routing, driveline angles, alignment, legal requirements, and follow-up checks determine whether the vehicle drives properly.
Lift kit installation has evolved far beyond crude spacers. Basic aftermarket modifications appeared in the 1950s, specialized systems developed through the 1970s and 1980s, and modern kits now use engineered materials, modular components, and vehicle-specific geometry. The category has also become a substantial aftermarket business. One suspension lift kits market analysis estimates the market at USD 2.4 billion in 2025, rising to USD 2.5 billion in 2026 and projected to reach USD 4.4 billion by 2036 at a 5.7% CAGR. That scale reflects ongoing demand for both parts and professional installation, not just occasional hobby projects.
Table of Contents
- Choosing the Right Lift Kit for Your Vehicle
- Pre-Install Prep, Tools, and Safety
- Step-by-Step Lift Kit Installation
- Alignment and Post-Install Validation
- Time, Cost, and DIY Versus Pro Scenarios
- Compliance, Ownership Costs, and Final Verdict
Choosing the Right Lift Kit for Your Vehicle
The right kit starts with how you drive, not how tall you want the vehicle to look. A commuter that sees gravel roads needs a different system from a Wrangler built for rock crawling, and a work truck carrying heavy loads has different priorities from a weekend trail rig.
Four practical lift-kit families
Spacer leveling kits raise one end of the vehicle, usually the front, to reduce the factory nose-down stance. They add limited clearance and work well for a daily-driven half-ton truck carrying light trail equipment. A spacer can accommodate a larger tire within the available wheel-well space, but it doesn't create the same suspension travel or under-axle clearance as a full suspension system. Spacer material matters. Stamped steel is functional when correctly engineered, while billet aluminum can offer precise fitment and durable construction. Neither option compensates for worn shocks, bushings, or ball joints.
Body lift kits raise the body from the frame while leaving the suspension and axles in their original locations. They create room for larger tires and change the vehicle's stance, but they don't add underbody ground clearance or improve suspension articulation. This can suit a street-focused truck where appearance and tire clearance matter more than technical trail performance.
Suspension lift kits use coil spacers, replacement coils, longer shocks, brackets, or combinations of those parts. They raise the chassis and can improve approach, departure, and breakover clearance. A modest suspension lift can work for commuting and light trail driving, while a taller system demands closer attention to caster, steering, CV angles, brake lines, and control-arm travel.
Long-arm or link-arm systems relocate suspension pivot points to improve articulation and control suspension geometry at greater lift heights. They're appropriate for serious off-road use, especially rock crawling, but they bring more installation complexity and often require supporting changes to steering, driveline, and braking systems. They aren't a sensible choice just because a taller stance looks attractive.
| Kit Type | Added Height | Tire Clearance | Cost Range (USD) | Best Use |
|---|---|---|---|---|
| Spacer leveling kit | Vehicle-specific | Limited additional clearance | Varies by vehicle and kit | Daily driving and light trail use |
| Body lift kit | Vehicle-specific | More body-side clearance | Varies by vehicle and kit | Appearance and street-oriented tire fitment |
| Suspension lift | Vehicle-specific | Greater clearance and travel potential | Varies by system | Trail driving, hauling, and mixed use |
| Long-arm or link-arm system | Vehicle-specific | Built around larger tire and articulation goals | Varies by system | Rock crawling and dedicated off-road builds |
Don't assume a two-inch spacer on a half-ton truck behaves like a four-inch short-arm kit on a Jeep Wrangler. The vehicle's year, trim, drivetrain, axle design, factory suspension, wheel offset, and tire choice all affect the result. Confirm that the kit is engineered for the exact application, then check whether the shocks, springs, control arms, brackets, and steering components are designed to work together.
Practical rule: Match lift height to tire size and intended use. If the kit listing doesn't clearly identify your exact year, trim, and drivetrain, stop before you buy it.
Pre-Install Prep, Tools, and Safety
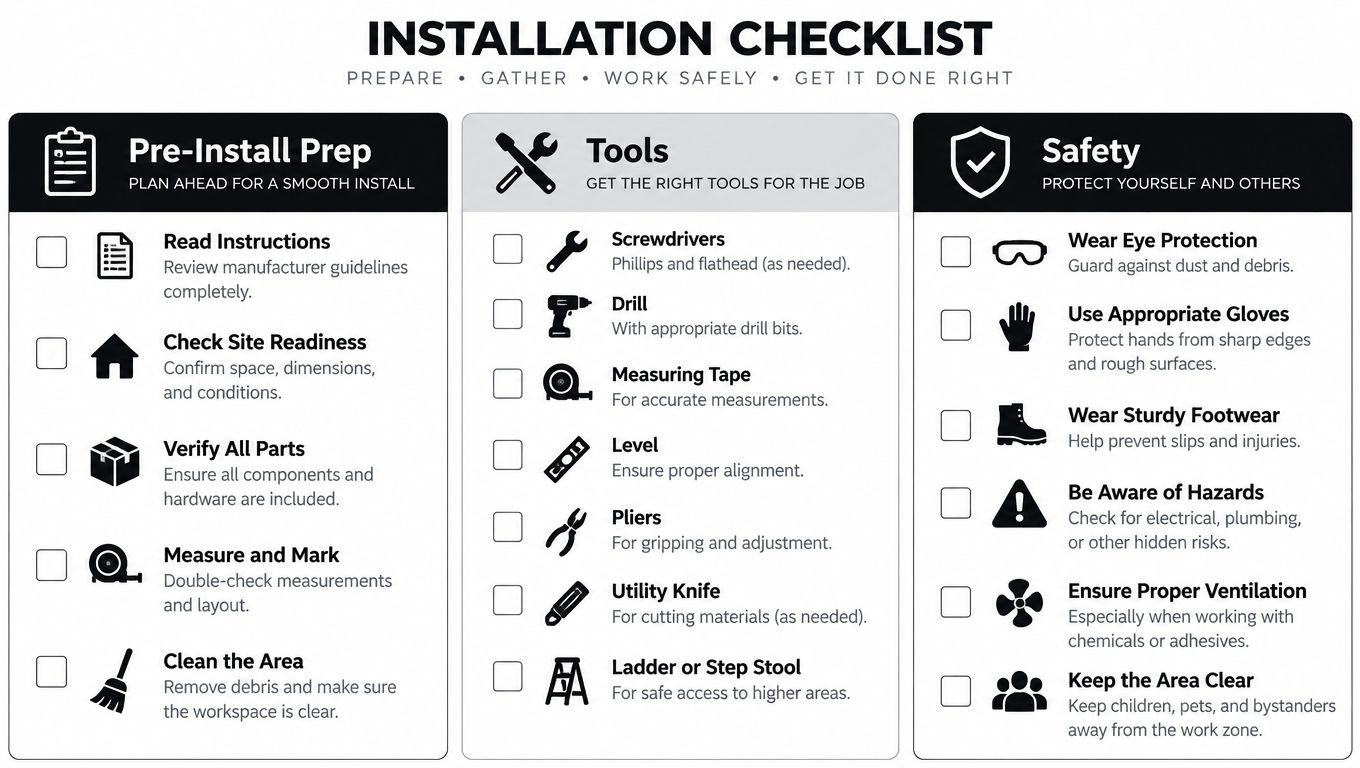
A smooth lift kit installation is mostly decided before the first bolt comes out. A level concrete floor, adequate support, and accurate baseline measurements prevent the common mistake of discovering halfway through the job that the vehicle is unsupported, the spring compressor doesn't fit, or the kit doesn't match the suspension under the truck.
Set up on level concrete with wheel chocks and 4-ton-or-higher jack stands rated for the vehicle's curb weight. A taller truck needs enough overhead room to raise the chassis safely. An 8-foot ceiling is a practical minimum for many four-inch-and-taller projects, although the actual requirement depends on the vehicle, tires, jack height, and work position.
Tools that earn their place
Use both metric and SAE socket sets, a breaker bar, pry bars, and a torque wrench rated for the fastener range required by the vehicle. The plan notes call for a wrench covering 50 to 150 ft-lbs, but your vehicle may require values outside that range, so check the factory service information and kit instructions rather than treating a general-purpose wrench as universal.
Specialty tools can decide whether a job remains controlled:
- Spring compressor: Required for some coil and strut applications. Use the correct design for the spring and inspect it before loading.
- Ball-joint press: Useful when separating or replacing press-fit joints without hammering the knuckle.
- Pitman-arm puller: Safer than striking the steering gear or arm repeatedly.
- CV axle tap and support tools: Help prevent damage when separating axle shafts.
- Quality torque wrench: Torque values are not suggestions. Record each completed fastener if the job has many brackets and links.
Have new crush sleeves, appropriate grade-8 hardware where specified, threadlocker, and anti-seize available. Don't replace manufacturer-specified hardware with whatever happens to fit. Check whether the kit requires new bolts, sleeves, bushings, or brake-line brackets before disassembly.
Wear ANSI-rated safety glasses, mechanic gloves, and steel-toe footwear. Keep a second person available, particularly when handling coil springs, moving a supported axle, or lowering the vehicle from stands. A spring under compression can release energy violently, and a second person can't make an unsafe compressor safe, but they can help spot movement and call out problems.
Measure before touching the suspension
Record ride height at all four corners and measure each hub-to-fender gap from the same reference points. Photograph the undercarriage, brake-line routing, ABS wire clips, driveshaft clearance, bump stops, sway-bar links, and control-arm positions. If you can access an alignment printout, save the existing caster, camber, toe, and thrust-angle readings.
Finally, compare every part number against the vehicle VIN, trim, drivetrain, and axle configuration. Lay out the complete kit on the floor and confirm that brackets, shocks, springs, sleeves, hardware, and instructions are present before you lift the vehicle.
The installation video below can help you visualize the sequence, but it doesn't replace the manufacturer's instructions or the service manual.
Step-by-Step Lift Kit Installation
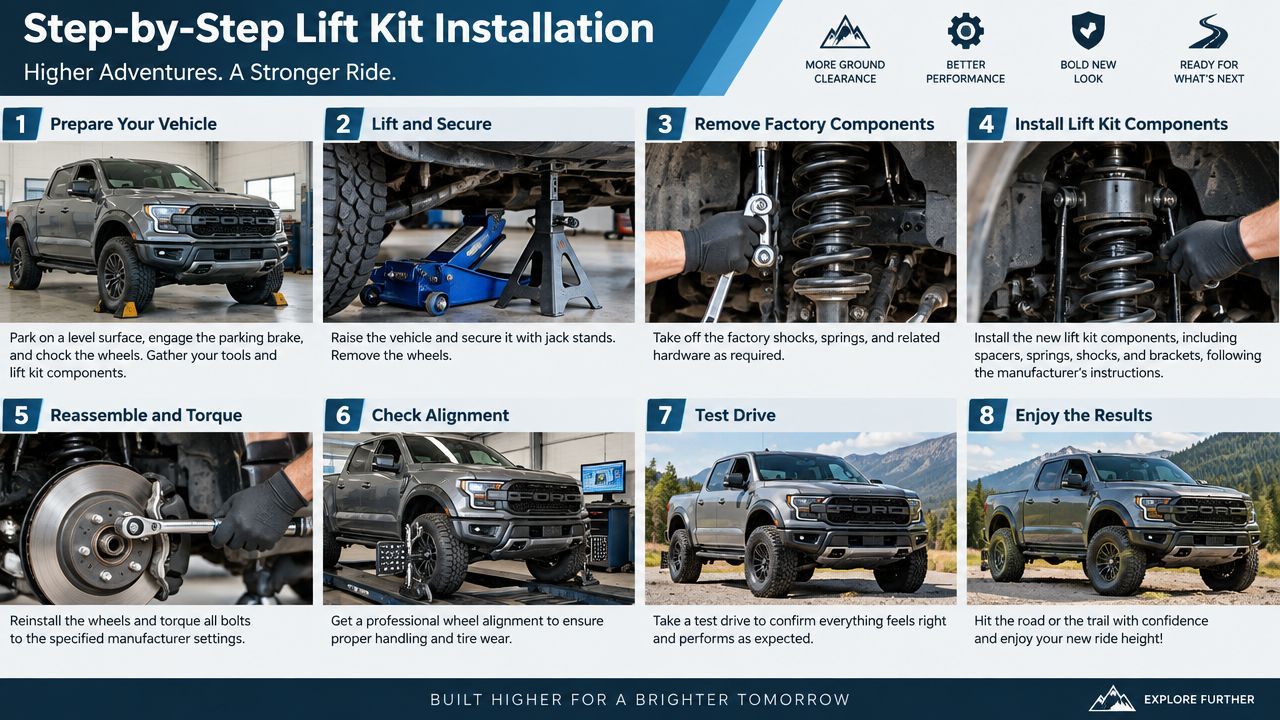
The exact procedure varies by vehicle, but most DIY projects fall into two groups: a spacer or leveling kit, and a suspension lift with replacement coils and shocks. Both require the same discipline at the beginning. Park on level ground, chock the wheels, loosen the lug nuts while the vehicle is on the ground, raise the chassis, and support it securely before removing the wheels. Disconnect the battery if the service procedure or kit instructions require it, especially when working near electronic steering or sensor wiring.
Spacer and leveling-kit sequence
With the front supported, remove the wheels and identify how the strut or coil assembly is retained. Support the spindle or steering knuckle before separating the lower connection. Letting the spindle hang from the brake hose, ABS wire, or CV axle is a fast way to create damage.
Remove the upper strut hardware and lower the assembly in a controlled way. If the kit places a spacer above the coil spring, install it according to the supplied orientation and hardware instructions. Some applications require a spring compressor, while others allow the complete strut assembly to be removed and modified without compressing the spring. Never guess. If the instructions call for spring compression and you don't have the correct compressor, the job has reached its professional-installation limit.
Reinstall the strut and use the vehicle's factory torque specifications unless the kit manufacturer provides a different value. The plan notes identify 100 to 130 ft-lbs as a typical upper strut-mount range, but that range isn't a substitute for the exact specification for your vehicle. Torque fasteners in the required sequence, then reconnect the steering and suspension joints.
A rear leveling setup may use blocks or spacers. Keep the block orientation correct, seat the axle fully, and replace worn U-bolts rather than forcing old hardware to clamp a changed stack. On leaf-spring trucks, the rear portion is often simpler, but simpler doesn't mean unimportant. Confirm that the axle center pin engages correctly and that brake hoses and ABS wires still have full movement.
Full suspension-lift sequence
A full lift generally involves more disassembly. Remove the brake calipers and secure them without hanging them from the hoses. Remove the rotors and hub or spindle assemblies as required by the vehicle. Support the spindle before separating the ball joint, then control the axle and knuckle so the CV shaft doesn't overextend.
Compress and remove the original coil springs with the correct tool. Install the new coils, extended-length shocks, drop brackets, control-arm extensions, and steering or track-bar components in the order specified by the kit. Some systems change the position of the control-arm pivots, while others require adjustable arms to restore usable geometry. Follow the supplied crisscross pattern when tightening brackets and suspension fasteners.
Don't over-compress a coil spring. Don't reuse worn crush sleeves, bent hardware, damaged bushings, or stretched U-bolts. These parts may look serviceable on the bench and still allow movement once the vehicle carries its full weight.
Before lowering the vehicle, reconnect sway-bar links and inspect brake-line and ABS-wire clearance through steering and suspension travel. Check the CV shaft, shock bodies, bump stops, and tire path at full lock. Run a hand-tight fastener audit, confirming that every removed fastener is installed and every bracket sits flush. Lower the vehicle gradually, settle the suspension, then torque ride-height-sensitive bushings with the suspension at normal ride height when the instructions require it.
Alignment and Post-Install Validation
A truck can sit level in the driveway and still wear its tires rapidly or drift across a lane. Lifting changes the relationship between the wheels, steering knuckles, control arms, track bar, axle, and driveshaft. The lift-kit installation mistakes guide identifies skipped measurements, worn reused parts, bushings tightened at full droop, and driving before alignment as common installation errors.
Alignment is a measurement process
Start with thrust angle, then set camber, caster, and toe to the vehicle and kit manufacturer's specifications. A leveling kit may alter caster slightly, while a taller suspension lift can push several angles outside their usable ranges. Depending on the design, correction may require adjustable control arms, cam bolts, track-bar brackets, or steering components.
Do not copy a target from another truck. Identical lift heights can produce different results across axle and suspension designs. A suspension-lift safety guide warns that lifts above roughly 3 to 4 inches may require reinforcement or upgraded steering and suspension parts to preserve safe operating ranges.
| Angle | Stock Tolerance | After Leveling Kit | After 2-4 in Suspension Lift | After 4-6 in Suspension Lift |
|---|---|---|---|---|
| Thrust angle | Use vehicle specification | Verify axle remains square | Inspect after bracket or arm changes | Confirm bracket, arm, and axle alignment |
| Camber | Use vehicle specification | Measure and correct if needed | Check both sides under settled ride height | Adjustable components may be required |
| Caster | Use vehicle specification | Often changes modestly | Restore with arms or cam adjustment when required | Treat as a primary geometry concern |
| Toe | Use vehicle specification | Set after ride height settles | Set after caster and camber | Recheck after steering correction |
Small geometry errors can become expensive ownership problems. A recent source reports that a track-bar bracket misaligned by 1.5 mm can produce 0.4 degrees of toe-in deviation and increase tire wear by up to 30% over 10,000 miles. The post-installation geometry analysis supports a practical shop rule: tight hardware does not prove that the axle and steering geometry are correct.
Validate the whole vehicle, not just the alignment rack
After alignment, take a controlled test drive. Check straight-line tracking at 45 and 65 mph, steering-wheel position, braking feel, bump steer over uneven pavement, and handling through a figure-eight. Keep the initial drive near home. Stop if the vehicle pulls, clunks, binds, or vibrates.
Inspect CV-axle plunge on independent front suspension, driveshaft angles, and vibration as speed increases. Re-torque the track bar after 50 to 100 miles, then check suspension fasteners after the first 500 miles, unless the kit specifies another interval. The post-installation checklist from Gresham 4 Wheel Drive also covers alignment, inspection, headlight re-aiming, brake-line checks, and follow-up tightening.
Treat inner-shoulder feathering, a steering wheel off-center by more than 2 degrees, or driveline vibration above 45 mph as reasons to stop and inspect. A four-to-six-inch full-size-truck lift can require about 12 to 16 labor hours when alignment, validation, and documentation are included, according to the professional installation guidance. That time represents measurement and quality control, not idle shop time.
Time, Cost, and DIY Versus Pro Scenarios
The kit price rarely tells you whether the job fits your weekend. Your real calculation includes equipment, seized hardware, replacement wear parts, alignment, workspace, and the cost of having the vehicle unavailable if the project stalls.
Some projects are approachable. Others only look approachable because the parts arrive in a box.
| Scenario | DIY Time | Pro Time | Parts Cost (USD) | Total DIY (USD) | Total Pro (USD) | Skill Level |
|---|---|---|---|---|---|---|
| Spacer leveling kit on a half-ton truck | 2 to 4 hours | Same-day service | USD 50 to USD 150 | Parts plus tools and alignment | Parts, labor, and alignment | Moderate DIY |
| 2 to 3 inch suspension lift on a half-ton or Wrangler | 6 to 10 hours | Same-day or scheduled service | USD 400 to USD 900 | Parts, replacement hardware, tools, and alignment | Parts, labor, and alignment | High DIY |
| 4 to 6 inch long-arm lift or coilover conversion | 12 to 20 hours | Scheduled shop project | USD 1,500 to USD 3,500 | Parts, specialty tools, and follow-up work | Parts, labor, alignment, and validation | Expert |
| Complete long-arm or link-based off-road build | More than 20 hours | Extended shop project | USD 4,000 to USD 8,000 or more | Parts, fabrication, tools, and tuning | Parts, fabrication, labor, and validation | Professional only |
The table's scenario ranges come from the supplied project brief, while the broader professional benchmark places installation at USD 800 to USD 5,000, with straightforward work taking 4 to 8 hours and complex builds taking 2 to 3 days in a lift-kit installation economics report. Labor rates vary by region and shop, so ask for a written estimate that separates installation, alignment, hardware, replacement wear parts, and any required steering or driveline work.
DIY costs rise quickly when you need a torque wrench, spring compressor, ball-joint press, puller, heavy jack stands, or a second set of hands. A stalled project also has an opportunity cost. If the vehicle must be ready for commuting on Monday, a shop may be cheaper than losing the entire weekend and paying for emergency recovery.
Shop-floor test: If you can't safely support the vehicle, control a compressed spring, torque every fastener, and arrange a professional alignment, you don't yet have a complete DIY plan.
A spacer or leveling kit can make sense at home when the vehicle is sound and the owner has the correct tools. A full suspension lift becomes a shop job when the work involves seized joints, spring compression, altered steering geometry, cutting, welding, or a long-arm conversion.
Compliance, Ownership Costs, and Final Verdict
A lift changes the vehicle's responsibilities after installation. Budget for alignment checks, headlight aiming, brake-line clearance, driveline inspection, insurance discussions, warranty limits, and local regulations. The post-installation ownership guidance recommends checking state or provincial height rules and OEM service bulletins before ordering parts.
Rules vary by jurisdiction. They may cover bumper height, fender coverage, lighting, suspension components, or inspection requirements, and some modifications may require engineering certification. Ask the motor-vehicle authority, inspection station, insurer, and kit manufacturer what applies to your exact vehicle. Get the insurer's position in writing.
After the first drive, re-aim the headlights and inspect brake hoses and ABS wires through full suspension travel. Check driveline angles for vibration or binding. An OEM may restrict warranty coverage for components affected by an aftermarket suspension change, so do not assume every related repair remains covered.
Ownership costs often appear during later inspections and repairs. Larger tires can increase steering load, alter braking behavior, change gearing, and raise fuel use. Extra ride height also increases demand on ball joints, tie rods, track bars, shocks, and steering stabilizers. Heavy front-axle loads and large tires can make a steering-stabilizer upgrade appropriate, as discussed in the lift-kit geometry coverage.
A practical verdict:
- Spacer and modest leveling kits: Suitable weekend DIY work when the vehicle is sound, the vehicle can be supported safely, torque equipment is available, and an alignment is planned.
- 2 to 4 inch suspension lifts: Use a shop unless you have the correct spring and suspension tools, a capable helper, and experience diagnosing geometry problems.
- More than 4 inches, long-arm conversions, cutting, or welding: Treat the job as professional-only without specialist fabrication and suspension experience.
A lift is a system change, not a one-time bolt-on. Compare the complete installation estimate with alignment, compliance checks, replacement wear parts, tire fitment, and follow-up inspections before buying the kit.
Audio Jam Inc offers lift kits, wheels and tires, and off-road accessories for trucks, Jeeps, UTVs, ATVs, motorcycles, and boats. Fitment confirmation and installation support are available for selected projects. Visit Audio Jam Inc to review compatible options and plan supporting upgrades before scheduling installation.













