


Best Sound Deadening Material for Car Audio: A Guide

Butyl-rubber constrained-layer damping mats are the best foundation for panel resonance, with 80-mil mats suited to many doors and side panels, while 120–200-mil materials are better where floors and trunks have more space. The best overall system adds foam and mass-loaded vinyl, because damping controls vibration while the other layers address airborne noise.
You turn up a new amplifier expecting the cabin to open up. Instead, the bass makes the door card buzz, the rear hatch chatters, and tire noise fills the gaps between vocals. More power only makes the unwanted sounds easier to hear.
The answer isn't a single magic mat. The best sound deadening material for car audio depends on whether you're trying to stop a vibrating panel, absorb sound inside a cavity, or block road and engine noise before it reaches the cabin. A properly planned installation uses those functions in the right order.
Table of Contents
- Why Sound Deadening Matters for Car Audio
- Understanding the NVH Market Context
- Comparing Sound Deadening Material Types
- The Three-Layer Noise Control Strategy
- Diagnosing Your Vehicle's Noise Issues
- Installation Best Practices for DIYers
- Final Recommendations for Audio Jam Customers
Why Sound Deadening Matters for Car Audio
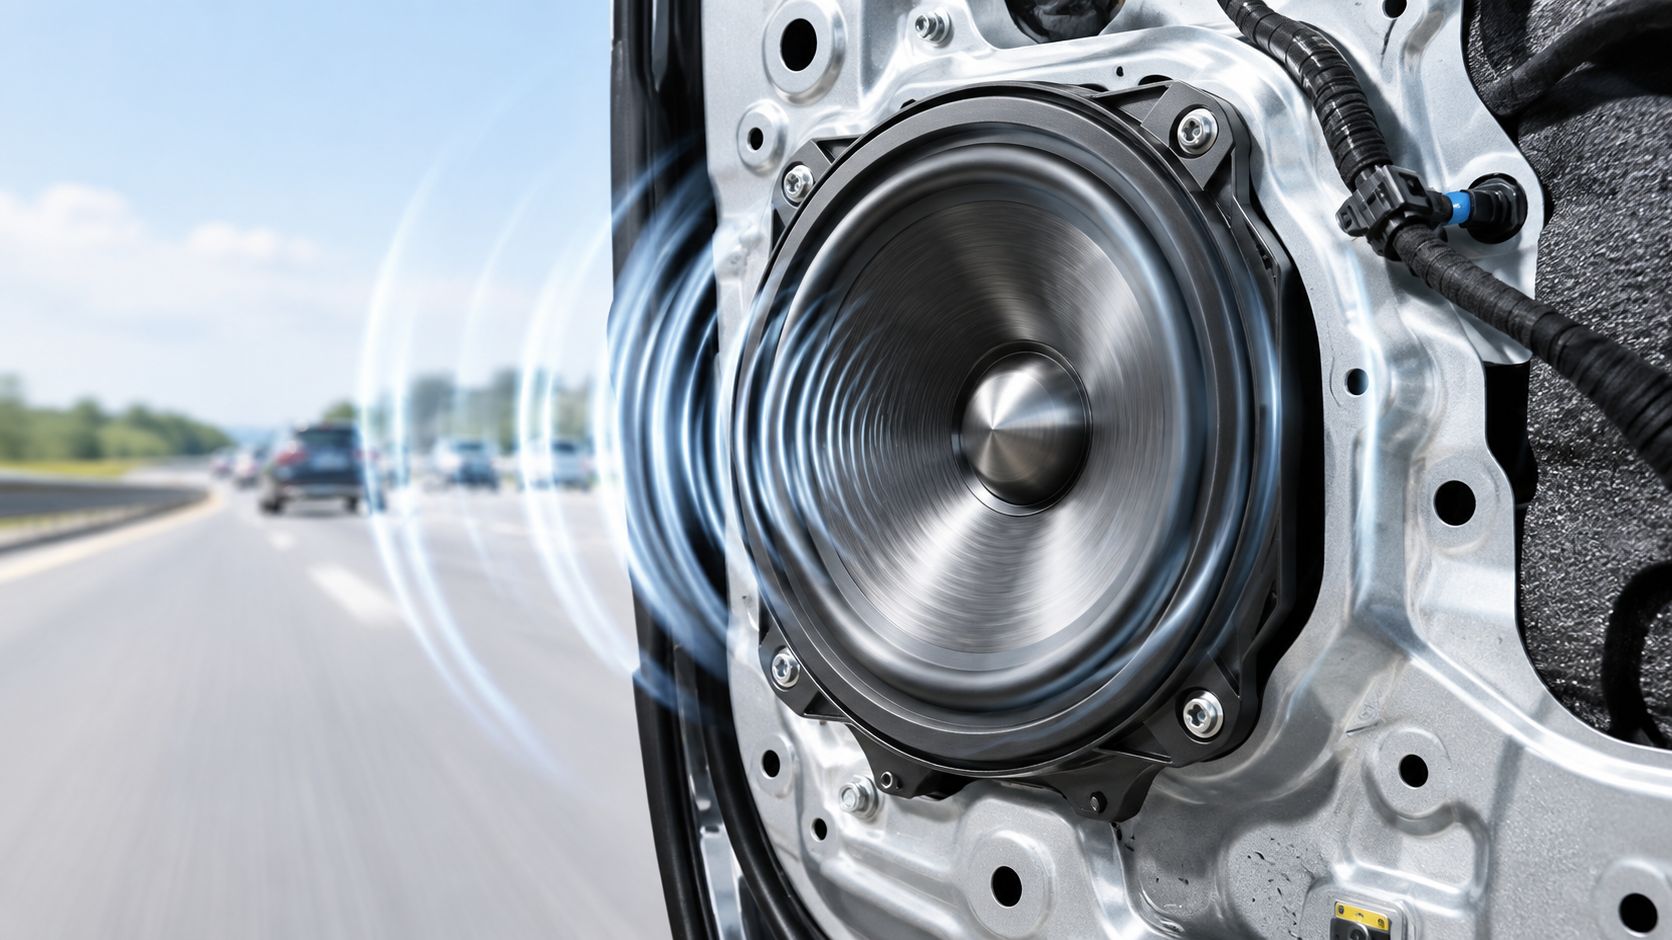
A car door is a difficult speaker enclosure. It contains thin sheet metal, plastic trim, wiring, access openings, moisture barriers, clips, and hardware that can all respond when the woofer moves. When the panel flexes or a loose trim piece vibrates, the vehicle adds its own sound to the music.
That problem becomes obvious with bass-heavy tracks. The kick drum loses definition, low notes blur together, and a rattle appears only at certain frequencies. The speaker may be working correctly, but the door is behaving like an unwanted instrument.
Power can't repair a noisy enclosure
Raw amplifier wattage won't fix structural vibration. It can raise the music above the road, but it can also drive the door, rear deck, trunk lid, and license plate harder. If the problem is resonance, the practical fix is to control the panel rather than overpower it.
Butyl-rubber constrained-layer damping, or CLD, is the correct starting point for that job. The mat bonds to the metal and uses a flexible damping layer with a constraining surface to reduce the panel's tendency to ring. The result is a more stable mounting environment for the speaker and less energy wasted in sheet-metal movement.
This isn't the same as making the car completely quiet. A damping mat can reduce resonance, but it won't act like a complete barrier against tire roar or engine drone. That distinction matters because many disappointing installations come from using a good product for the wrong noise path.
Installer's rule: If the noise changes with bass notes or disappears when you press on a trim panel, start by controlling vibration. If it stays present as a steady road or engine sound, plan for absorption and blocking layers too.
The audio benefit is cleaner reproduction
A treated door can give the speaker a quieter mechanical environment. Bass sounds tighter because fewer nearby surfaces are moving along with the cone. Midrange detail becomes easier to follow because rattles and panel coloration aren't competing with vocals and instruments.
The same logic applies to a subwoofer enclosure and trunk area. A trunk lid that flexes or a rear deck that buzzes can make a strong subwoofer sound less controlled. Targeted damping in those locations often makes more sense than covering every visible surface with the heaviest product available.
Sound deadening also improves comfort, but audio clarity should guide the first treatment areas. Start with the doors if the front speakers are the weak point. Move to the trunk and rear deck when the subwoofer creates rattles. Treat the floor, firewall, or cargo area when the main complaint is persistent road noise.
Understanding the NVH Market Context
Car-audio sound treatment sits inside the larger noise, vibration, and harshness, or NVH, industry. Manufacturers and installers use damping, absorption, and insulation materials to control the sounds and movements created by the road, drivetrain, tires, and body panels.
That broader context explains why butyl mats remain so common. They aren't merely aftermarket accessories sold around speaker upgrades. Damping is an established engineering approach used to control resonance in vehicle structures.
The automotive NVH materials market was estimated at USD 14.19 billion in 2025 and is projected to reach USD 24.57 billion by 2034, with a 6.4% CAGR, according to Fortune Business Insights' automotive NVH materials market overview. The same market snapshot gives damping a 36% share in 2025, which helps explain why constrained-layer damping is usually the first material discussed in a car-audio build.
Why damping comes first
A separate global NVH products market report estimates the market at USD 16.95 billion in 2025 and projects USD 28.25 billion by 2034. It identifies soundproofing materials at 35.2% share, representing about USD 5.97 billion in 2025 revenue, while vibration dampers account for 28.1%.
Those categories serve different purposes. Acoustic foams, mass-loaded vinyl, polyurethane barriers, melamine foam, and fibrous insulation systems help absorb or block noise. Damping mats address the mechanical movement of the panel itself. A quiet cabin normally needs more than one of them because a vibrating door and airborne tire noise aren't the same problem.
Passenger cars represented 64.78% of automotive NVH material demand in 2025, according to the same report. That doesn't tell you which product belongs in your particular vehicle, but it does show that these materials are being applied across a large, established vehicle category rather than only in specialty audio builds.
For a customer choosing materials, the market context leads to a simple practical conclusion:
- Damping mats control resonance in thin metal and other flexible panels.
- Foam and fibrous absorption manage sound energy within cavities and between trim surfaces.
- Heavy barriers reduce the transmission of airborne noise through floors, firewalls, and cargo areas.
The mistake is treating the biggest category as the complete answer. Damping is the foundation for speaker doors because resonance is usually the first audio-specific problem. It isn't a substitute for every other layer.
Comparing Sound Deadening Material Types
A car audio build usually fails for a simple reason. The installer picked one material for every noise source. The better approach is to match the material to the problem, whether that is panel resonance, trim buzz, airborne road noise, or limited clearance behind the panel.
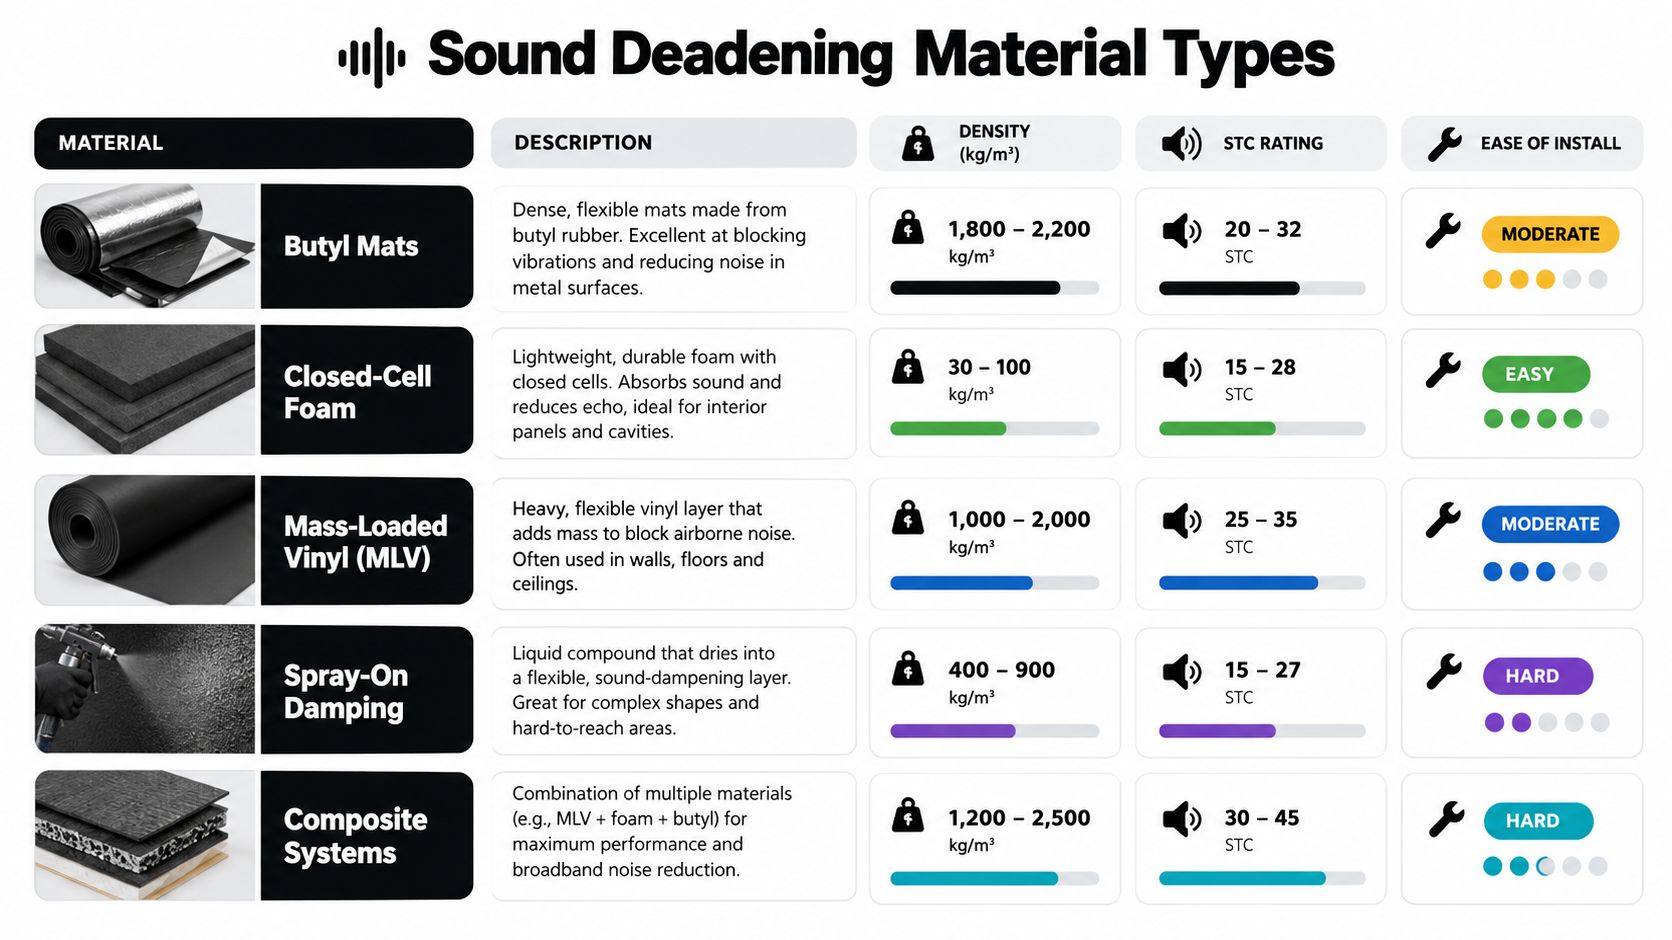
| Material | Best For | Install Difficulty | Weight |
|---|---|---|---|
| Butyl CLD mats | Panel resonance, speaker doors, rattles | Moderate | Moderate |
| Closed-cell foam | Decoupling trim and adding absorption | Moderate | Low |
| Mass-loaded vinyl | Blocking low-frequency airborne noise | High | High |
| Spray-on damping | Difficult or irregular surfaces | High | Low to moderate |
| Composite multilayer systems | Broad noise control in a planned build | High | Moderate to high |
Butyl mats
Butyl-rubber CLD mats are the strongest first choice for vibrating sheet metal. They work by damping panel movement, so they are most useful on broad, flexible areas such as door skins, roofs, rear decks, and selected trunk panels.
Installation quality matters as much as the material itself. The metal needs to be clean, dry, and free of anything that interferes with full adhesive contact. A roller helps press the mat into contours and reduce air pockets. Coverage over most of the resonant panel usually matters more than building a thick patch in one spot, and installers generally aim for a practical temperature range of 65–95°F so the adhesive can bond properly. Butyl is also a better automotive choice than asphalt-based material because it stays flexible in heat and avoids the odor and brittleness problems that come with asphalt.
Thickness still affects handling and fit, but a thicker mat is not automatically better if it does not bond well or if it creates clearance problems behind the trim.
Closed-cell foam
Closed-cell foam is a decoupling and absorption layer. It keeps trim from rubbing against metal, and it can reduce reflected sound inside a door or trim cavity. That makes it useful where buzzes, squeaks, and light contact noise are the main complaint.
It is lightweight and easy to cut, but it still needs room to sit correctly. A thick layer can stop a door card, carpet, or interior panel from fitting the way it should. It also will not stop a large metal panel from ringing on its own. Use it after the panel has been controlled, or in places where the main issue is contact between two surfaces.
Mass-loaded vinyl
MLV uses surface mass to block airborne sound. It is a strong fit for low-frequency road, tire, and engine drone, especially in floors, firewalls, and cargo areas. The trade-off is practical. It adds substantial weight, takes more planning to cut and fit, and can interfere with carpet, seats, trim, wiring, and service access.
MLV also does not stop the metal beneath it from vibrating. A technical comparison notes an approximate 3–6 dB improvement at mid frequencies for about a 1 kg/m² increase in surface mass, while also pointing out that MLV has near-zero damping behavior. In a real vehicle, MLV works best over a decoupling layer and alongside butyl CLD, not as a stand-alone fix.
Spray-on damping
Spray-on coatings can reach irregular shapes and spots where sheet material is hard to place. They can make sense for wheel wells, complex metal forms, or projects where a molded layer is easier than cutting and fitting panels.
The trade-off is control. Coverage and cured thickness are harder to verify, overspray can create cleanup problems, and the result is difficult to reverse. A coating can solve a specific access problem, but it is not my default choice for a door that can take a bonded mat cleanly.
Composite systems
Composite systems combine functions in one construction, often pairing a damping layer with foam, felt, or a barrier. They can simplify a planned installation when the vehicle has enough space for the full assembly.
They also make mistakes more expensive. If the underlying panel still rattles, a complex composite will not fix the diagnosis. Measure clearance, identify the noise path, and choose a system that bonds firmly without blocking drains, fasteners, airbag paths, or moving mechanisms.
For an OEM speaker replacement, treatment should support the install instead of complicating it. The 2 Pair Of Powerbass S-6502 6.5" Coaxial OEM Speakers, Set of 4 (S6502) is an in-stock 6.5-inch coaxial option at $87.95, with one listed variant. Before adding layers around it, check mounting depth and trim clearance so the speaker, adapter, and deadening materials all fit without interference.
The Three-Layer Noise Control Strategy
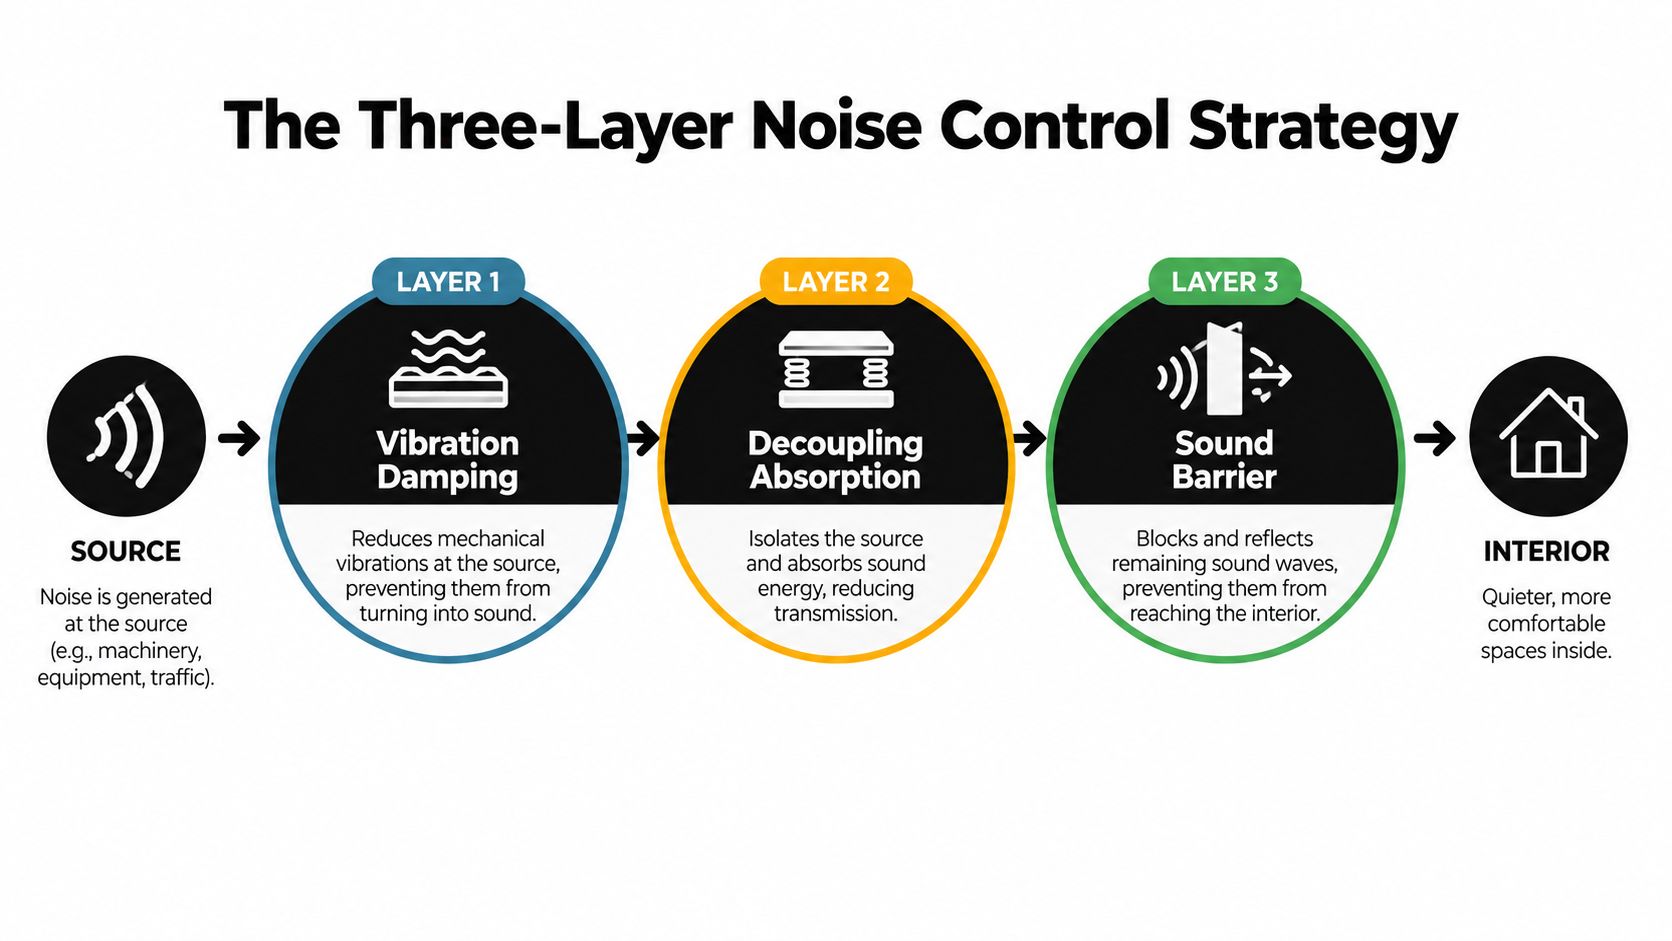
A complete treatment usually needs three different layers because sound reaches the cabin through different paths. CarAudioNow's guide to car sound-deadening kits describes the core distinction clearly: vibration damping, decoupling absorption, and a sound barrier each address a separate part of the problem.
First layer is vibration damping
The first layer attaches directly to the resonant panel. Butyl CLD is the usual choice because it reduces the panel's flexing and ringing. In a speaker door, that means treating the metal around the speaker and the broad areas most likely to respond to bass energy.
This layer answers the question, “Why is the car making a noise when the speaker plays?” It doesn't need to cover every hidden surface indiscriminately. It needs firm, continuous contact on the places that move.
Second layer is decoupling absorption
The foam layer sits between surfaces that might rub, buzz, or transmit vibration into trim. It can also help absorb sound within an enclosed cavity. Its main value is separation. It keeps the door card from behaving like a second vibrating panel against the metal and reduces contact noise at clips and interfaces.
Installation clearance becomes critical. A layer that prevents the trim from seating correctly creates a new rattle, so the material should be cut around clips, rods, drains, wiring, and service points.
Third layer is the barrier
The barrier layer blocks airborne noise that damping can't eliminate. MLV is the most direct example. It belongs where road, tire, and engine noise passes through a large surface, such as the floor, firewall, or cargo area.
A barrier works best when the installation doesn't short-circuit it with gaps, hard contact points, or uncovered transmission paths. It also needs support and clearance because its weight and stiffness make it less forgiving than foam.
The practical sequence is simple: stop the panel from ringing, prevent trim from transmitting or creating noise, then block airborne sound where the vehicle is still letting it through.
This layered approach prevents a common shopping mistake. A customer hears road noise and buys a thick damping mat, then wonders why the cabin is still loud. Another customer installs MLV over a vibrating door and wonders why the bass rattle remains. The material isn't necessarily defective. It was assigned the wrong job.
Diagnosing Your Vehicle's Noise Issues
A short test drive can identify the treatment your vehicle needs before you buy material. Listen with the audio system off, then at moderate volume. Note whether the noise follows bass, vehicle speed, road surface, engine load, or airflow.
A rattle usually appears during a specific event. A bass note may trigger it, the door may reproduce it when closed, or a rough patch may expose a loose part. Place a hand on the suspected trim or panel without obstructing safety equipment. If the sound changes under light pressure, inspect the panel, clip, grille, speaker mount, and nearby trim before adding a barrier.
A drone behaves differently. It remains low and steady, often changing with speed, tire rotation, road surface, or engine load. There may be no loose component to find. If a door treatment improves speaker performance while the cabin remains loud, the main noise path is probably elsewhere.
Match the symptom to the layer
Use the symptom to choose the first layer and the area to inspect:
- Bass-linked rattle: Apply butyl CLD to the resonant door, rear deck, hatch, or trunk panel. Check fasteners and trim contact during the same inspection.
- Door-card buzz: Add decoupling foam where plastic meets metal or where clips contact the panel. Confirm that the added thickness will not prevent the trim from seating.
- Steady tire or road drone: Trace the noise toward the floor, cargo area, wheel areas, or other transmission paths. Foam and a barrier may be appropriate after that check.
- Engine-related noise: Inspect the firewall and floor before adding more door mat. These areas may need a barrier and absorption treatment.
- Wind hiss: Check door seals, mirrors, vents, and body openings. Sound treatment cannot close a damaged seal or another open path.
If a steady drone remains after a complete door treatment, measure or compare the noise at the floor and firewall before buying more mat. MLV paired with butyl CLD can address a transmission path, but only when the diagnosis points away from a panel rattle. Technical guidance on MLV and automotive insulation also supports pairing the materials rather than relying on the barrier alone, as described in technical guidance on MLV and automotive insulation.
Choose coverage by outcome
For better bass response, start with the front doors and any area that visibly or audibly resonates. Targeted treatment can stabilize the speaker mounting area without requiring a full interior teardown.
For a quieter highway cabin, investigate the floor, firewall, cargo area, and wheel areas. Foam and barrier materials become more relevant, but broad interior work creates more opportunities to interfere with trim, wiring, seat mounts, drains, and service access.
Cover the surfaces that contribute to the complaint, not just the panels that are easiest to reach. Diagnosis reduces unnecessary weight and labor, and it prevents a loud transmission path from being missed.
Installation Best Practices for DIYers
A reliable installation depends on preparation as much as material choice. Remove the door card carefully, photograph connector locations, and group fasteners by location. Protect wiring, airbags, and speakers, and confirm that factory drains remain open before applying anything.
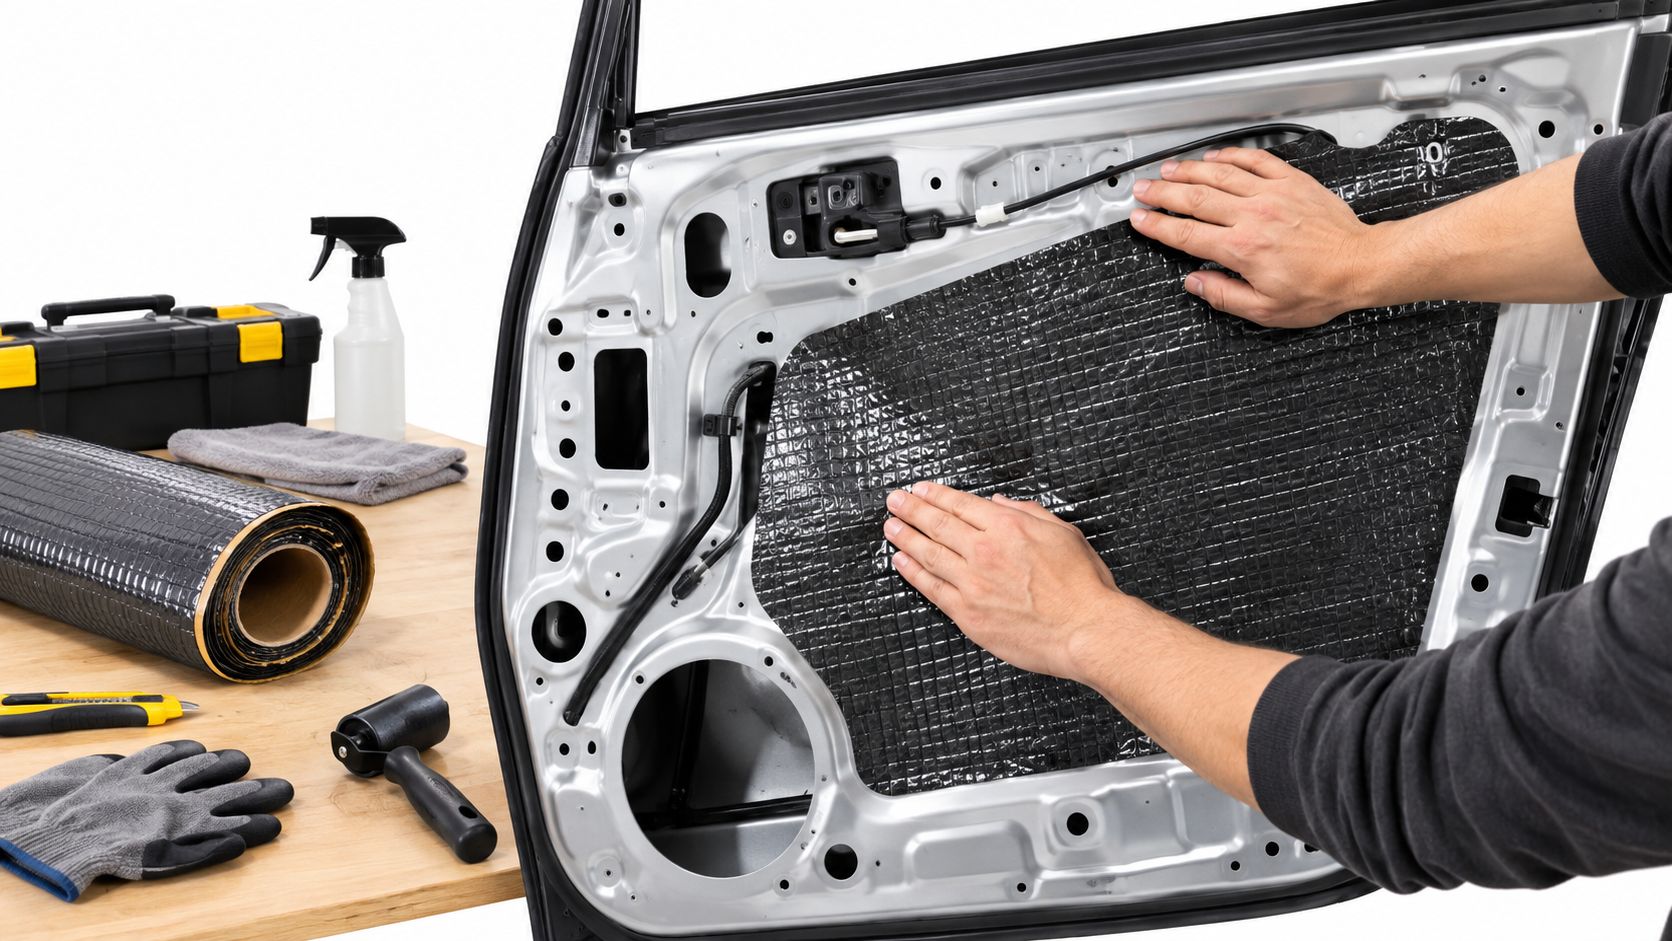
Clean each bonding surface until the metal is dry and stable. Remove dust, grease, moisture, and loose factory material. Cut the mat into manageable sections so it follows contours without folding or bridging across open cavities.
Apply the mat with purpose
Butyl mat bonds and conforms more easily when the material and panel are warm. Keep heat controlled and away from wiring, paint, airbags, and trim. The recommended working range of about 65–95°F is covered in this installation guidance for automotive sound deadening.
Use a hand roller from the center of each piece toward its edges. Press around ribs, seams, and corners until the adhesive contacts the metal throughout. A firm, even surface matters more than a perfectly smooth appearance. Air pockets and bridges leave sections free to vibrate.
Start with broad resonant areas, then inspect and listen before adding more material. Coverage aimed at the panel that moves will usually do more than extra thickness placed randomly. Floor treatment also requires clearance checks around carpet, seat mounts, pedals, wiring, and trim returns.
Use foam for separation at trim contact points or where a cavity allows it without blocking drains or service access. Before final assembly, refit the trim and operate the window, handles, locks, and controls. Check every clip, screw, seal, and connector. A bowed door card, rattling clip, or window that catches indicates excess thickness or misplaced material.
The following video provides a visual reference for the general installation process:
Professional help makes sense when the work involves extensive interior removal, factory airbag locations, difficult access, or a full barrier system. An experienced installer can also separate panel resonance from airborne noise, loose components, and vehicle faults that treatment will not correct.
Final Recommendations for Audio Jam Customers
For an entry-level DIY audio upgrade, start with butyl CLD in the front doors and concentrate on the panels around the speakers. Add decoupling foam where the trim or grille creates contact noise. This gives the speaker installation a stable foundation without committing to a full cabin treatment.
For a serious audio enthusiast, plan the build as a three-layer system. Use CLD on resonant panels, foam at trim and interface points, and MLV where road, tire, or engine noise travels through broad cabin surfaces. Check clearance and weight before ordering material.
Off-road and marine customers need a more cautious approach. Choose materials that tolerate the vehicle's environment, keep drainage and service access open, and avoid unnecessary weight in locations where vibration, water exposure, or limited clearance already creates installation challenges.
Audio Jam Inc provides car-audio parts and installation services, including speakers, subwoofers, amplifiers, head units, and integrated vehicle upgrades, so the sound-treatment plan can be considered alongside the rest of the system.
Tell the team at Audio Jam Inc whether you're chasing door rattles, subwoofer vibration, or highway drone, and they can help match the treatment to the vehicle and audio goal. You can also arrange an installation or shop for the other components needed to make the system sound cleaner without adding the wrong material in the wrong place.













