


Backup Camera for Car Stereo: How to Choose and Install One

You shift into Reverse, the stereo clicks over, and the screen stays black. Maybe the camera works intermittently, shows a rolling image, or displays a blue screen even though the yellow RCA plug is firmly connected. Those failures usually aren't caused by the plug itself. The camera and head unit may be speaking different video formats, or the stereo may never be receiving the reverse trigger that tells it to switch inputs.
A properly installed backup camera for car stereo follows a simple signal path. The camera captures the rear view, reverse power wakes it, a video cable carries the image to the head unit, and a trigger wire commands the screen to display it. The details in that path determine whether the system works every time you select Reverse.
Table of Contents
- What a Backup Camera for Car Stereo Actually Does and Why It Matters
- Camera Types and Signal Formats Buyers Get Wrong
- Checking Stereo Compatibility Before You Buy
- Mounting and Running the Cable Cleanly
- Wiring Reverse Power, Ground, and the Trigger Wire
- Configuring the Head Unit and Testing the Signal
- Fixing a Blank or Flickering Reverse Screen
What a Backup Camera for Car Stereo Actually Does and Why It Matters
A backup camera is a visibility aid, not an autonomous parking system. The camera sits at the rear of the vehicle, captures a wide view, and sends that video through a dedicated rear-camera input on the aftermarket stereo. When the transmission enters Reverse, the head unit uses a trigger signal to switch from audio, navigation, or CarPlay to the camera feed.
That screen can make low-speed maneuvering more precise, especially in vehicles with limited sightlines. Sedans can hide objects close to the trunk, SUVs can block the area below a liftgate, and trucks with caps can create a broad blind zone immediately behind the bed. Larger vehicles also make it harder to see pedestrians, children, pets, and low obstacles from the driver's seat.
Safety habit: Walk behind the vehicle before reversing. The camera supplements mirrors and shoulder checks, but it doesn't replace them.
Independent research examined child visibility behind passenger vehicles and found that backup cameras, alone or combined with parking sensors, reduced the rear blind zone by about 90% on average for the tested 2010–2013 model-year vehicles, as reported in this peer-reviewed PubMed study on backup cameras and rear blind zones. That doesn't mean the camera reveals every part of the vehicle's rear area. Another review found an average 46% increase in rear blind-zone visibility, with results ranging from 36% in smaller sedans to 75% in hatchbacks across tested vehicles, as described in this backup camera visibility analysis.
Why the 2018 rule changed aftermarket installs
In the United States, federal rear-visibility requirements took full effect on May 1, 2018, for all new light vehicles under 10,000 pounds gross vehicle weight rating. The National Highway Traffic Safety Administration's rule requires a rear view covering a 10-by-20-foot zone directly behind the vehicle, with the image appearing within two seconds of shifting into Reverse and remaining visible for at least four seconds but no more than eight seconds, according to the NHTSA rear-visibility rule coverage.
That requirement made the camera a standard safety feature in nearly the entire new-car market and influenced the design of aftermarket head units, vehicle-specific harnesses, and integration interfaces. Older vehicles can still receive the same type of camera assistance through an aftermarket stereo or monitor kit, but safe operation still starts with a physical walk-behind inspection.
Camera Types and Signal Formats Buyers Get Wrong
The yellow RCA connector tells you how the camera connects physically. It doesn't tell you what video signal travels through that connector. That distinction causes many blank-screen installations.
CVBS is the traditional composite video format. Most basic aftermarket cameras use it, and North American head units commonly expect NTSC CVBS. AHD cameras can use an RCA-style coax connection while sending a higher-resolution analog signal, such as AHD 720p or AHD 1080p. An older stereo that accepts only CVBS can't decode that AHD feed.
LVDS is a digital connection commonly associated with factory camera systems. It isn't interchangeable with a universal aftermarket RCA camera input without the correct conversion hardware.
| Format | Resolution | Connector | Head Unit Compatibility | Common Failure When Mismatched |
|---|---|---|---|---|
| CVBS NTSC | Standard composite video | Usually yellow RCA | Head units listing CVBS and NTSC | Black, rolling, or unstable image if the system expects another format |
| CVBS PAL | Standard composite video | Usually yellow RCA | Head units listing PAL | Rolling image, distorted picture, or no display on NTSC-only equipment |
| AHD | AHD 720p or AHD 1080p | Often RCA-style coax | Head units specifically listing the matching AHD mode | Blue screen, black screen, or incompatible signal |
| LVDS | Digital factory-camera signal | Vehicle-specific digital connector | Compatible OEM systems or dedicated converters | No image through a normal RCA camera input |
The smaller mismatches matter too
PAL versus NTSC is easy to overlook when a camera comes from an international seller. A camera can have the correct RCA plug and still produce no usable picture because the head unit expects NTSC and the camera outputs PAL.
Aspect ratio can also affect the result. Many composite cameras use a 4:3 image, while newer widescreen head units may expect 16:9. The picture may display with distortion, cropping, or an incorrect menu setting rather than a total loss of signal.
Check whether the camera produces a mirror image. For a rear-facing camera, the image should normally behave like a mirror so the driver's left and right match the vehicle. The camera should provide the mirrored feed, while the head unit should avoid applying a second flip.
Power requirements create another trap. Many cameras use 12-volt power from the reverse-light circuit, while some cameras require 6 volts and need a reducer. Never assume the red camera lead can connect directly to the vehicle's reverse circuit.
If the stereo manual lists only CVBS/RCA, choose a CVBS NTSC mirror-image camera. Move to AHD only when the head unit explicitly supports the camera's AHD mode.
Checking Stereo Compatibility Before You Buy
Start with the head unit manual, not the camera listing. Product pages often emphasize the RCA connector while hiding the signal-format requirement that determines whether the screen can decode the image.
Use this compatibility checklist
- Find the dedicated input. Look behind the stereo for a jack labeled CAMERA, CAM-IN, or REAR CAM. It's usually a yellow RCA connection. An auxiliary AV input may accept video but still won't trigger the automatic reverse display.
- Confirm the video format. The manual should identify support for CVBS, AHD 720p, AHD 1080p, or another specific mode. Match the camera to that list exactly. If the stereo lists CVBS only, an AHD camera isn't a safe purchase.
- Check the television system. Confirm whether the head unit expects NTSC or PAL. A North American installation commonly needs an NTSC camera, but the manual is the authority for that particular receiver.
- Identify the reverse-control method. Most aftermarket decks use a reverse trigger wire. Some newer installations depend on a CAN-bus interface, while others require the camera function to be enabled in a menu before the screen will switch.
- Inspect physical clearance. Measure the space behind the dash and around the mounting brackets. A shallow-chassis DIN receiver may leave little room for the RCA pigtail, trigger lead, and vehicle-specific harness.
- Separate guideline functions. Some stereos draw their own parking lines. Others expect the camera to send a clean image. Avoid stacking camera-generated lines on top of head-unit overlays unless the manual says the combination is supported.
- Check firmware information. Firmware revisions from manufacturers such as Kenwood, Pioneer, Sony, and Alpine can affect AHD behavior and camera settings. Check the current revision before committing to a higher-resolution camera.
The matrix that determines the result
The camera must match the stereo in four places: physical connector, video signal, television system, and reverse-switching method. Then verify power voltage, image orientation, and guideline handling. A yellow RCA connection confirms only the physical path. It doesn't confirm that the screen can interpret the signal or knows when to display it.
Mounting and Running the Cable Cleanly
Choose the camera location before you reach for a drill. A license-plate bracket camera is quick to replace and usually needs little fabrication, but its low position can exaggerate distance. A flush camera behind trunk trim looks more integrated and is better protected from casual contact and wash spray when the vehicle's bodywork allows it.
Trunk-lip and lip-mount cameras need a centered position and a downward angle that shows a useful bumper reference. Aim for a view that lets you see the bumper edge and the pavement behind it without pointing so sharply downward that the image loses useful distance.
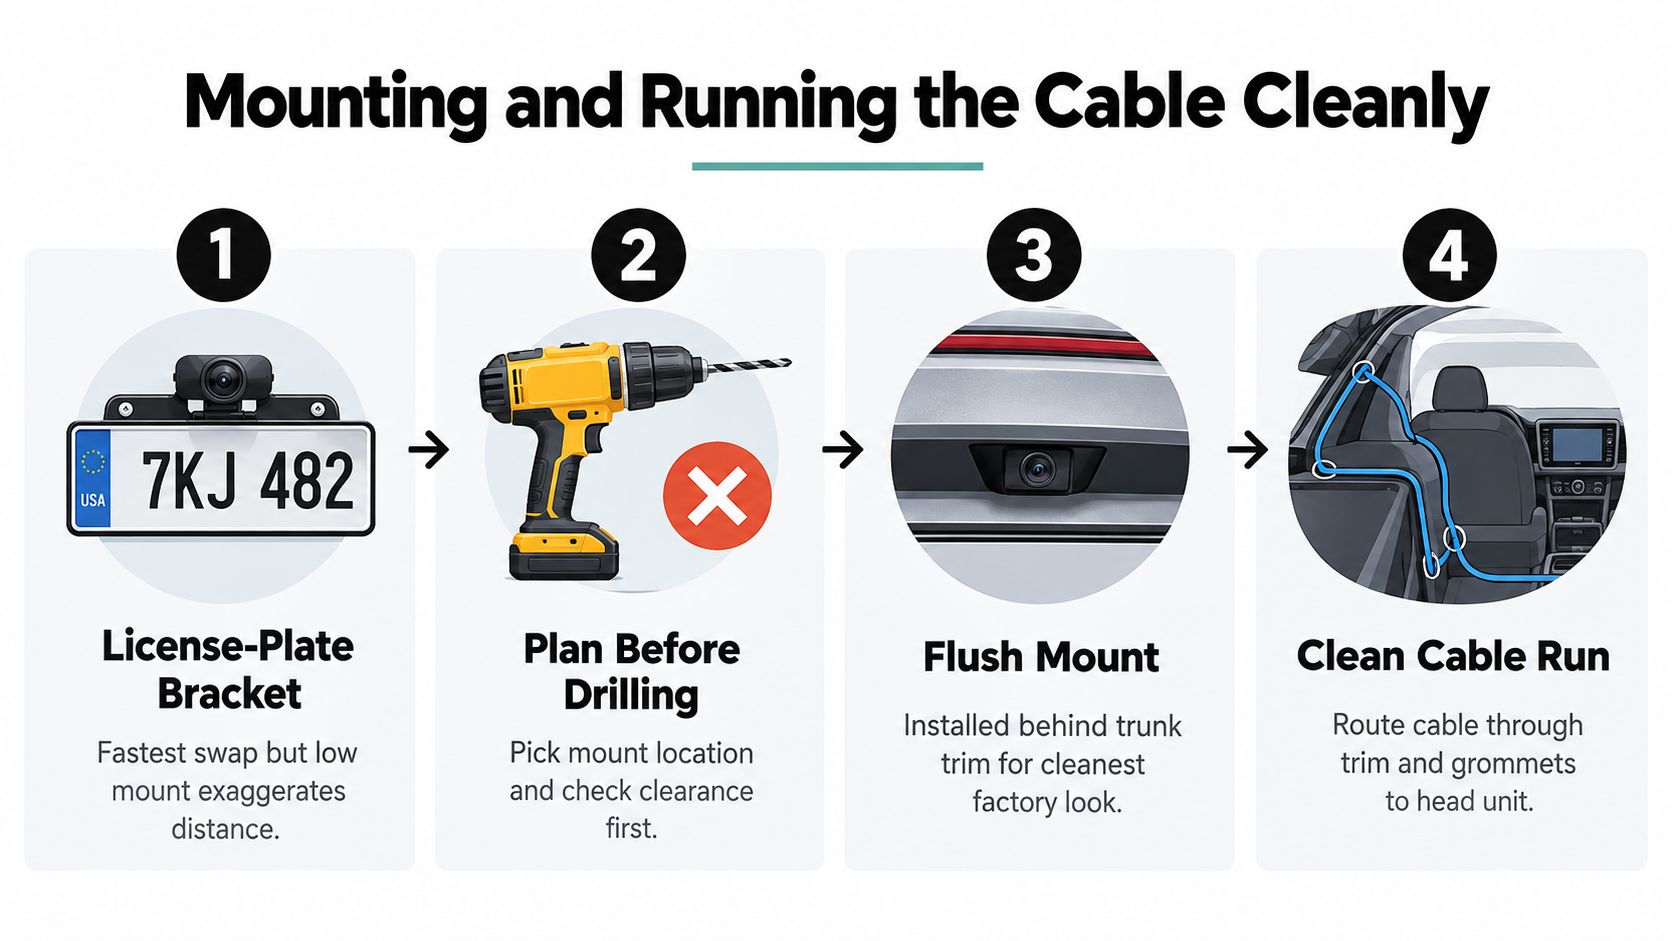
Drill once, seal once
If the camera cable needs a body pass-through, use a stepped bit and create a clean opening. A 3/8-inch hole is a common pass-through size for a camera lead, but verify the cable and grommet dimensions before drilling. A rubber grommet prevents sheet metal from cutting the insulation, and silicone around the pass-through keeps water from entering the trunk or cabin.
Don't leave the cable loose inside the hatch or trunk lid. Follow the factory harness route, secure the video cable with zip ties at regular intervals, and keep it clear of seatbelt anchors, hinges, latch mechanisms, and moving trim. A cable that looks fine during installation can fail later after repeated hatch movement.
Installation rule: Protect every sheet-metal pass-through. A clean picture depends on cable insulation staying intact.
Run the RCA toward the dash beside the factory harness rather than across open floor areas. Keep the head-unit end protected while pulling it through the headliner, sill panel, or trim channel. Cover the RCA plug with tape during the pull so the terminal and connector don't get crushed or contaminated.
Keep the RCA run under 15 feet where possible. Longer routing can need shielded cable, particularly when the vehicle has noisy electrical accessories or the video cable must pass near ignition-related wiring. Reinstall trim only after the camera image has been tested.
Wiring Reverse Power, Ground, and the Trigger Wire
Most aftermarket systems have three functional connections: camera power, camera ground, and a reverse trigger that tells the head unit to change displays. The video signal travels separately through the RCA cable.
Connect the camera's power lead to the positive wire at the reverse lamp. This makes the camera wake only when the vehicle is in Reverse instead of remaining powered whenever the ignition is on. Connect the camera ground to a clean, bare-metal chassis point, not painted metal or a bracket isolated by plastic.
The head-unit reverse trigger normally connects to the same reverse-lamp positive lead. When the transmission selects Reverse, that circuit supplies the signal that commands the stereo to open the rear-camera input. Use a properly insulated splice, such as solder with heat-shrink, or a suitable tap designed for the vehicle wiring.
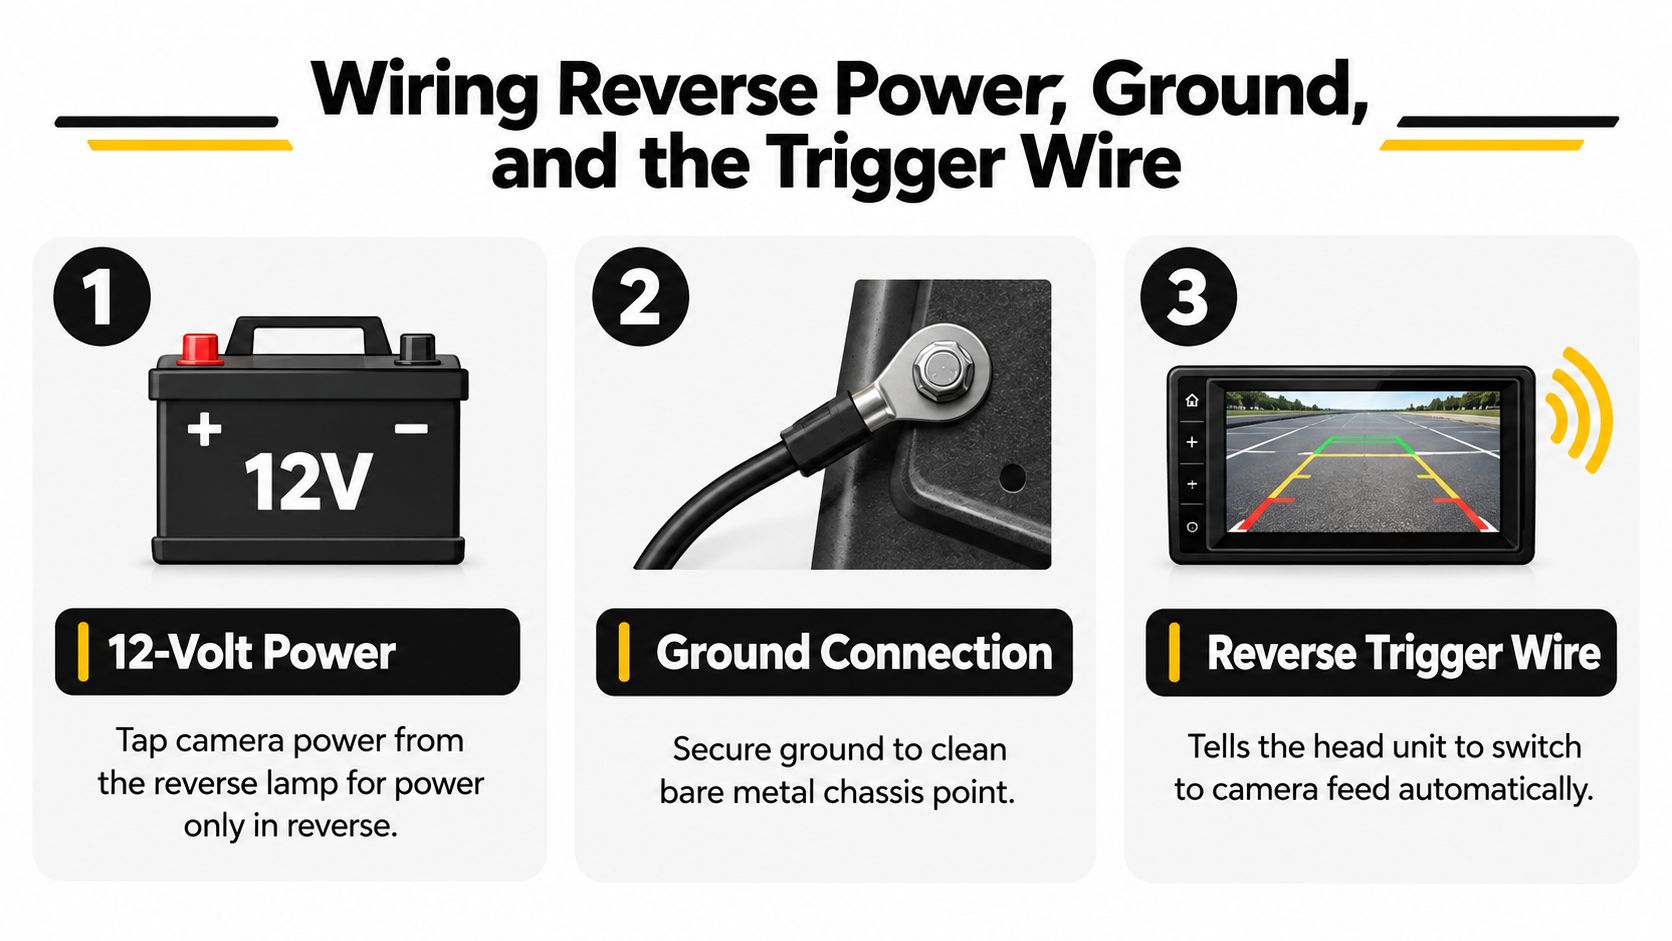
Check voltage before blaming the camera
Polarity matters. On a camera with integrated LEDs or infrared illumination, reversed power and ground can prevent the camera and lighting array from operating. Verify the vehicle wire with a multimeter rather than trusting color alone, especially when a vehicle-specific harness or trailer wiring has been modified.
A poor ground can create a snowy image, flicker, or horizontal interference. Scrape paint from the grounding point, fasten the terminal tightly, and protect the completed connection from moisture. Keep the RCA away from ignition-coil wiring and other high-interference routes to reduce alternator whine and moving bars.
This aftermarket backup-camera installation guidance also supports using reverse-light power, a solid ground, and a protected video route. Chafed insulation, dirty lenses, and constant-on power are common reasons an installation becomes unreliable after it initially appears functional.
Configuring the Head Unit and Testing the Signal
A camera can be wired correctly and still stay hidden because the head unit's camera input is disabled. Power the stereo in accessory mode before reinstalling the dash trim, select Reverse with the parking brake applied as appropriate for the vehicle, and watch for the automatic switch.
If the screen doesn't change, open the head unit's System, Camera, or AV settings. Enable the rear-camera input and confirm the reverse source is assigned to the dedicated camera connection rather than a general AV input. Some units require a menu toggle even after the trigger wire is connected.
Test the view, not just the presence of an image
An image proves that video is reaching the display. It doesn't prove that the camera is aimed correctly or that the overlay lines mean what you think they mean.
- Aim the reference point: Use a 6-foot reference behind the bumper and adjust the camera angle or overlay so the displayed lines align with the actual space.
- Correct the orientation: Check mirror-flip settings and confirm that left and right correspond to the vehicle.
- Adjust the display: Set brightness and contrast so pavement, curbs, and low obstacles remain visible in the conditions where you'll use the camera.
- Cycle the trigger: Move between Drive and Reverse five times and look for delayed switching, flicker, or a feed that remains on after leaving Reverse.
- Verify obstacle visibility: Have a helper select Reverse while you walk behind the vehicle. The display should clear the nearby area within one second of selecting Reverse.
The common assumption is that an image on the screen means the installation is finished. It doesn't. The final test combines automatic switching, image orientation, line accuracy, and a physical inspection around the vehicle.
Fixing a Blank or Flickering Reverse Screen
Diagnose the system from the display backward. If the screen is black, first confirm that the stereo is on the dedicated rear-camera input and that the camera function is enabled. A camera connected to AV-IN may produce a picture when selected manually but never appear automatically in Reverse.
Next, test the trigger. The head-unit reverse lead should receive a clean 12-volt signal only when Reverse is selected. A floating wire, weak splice, or back-fed circuit can cause intermittent switching. If the trigger is correct but the screen stays blank, check camera power and ground at the rear before replacing the camera.
Match the symptom to the likely fault
| Symptom | First checks |
|---|---|
| Completely black screen | Camera setting, dedicated CAM-IN selection, reverse trigger, camera power |
| Blue screen or no signal | CVBS versus AHD mismatch, NTSC versus PAL mismatch, disconnected RCA |
| Rolling or distorted image | PAL/NTSC conflict, damaged RCA, poor ground, unsupported aspect setting |
| Flicker during hatch movement | Chafed cable, loose grommet route, damaged conductor near a hinge |
| Image appears manually but not in Reverse | Trigger wire, CAN-bus integration setting, disabled automatic switching |
| Camera powers but LEDs stay dark | Reversed polarity, wrong voltage, failed illumination circuit |
Signal mismatch deserves special attention. A camera can have power, a good ground, and a secure RCA connection while still producing a blank or unstable image if it outputs AHD and the stereo accepts only CVBS, or if it sends PAL to an NTSC-configured input. This compatibility guide for aftermarket stereo cameras identifies signal format, reverse-trigger settings, and menu options as recurring causes of black or distorted screens.
If the camera works when tested directly on a suitable 12-volt source, inspect the vehicle-side wiring and reverse-lamp connection. If it fails there too, the camera or its voltage requirement is the likely issue. Also clean the lens and check the grommet route. Moisture and abrasion can turn a previously stable feed into flicker.
Wireless systems don't remove these compatibility checks. The stereo still needs a dedicated rear-camera input and automatic reverse switching, and the wireless transmitter and receiver add more points to isolate. For most daily-driver installations, a correctly matched wired CVBS system is easier to diagnose than a wireless setup with an uncertain signal path.
Audio Jam Inc offers rear-view camera installation, camera products, monitor kits, and head units with backup-camera functionality for drivers who want the signal path wired and configured correctly. Visit Audio Jam Inc to shop compatible equipment or arrange an installation in Bear, Delaware, and bring a blank-screen or flickering-camera problem to a technician who can test the format, trigger, power, ground, and cable instead of guessing.













