


6.5 to 6x9 Speaker Adapter Installation Guide

You've just opened the box containing a new round 6.5-inch speaker, held it over the factory opening, and found the problem: the car has an oval 6x9 location, while the speaker has a completely different frame and bolt pattern. A 6.5 to 6x9 speaker adapter solves that mismatch, but only when its cutout, thickness, mounting holes, and seal match the actual installation.
Treat the adapter as part of the speaker enclosure, not as disposable hardware. A loose ring, a leaking gasket, or a basket that contacts the window can erase the benefit of the upgrade and create rattles that are harder to fix than the original fitment problem.
Table of Contents
- Why Your New Speakers Need an Adapter Plate
- Understanding the Dimensional Mismatch
- Measuring Your Speaker and Door Cavity
- Step-by-Step Installation and Acoustic Sealing
- Common Fitment Traps and Material Choices
- Achieving a Clean Factory-Like Finish
Why Your New Speakers Need an Adapter Plate
Set the round 6.5-inch basket over the oval 6x9 studs and the ears can miss by 20-30mm. The adapter's outer oval and inner round pattern correct that offset without drilling the door steel. It also establishes the speaker's height, so the upgrade depends on more than matching bolt holes.
A properly shaped plate follows the vehicle's factory 6x9 footprint and gives the replacement speaker a flat, supported surface. Check the basket diameter, mounting ears, and screw locations before tightening anything. The plate must leave room for the wiring connector and keep the speaker centered in the opening.
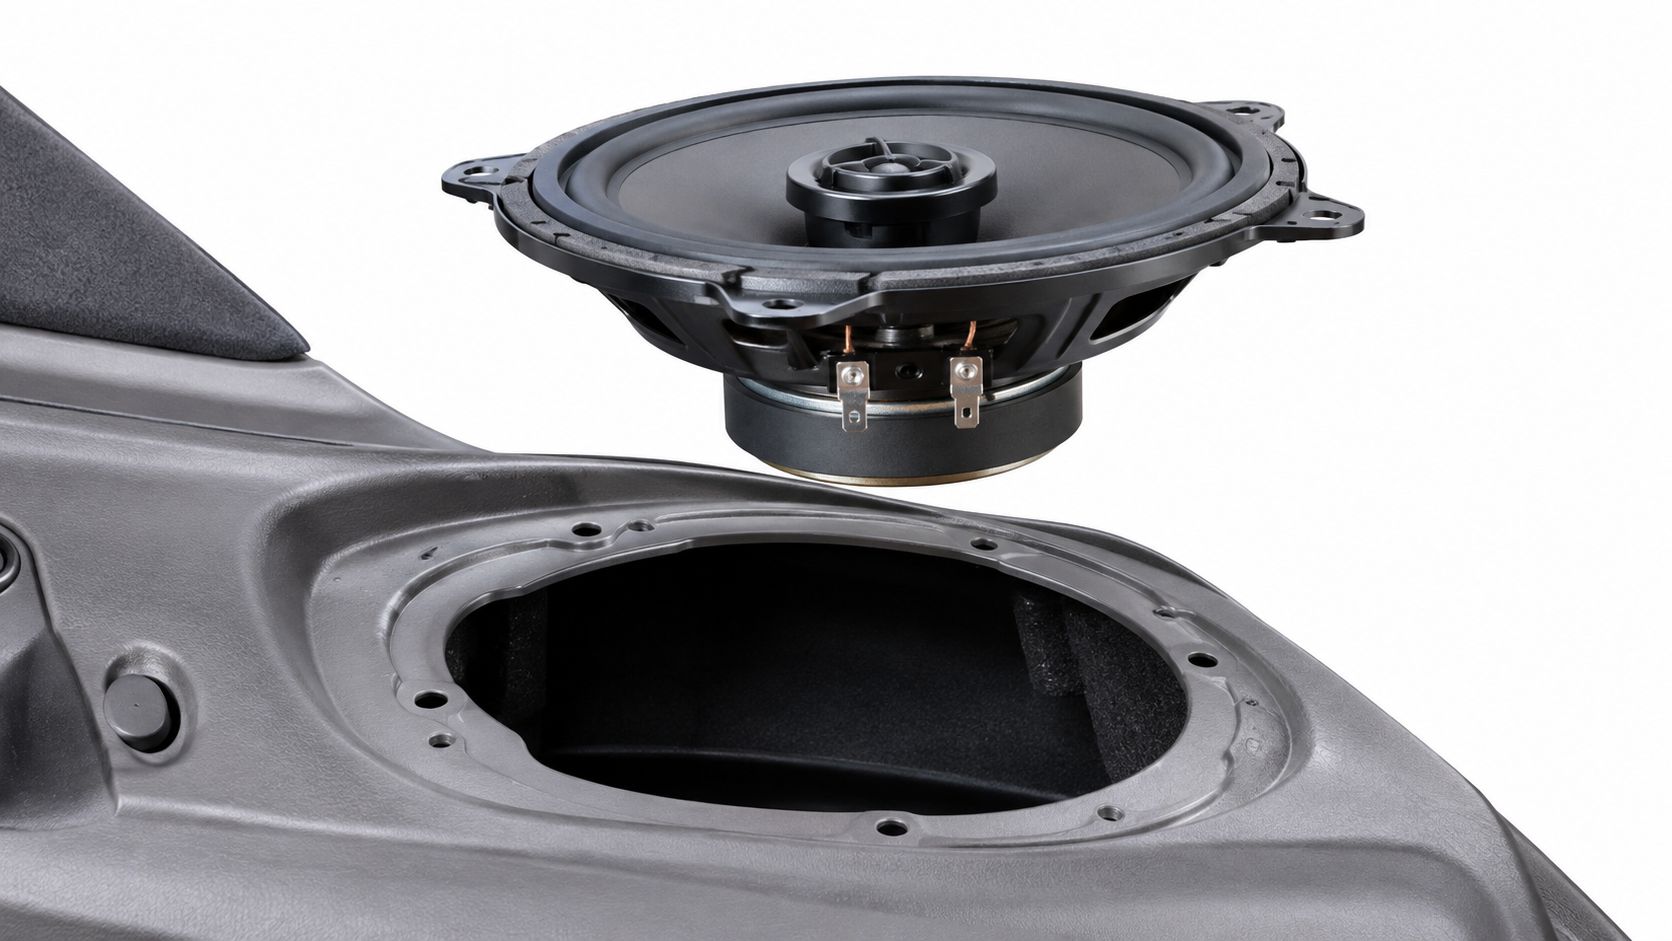
The adapter also controls the seal
Treat the adapter as part of the acoustic enclosure. Its contact surface should sit flat against the door or rear-deck metal, with no raised ribs, wiring, or paint preventing a continuous seal. A plate that rocks under finger pressure can flex under bass energy, loosen its fasteners, and create a rattle.
Depth matters just as much. Before final tightening, move the window through its full travel and check the basket, magnet, terminals, and wiring for contact with the glass, regulator, or inner door skin. A spacer that sits too thin can put the speaker into the window path. One that sits too thick can push the grille or trim panel outward.
A firm seal keeps the speaker's front and rear air movements separated. Gaps let pressure leak around the basket, reducing mid-bass and encouraging panel noise even when the wiring and amplifier are working correctly.
Fitment guidance places 6.5-inch speakers in common front- and rear-door applications, while 6x9 locations often occur in sedan rear decks and aftermarket pods. That makes the conversion useful where the factory oval location is inconvenient for a modern round driver, provided the plate matches the actual mounting geometry.
Practical rule: If the adapter does not sit flat and seal against the vehicle, the installation is not finished when the screws are tight.
A correctly selected plate preserves the factory mounting area, supports the basket around its perimeter, and keeps serviceable access to the speaker. Confirm those points before drilling or trimming anything.
Understanding the Dimensional Mismatch
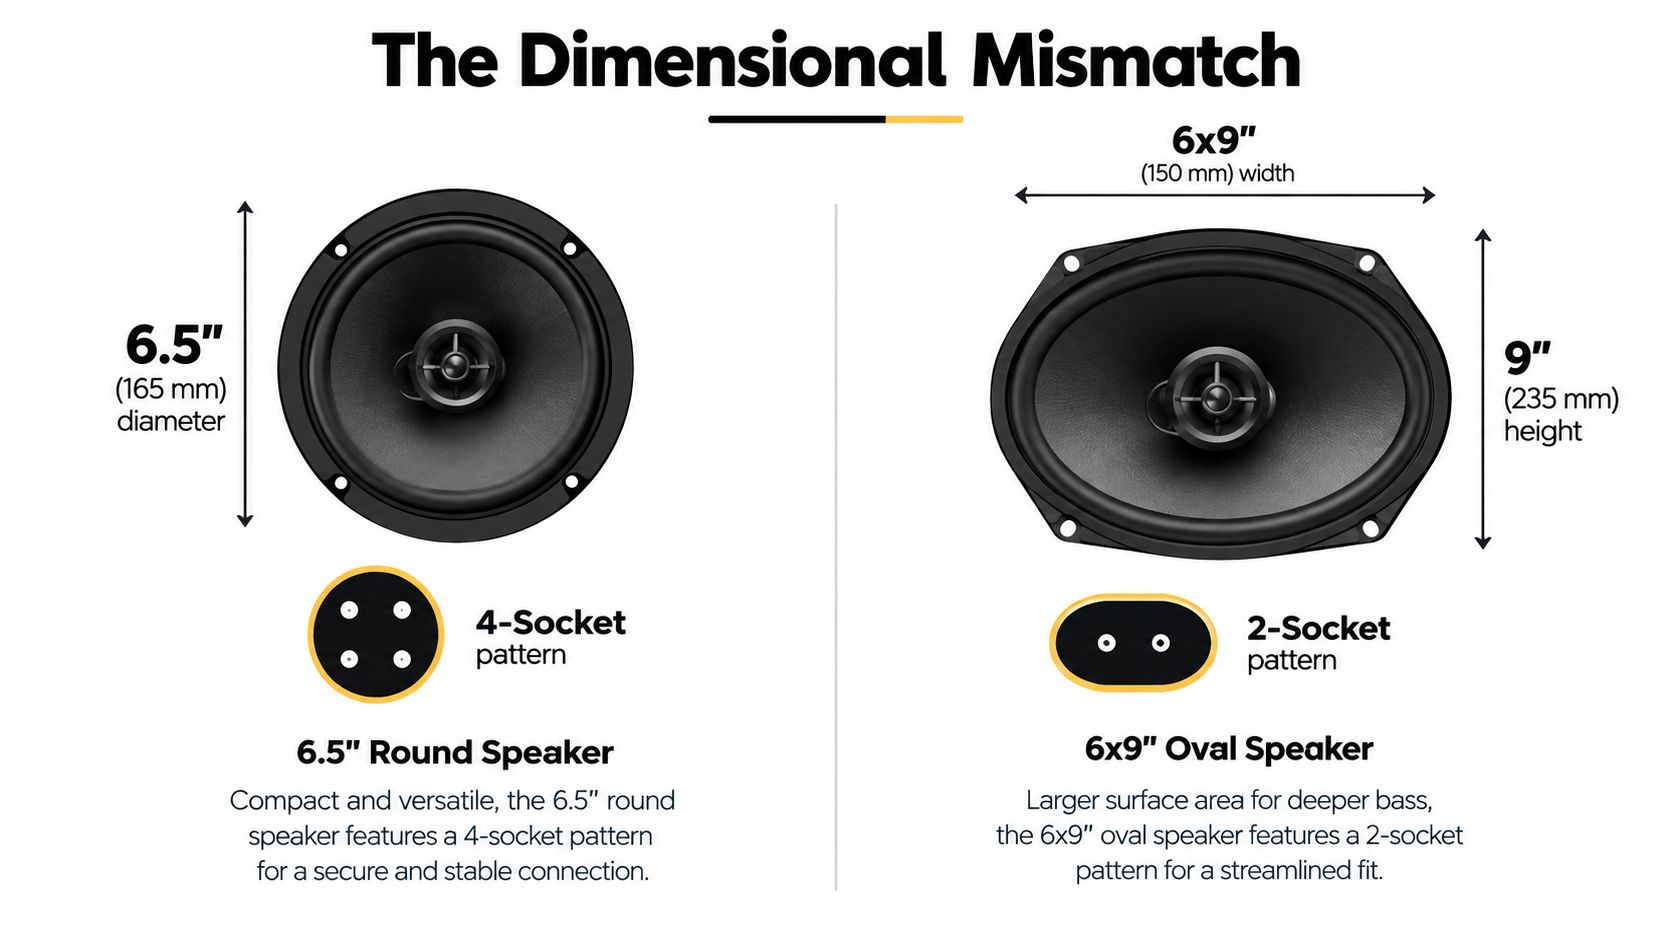
A 6.5-inch label describes a speaker category, not the exact cutout or frame. A typical round driver may need a cutout around 5.5 to 5.75 inches, while a factory 6x9 opening is approximately 5.1 by 7.9 inches. Its oval outer frame is about 6.1 by 9.1 inches. The mismatch is therefore both geometric and practical: the replacement driver must clear the factory opening while its flange remains fully supported.
The adapter is part of the mounting and sealing system. Its inner hole must suit the speaker basket and flange, while its outer profile must follow the usable metal around the original opening. A comparison graphic showing the physical dimension differences between a 6.5 inch round speaker and a 6x9 inch oval speaker.
Check the adapter against the vehicle
Lay the plate on the door steel or rear-deck mounting surface before installing the speaker. Verify that all four factory studs, or the intended screw locations, fall inside the adapter slots. Check the outer edge around the entire perimeter. It must clear raised ribs, stamped recesses, wiring connectors, and nearby braces by at least 2mm before the plate is considered usable.
A small interference point can tilt the adapter and break the acoustic seal. A plate that rests on a rib may tighten firmly while leaving a gap elsewhere. That gap allows front-side pressure to leak behind the speaker, reducing mid-bass and creating a path for vibration.
The inner opening needs its own clearance check. The speaker flange should sit on solid material around the full perimeter, while the basket, terminals, and lead wires remain free of the adapter edge. An opening that is too small can hold the speaker above the plate. One that is too large reduces flange support and makes sealing more difficult.
Door and rear-deck geometry
Door locations usually combine limited depth with moving glass, a window regulator, moisture barriers, and trim that sits close to the grille. Rear decks can provide a different cavity shape, but their factory grille height and stamped mounting surface still determine how far the speaker can project.
Universal plates are listed for factory 6x9 locations across Chevrolet, Toyota, Ford, GMC, Lexus, Cadillac, Lincoln, and other domestic and import applications. That coverage does not make the fit universal. Stud spacing, panel contours, connector position, and available clearance vary by vehicle. A representative universal adapter listing shows the broad vehicle coverage and stated mounting dimensions.
Measuring Your Speaker and Door Cavity
Don't order the adapter from the speaker label alone. The most useful measurement is the replacement driver's widest top-mount diameter, taken across the flange or frame that rests on the adapter. A speaker sold as 6.5 inches may have a larger flange, unusual mounting ears, or a basket shape that doesn't pass through a standard adapter opening.
Measure in this order
- Measure the speaker flange. Use a ruler or caliper across the widest part of the mounting surface. Compare that measurement with the adapter's stated speaker-hole size, not just its advertised compatibility.
- Check the adapter opening. Many standard 6.5-inch drivers have a maximum top-mount diameter around 5-1/16 inches, or 129 mm, while some plates specify a 5.625-inch cutout. Those measurements aren't interchangeable, so check the product specification before enlarging anything. The fitment guidance explains why flange diameter is more useful than nominal speaker size.
- Measure cavity depth. With the factory speaker removed, measure from the mounting surface toward the nearest obstruction. Check the window glass in both its raised and lowered positions, then inspect the regulator, braces, wiring, and moisture shield.
- Test the fasteners. Confirm that the adapter holes meet the factory studs or usable metal and that the supplied screws won't protrude into the glass path or the rear of the speaker.
A speaker can fit the hole and still fail the installation. Basket depth, terminal placement, and window movement deserve the same attention as the cutout.
Account for adapter thickness
Adapter thickness changes the speaker's position relative to the door panel. Available products include a 1/4-inch plastic plate, a 6 mm PVC ring, and 0.75-inch MDF rings. The adapter plate specifications show how material and thickness vary between products.
A thicker ring may provide a more rigid mounting surface or help a basket clear the factory opening, but it also moves the speaker toward the trim panel and can reduce window or grille clearance. A thin plate keeps the driver closer to the original position, yet it may not solve a deep-basket or uneven-panel problem. Place the adapter and speaker in the opening before final fastening, and operate the window by hand if necessary to verify the full travel path.
Step-by-Step Installation and Acoustic Sealing
Remove the door panel carefully and photograph the original speaker, connector, and fastener locations. Disconnect the battery if the vehicle's service procedure calls for it, especially when the door contains airbags or other integrated electronics. Clean loose foam, dirt, and old adhesive from the mounting surface so the adapter can sit flat.
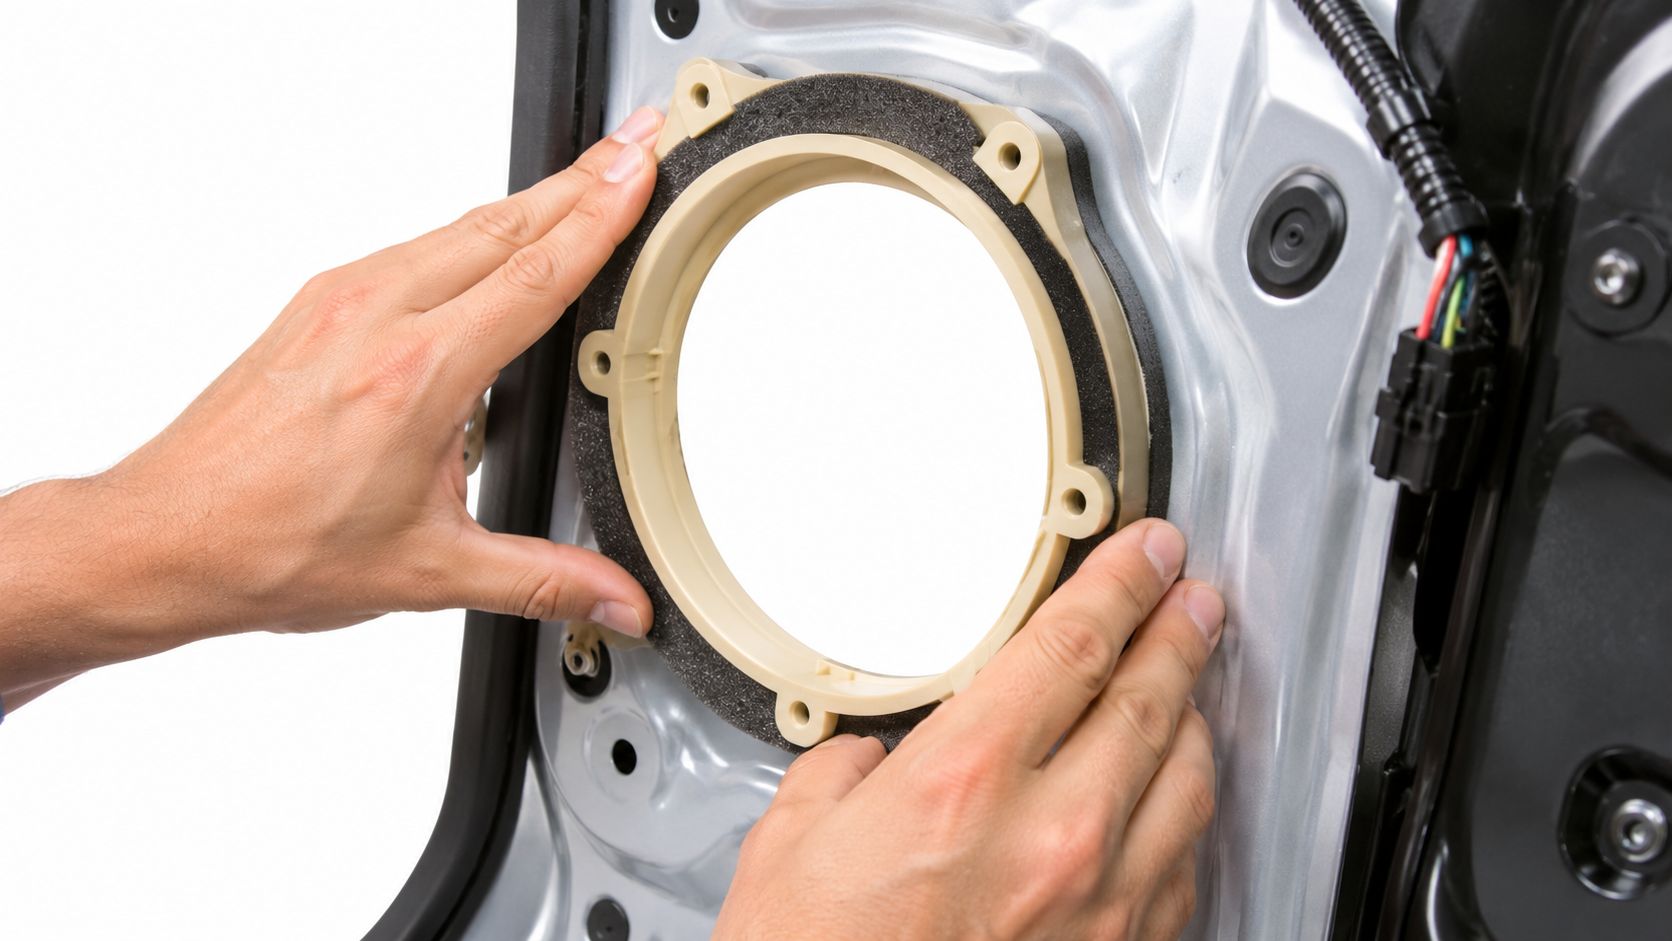
Build the mount from the vehicle outward
- Dry-fit the plate first. Set the adapter over the factory opening and confirm the outer footprint, bolt holes, wiring route, and panel contours. Don't force a tab into position. If the holes don't align naturally, identify the interference before drilling or tightening.
- Add the vehicle-side gasket. Apply closed-cell foam tape around the adapter's contact area. The gasket should form a continuous seal without crossing the speaker opening. On a permanent installation, a compatible sealant can help fill uneven metal, but keep it away from the cone, terminals, and serviceable fasteners.
- Fasten evenly. Start every screw before tightening any of them fully. Work around the plate gradually so you don't warp plastic or split MDF. Use enough pressure to compress the gasket, not enough to crush the adapter or distort the panel.
- Seal the speaker to the ring. Place another gasket between the speaker basket and the adapter. The frame should sit evenly on the ring, with no visible section suspended over an open gap.
- Protect the wiring. Use the correct vehicle adapter harness where available, secure the wire so it can't contact the cone, and leave enough slack for service without creating a loose loop that can rattle against the door.
The two sealing surfaces matter acoustically. The first separates the adapter from the vehicle panel, and the second separates the speaker from the adapter. A rigid, sealed mount helps the door cavity behave more consistently and stops vibration from turning the plate, trim, or metal skin into a noise source.
Check the window before reinstalling the panel. Move the glass through its travel while watching the speaker basket and terminals, then inspect the moisture barrier and nearby harnesses. A speaker that clears the glass at rest can still touch the regulator while the window moves.
Use the following installation reference for a visual example of adapter positioning and speaker mounting:
After the speaker is connected, play a bass-heavy track at a moderate level and listen around the adapter, door card, grille, and lower pocket. Pressing lightly on a suspected trim piece can identify a rattle, but don't press the speaker cone or grille hard enough to alter its movement. Fix the mechanical source rather than masking it with excessive foam.
Common Fitment Traps and Material Choices
The phrase “6.5-inch speaker” hides the measurement that causes many failed installs. Scosche specifies that one of its 6x9-to-6.5 adapters won't accept oversize 6.5-inch or 6.75-inch speakers and limits the speaker to a 5-1/16-inch top-mount diameter. Another adapter lists a 5.375-inch speaker-hole size, showing why the adapter specification must be compared with the actual driver. Scosche's fitment listing identifies the top-mount limit for its adapter.
An oversize frame may hit the adapter before the speaker reaches its mounting surface. Trimming can work when there is enough material around the opening, but removing too much weakens the ring and may leave the flange unsupported. If the basket, mounting ears, or grille clearance are wrong, a different speaker or vehicle-specific adapter is safer than forcing the combination.
Choose the material around the clearance problem
Material affects stiffness, moisture tolerance, resonance, and how far the speaker sits from the original panel. A thin plastic plate can preserve a near-stock position, while a thicker MDF or PVC ring can provide a more substantial spacer. The right choice depends on the door cavity and the driver's basket, not on the material name alone.
| Material | Typical Thickness | Best Use Case | Acoustic Impact |
|---|---|---|---|
| ABS plastic | 1/4 in | Tight factory-style fit with modest spacing | Keeps the driver close to the panel and resists common installation moisture |
| PVC | 6 mm | A rigid spacer where a plastic ring suits the vehicle | Adds controlled spacing while providing a firm mounting surface |
| MDF | 0.75 in | Deeper clearance or a substantial custom mounting ring | Can provide strong support, but it needs moisture protection in a door |
The product market includes thin ABS-style plates, PVC rings, MDF rings, and designs with provisions for component tweeters. That range tells you the adapter may influence the speaker's position and installation layout, not merely convert an oval hole into a round one. The broader adapter selection illustrates these differing material and design approaches.
Don't add thickness by default. Every extra spacer moves the speaker closer to the grille and changes the available window clearance.
Before choosing MDF for a door, seal its exposed surfaces against moisture. Before choosing a thin plastic plate, confirm that the speaker frame won't contact the factory opening and that the plate won't flex when the screws are tightened. Mechanical compatibility comes first, because no material can compensate for a hole pattern or basket that doesn't fit.
Achieving a Clean Factory-Like Finish
The new speaker may be mounted correctly while the installation still looks unfinished. If the original 6x9 grille no longer frames the round driver, use a compatible universal grille, modify the factory trim carefully, or choose an adapter design that includes a provision for a component tweeter. Keep the grille clear of the cone and surround, and check that the door panel doesn't press on the speaker when it snaps back into place.
A factory-like result comes from small details. Route wires away from moving mechanisms, protect connections from moisture, replace missing clips, and make sure the adapter gasket remains compressed after the trim is installed. Recheck the window path with the panel fitted, because the panel can change the available clearance around the speaker.
Before closing the door, verify the following:
- Mounting: Every fastener is tight without cracking the adapter.
- Sealing: Both the adapter-to-panel and speaker-to-adapter joints are continuous.
- Clearance: The glass, regulator, grille, and trim move freely.
- Connections: Polarity is correct and wiring can't contact the cone.
- Finish: The panel sits flush without forcing or distorting the grille.
Audio Jam Inc sells car audio speakers, including 6x9-inch options, and offers speaker installation booking for drivers who prefer a handled fitment and sealing check rather than a trial-and-error conversion. Visit Audio Jam Inc to shop speakers and installation options, then confirm the adapter, speaker flange, and cavity measurements before ordering.













