


12 Inch Sub Box for Truck: Build, Fit, and Install Guide

You've measured the space under the rear seat, found a 12-inch subwoofer you like, and then discovered that the enclosure you saved online may block the seat from folding, interfere with storage, or simply won't fit between the cab panels. The problem isn't always the subwoofer. In many truck installations, the enclosure is the part that determines whether the system feels integrated or improvised.
A 12 inch sub box for truck has to satisfy several demands at once. It must give the driver the correct airspace, fit around seat travel and cab structure, survive vibration, and leave enough room for the tools, groceries, or gear that made you choose a truck in the first place. The right box isn't necessarily the largest one you can install. It's the enclosure that matches the subwoofer, the cab, and the way you use the vehicle.
Table of Contents
- Why a 12 Inch Sub Box for Truck Is Different from a Car Box
- Sealed, Ported, and Bandpass Enclosures Explained
- How to Size and Tune a 12 Inch Sub Box for Truck Fitment
- Truck Cab Constraints and Real-World Fitment Choices
- Building a Durable Enclosure and Matching Amps Correctly
- Placement, Mounting, and Integration for Daily Truck Use
Why a 12 Inch Sub Box for Truck Is Different from a Car Box
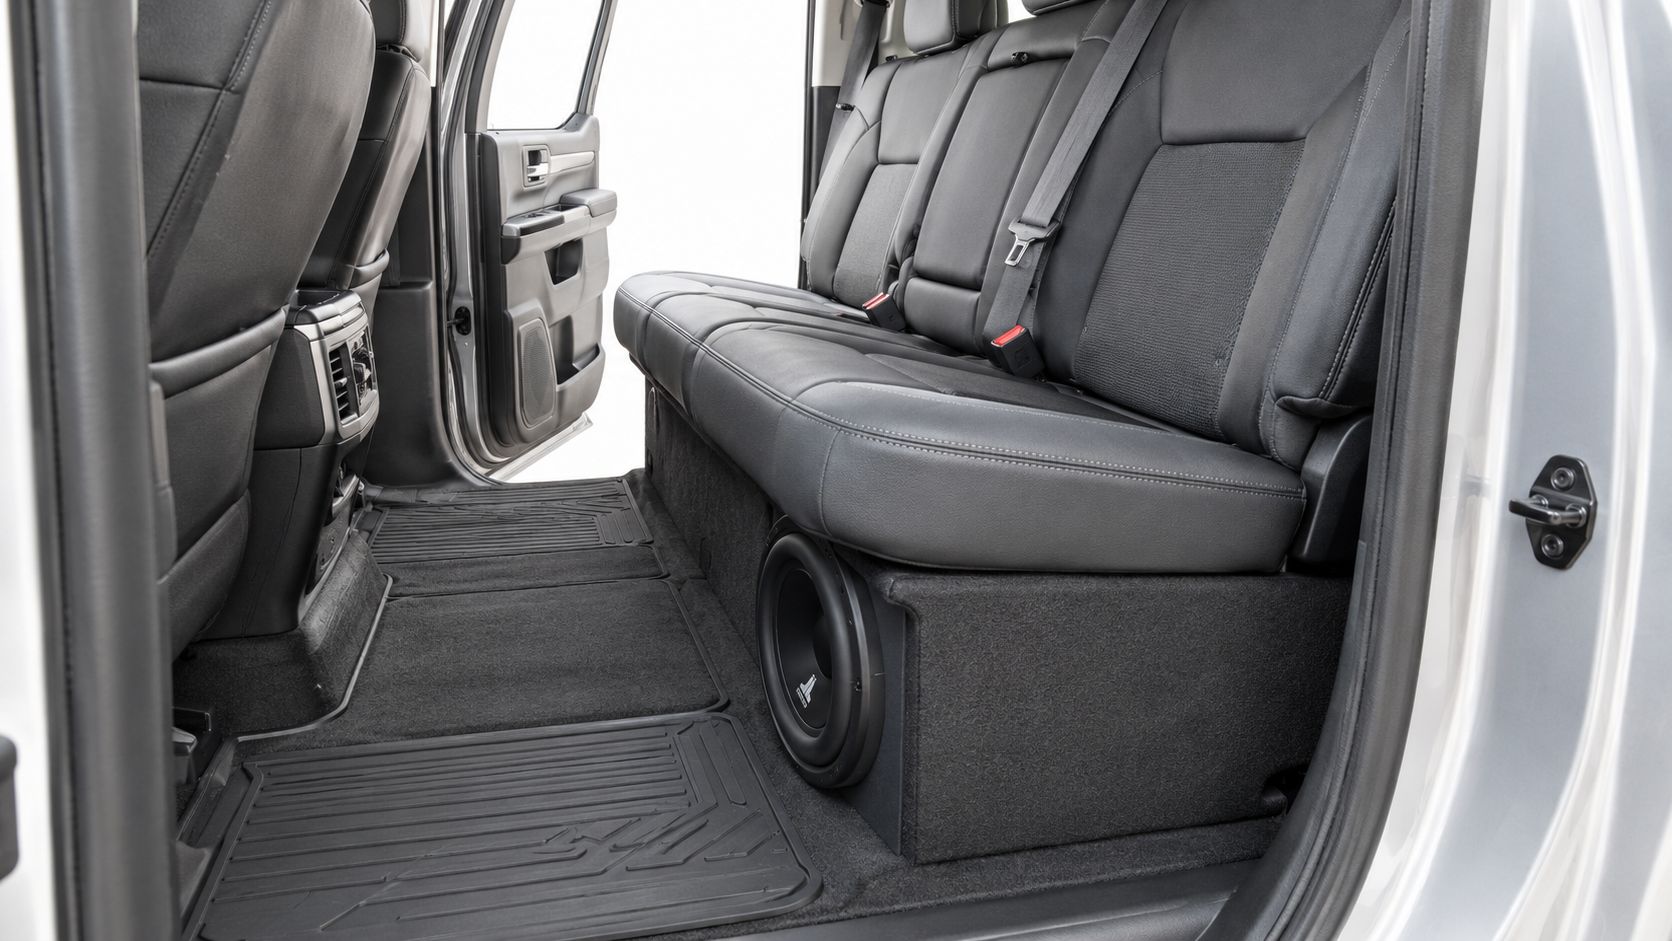
A truck cabin isn't just a car interior with more height. The rear seat may fold against the cab wall, lift from the floor, or move on a hinge that leaves very little usable depth. Storage pockets, seat brackets, jack tools, carpet contours, and irregular floor sections can all take space away from the enclosure. A box that fits neatly in a sedan trunk may be impossible to position under a truck bench without compromising the seat or blocking access to equipment.
Consider a daily driver with a crew cab. The owner wants deep bass, but the rear seating area still needs to hold work bags and emergency equipment. A large ported enclosure might produce impressive output, yet its height could prevent the seat from locking properly. A compact sealed enclosure may give up some peak output while preserving the seat function and keeping the cabin practical. Neither choice is automatically correct. The truck's geometry decides which tradeoff makes sense.
Cabin volume changes the listening experience
The passenger cabin acts as part of the acoustic environment. A compact truck interior can make bass feel strong even when the enclosure itself occupies limited space, while a larger or more open cab may respond differently. Seatbacks, floor position, and the direction of the subwoofer all affect how energy reaches the listening position.
That's why “bigger box equals better bass” is an unreliable rule. A box that's too large for the driver can produce an uncontrolled or poorly balanced response, while a box that's too small can restrict the driver and reduce the low-frequency result. The enclosure needs the right internal volume, not merely impressive external dimensions.
The practical starting range for a single 12-inch driver is about 1.0 to 1.5 cubic feet in a sealed enclosure and 1.5 to 2.5 cubic feet in a ported enclosure, although the driver's own specifications and the intended tuning remain decisive. These ranges are outlined in this 12-inch subwoofer box dimensions guide, which also explains why internal volume calculations use 1,728 cubic inches per cubic foot.
Practical rule: Measure the truck first, then select the enclosure type and subwoofer combination that can live comfortably in that space.
Fitment is an engineering decision
Start with the usable space, not the advertised box size. Measure the available width, height, and depth with the seat in every position you expect to use. Check the clearance for the subwoofer frame, terminal connections, amplifier wiring, and port opening. Then account for the fact that the enclosure may need a little breathing room around its edges to avoid contact with metal panels and trim.
This approach prevents a common expensive mistake. A builder orders a universal box, discovers that the port faces the seatback, and then tries to solve the problem by changing the mounting position or blocking part of the opening. The result may be louder in one narrow range but less balanced overall. A truck system works better when fitment, airspace, placement, and tuning are planned together.
Sealed, Ported, and Bandpass Enclosures Explained
The sealed-versus-ported decision matters, but truck owners also need to understand how a bandpass enclosure differs. Each design uses the same subwoofer in a different acoustic system. That changes the amount of space required, the way bass builds in the cabin, and how forgiving the installation will be when the truck is used every day.
Sealed enclosures
A sealed box traps air behind the driver. That enclosed air acts like a spring, helping control cone movement and producing a bass character many listeners describe as tight, smooth, or well-defined. The design usually works well when the available space is limited and the owner wants a predictable response for varied music.
The compact nature of a sealed enclosure can make it attractive for under-seat installations. It doesn't need a port tube or slot, so the builder can use the available shape more efficiently. That doesn't mean every sealed box can be made arbitrarily small. The driver still needs the manufacturer's recommended net airspace, and the enclosure must remain rigid and airtight.
A sealed design suits a truck owner who values usable rear-seat space, controlled bass, and a straightforward build. It's also easier to integrate when the available enclosure shape is shallow or irregular.
Ported enclosures
A ported box uses an opening and an internal passage to reinforce output around a selected tuning frequency. Properly designed, it can deliver more audible impact and stronger low-frequency authority than a sealed enclosure of similar general purpose. The tradeoff is that the port consumes space and requires careful design.
A published ported layout for a 12-inch car enclosure uses roughly 2.30 cubic feet of net internal volume, a 35 Hz tuning target, about 22.5 square inches of port area, and a 5.35-inch inner-diameter pipe. These figures come from the 12-inch enclosure design reference, but they aren't universal settings. The correct target depends on the driver, the available truck space, and the type of bass you want.
A ported box makes sense when the truck has enough depth and height for the enclosure, the owner wants more output near the tuning range, and there's room to build the port without sharp turns or excessive restriction. A poorly sized ported box can sound boomy, noisy, or weak outside its preferred range.
Bandpass enclosures
A bandpass design places the driver inside one chamber and uses a ported chamber to release the sound into the cabin. The design can produce strong output over a narrower range, but that specialization makes it less forgiving than sealed or conventional ported construction.
Truck owners should approach bandpass boxes as purpose-built systems rather than universal upgrades. The enclosure must be designed around the specific driver, chamber volumes, port dimensions, and available opening into the cabin. If the output window doesn't suit your music or listening habits, the system can feel uneven even when it plays loudly.
| Enclosure Type | Bass Character | Space Efficiency | Best Truck Use Case |
|---|---|---|---|
| Sealed | Controlled, smooth, and responsive | Often the easiest to package | Daily driving, limited under-seat depth, varied music |
| Ported | Stronger impact around the tuning range | Requires room for port volume and clearance | Owners prioritizing output and deeper authority |
| Bandpass | Specialized and concentrated output | Usually difficult to package and tune | Custom builds designed around a specific driver and listening goal |
The choice becomes clearer when you separate musical balance from maximum output. Choose sealed when utility and predictable response lead the decision. Choose ported when available space and output justify the added design work. Consider bandpass only when a specialist has a clear reason to use it in your particular truck.
How to Size and Tune a 12 Inch Sub Box for Truck Fitment
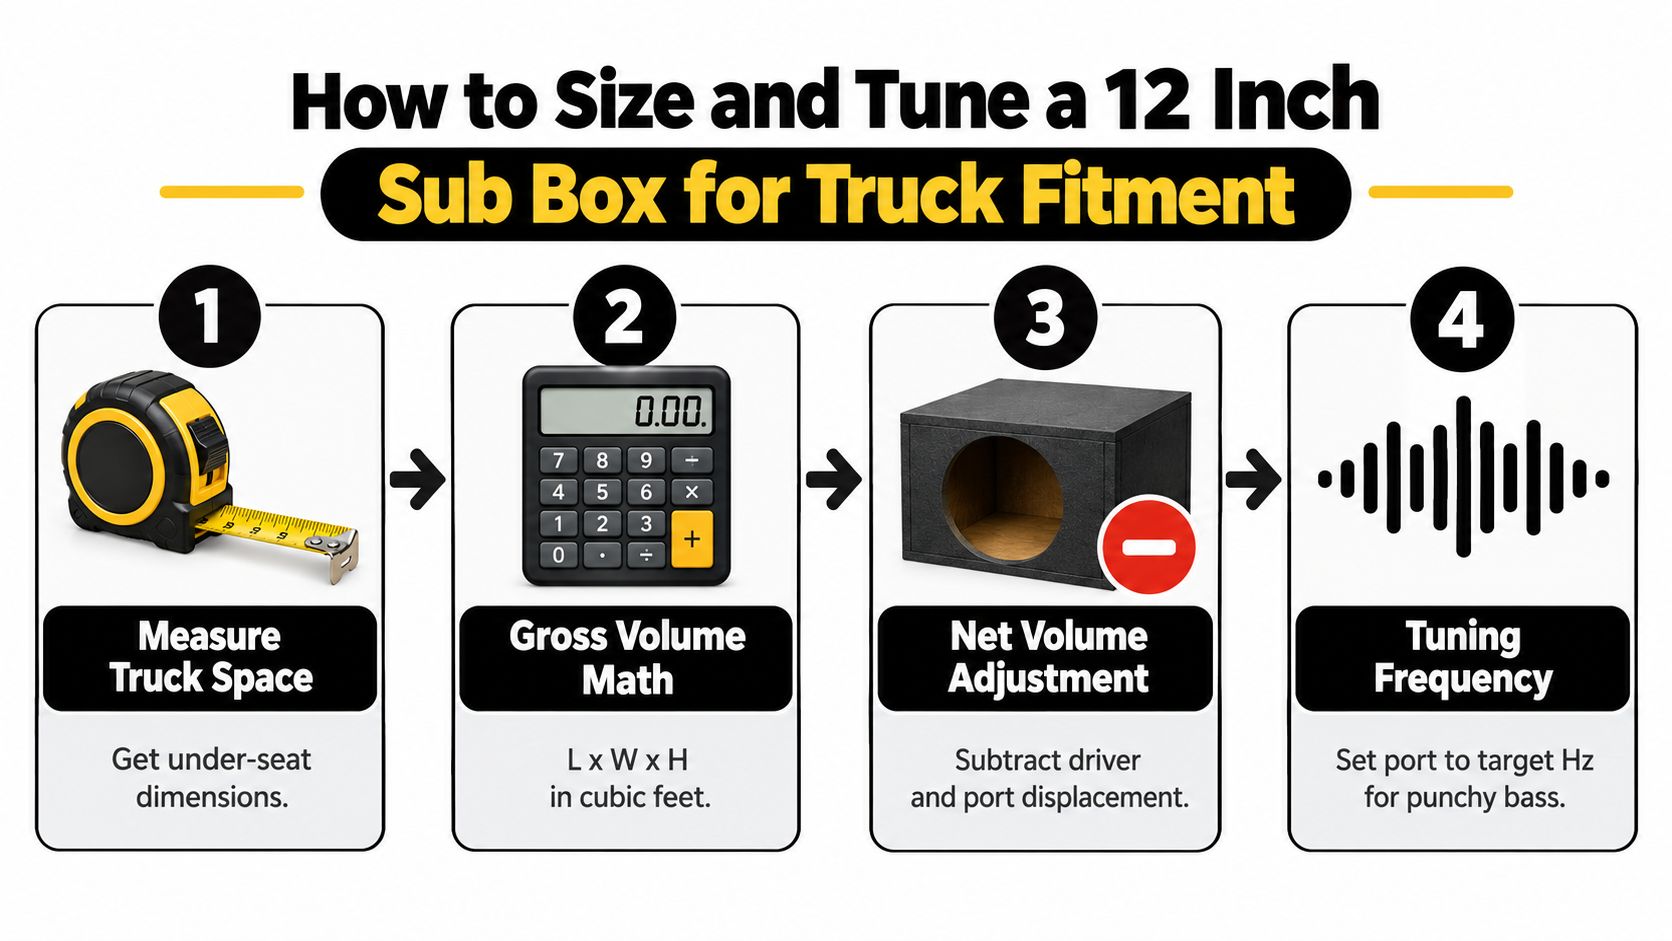
Enclosure sizing starts with one distinction that causes many DIY problems: gross volume is not net volume. Gross volume describes the airspace calculated from the enclosure's internal dimensions before components occupy any of it. Net volume is the airspace that remains after subtracting the subwoofer, port, bracing, and terminal hardware.
If you build from gross volume alone, the finished box can be acoustically smaller than the driver's recommendation. That changes the way the cone moves and can shift the intended response. Two boxes with the same outside dimensions can perform differently if their panel thickness, port design, internal bracing, or component displacement differs.
Follow the volume workflow
Use this sequence before cutting material:
- Measure the usable truck space. Record the maximum width, height, and depth with the seat positioned as it will be used. Mark obstructions instead of treating the area as a perfect rectangular cavity.
- Calculate the internal gross volume. Multiply the internal length, width, and height. If you're working in cubic inches, convert the result to cubic feet using 1,728 cubic inches per cubic foot, as described in the truck subwoofer box dimensions guide.
- Subtract occupied volume. Remove the driver displacement, port displacement, bracing, and terminal cup volume. A 12-inch driver may displace about 0.08 to 0.12 cubic feet, according to the published enclosure design reference. Use the actual displacement listed by the manufacturer whenever it's available.
- Compare net volume with the driver specification. Don't assume that a common range is correct for every model. The subwoofer's recommended sealed or ported airspace is the controlling specification.
For a ported design, you also need to verify port area, port length, and tuning frequency. A target such as 2.30 cubic feet net tuned to 35 Hz can serve as a reference layout, but copying those figures into a different driver's enclosure may produce the wrong result. The port must fit inside the truck without being folded into an unnecessarily restrictive shape or placed where the seat blocks its opening.
Check the box on paper
Draw the enclosure with its actual wall thickness and internal partitions. Write the volume of each section beside the drawing. For a slot port, calculate the space occupied by the port structure rather than subtracting only the visible opening. For a round port, include the tube's internal volume and check that the end of the tube has adequate clearance from the enclosure wall.
Use a calculator or enclosure-design software to verify the result, but don't treat software as a substitute for the manufacturer's data. Enter the driver's recommended alignment, displacement, and tuning requirements first. Then compare the modeled enclosure with the truck's physical limits.
Build check: If the box only fits after you ignore the port, seat movement, or driver depth, it doesn't fit yet.
A shallow enclosure can be correctly tuned, but its shape may force a wider or taller footprint. That's acceptable when the truck has width to spare. The goal is not to make every dimension small. The goal is to preserve the required net volume while fitting the enclosure into the cab without compromising its acoustic openings or daily function.
Truck Cab Constraints and Real-World Fitment Choices
Truck fitment changes from one cab layout to another. A crew cab may offer a broad rear bench but limited space under the seat. An extended cab may have less passenger room but a different storage shape. Seat travel can alter the available depth, and a folding seat can require clearance above the enclosure even when the floor area looks generous.
Measure the truck in its normal configuration and in its stored configuration. If the rear seat folds, lift it and check the full arc of movement. If it flips upward, identify where the enclosure could contact the seat frame. Include the cable path, fuse access, amplifier location, and any factory storage compartment in the drawing.
Choosing among shallow, standard, and dual-sub layouts
A shallow 12-inch subwoofer can be the right answer when the truck has limited mounting depth but enough floor area for the enclosure's width and height. Shallow-mount models under 4 inches deep are commonly used where a full-size 12-inch driver might need about 6 to 7 inches of mounting depth, according to this truck subwoofer fitment guide. The exact driver still matters, because basket depth, motor structure, and required airspace can vary.
A standard 12-inch driver makes more sense when the cab can provide the required mounting depth and net volume without sacrificing seat travel. It may offer more flexibility in driver selection, but the enclosure must still respect the seatback angle and the available space around the frame.
A dual-10 layout can be worth considering when a single 12-inch enclosure creates an awkward shape. Two smaller drivers may distribute the required footprint differently, allowing the builder to use a long, low enclosure under the bench. That doesn't automatically mean more output or better sound. It means the layout may match the truck's geometry more effectively.
Recent truck-box coverage also points toward compact or shallow solutions when cabin space is restricted, as discussed in this guide to down-firing subwoofer boxes for trucks. Treat that as a fitment principle rather than a universal product recommendation.
Use a practical inspection list
Before buying or building, confirm:
- Seat movement: The seat folds, lifts, and locks without touching the enclosure.
- Mounting depth: The subwoofer's full frame and terminal area clear the rear wall and seat structure.
- Port clearance: The port opening isn't pressed against a panel, carpet, or seatback.
- Cargo access: You can still reach the tools and storage areas you use.
- Service access: The driver, terminals, fuse, and amplifier can be inspected later.
- Cab protection: The enclosure won't rub against painted metal or sharp brackets.
The best truck enclosure is the one that fits these conditions before you connect the amplifier. If a standard 12 forces too many compromises, a shallow 12 or dual-10 design may deliver a more satisfying daily system.
Building a Durable Enclosure and Matching Amps Correctly
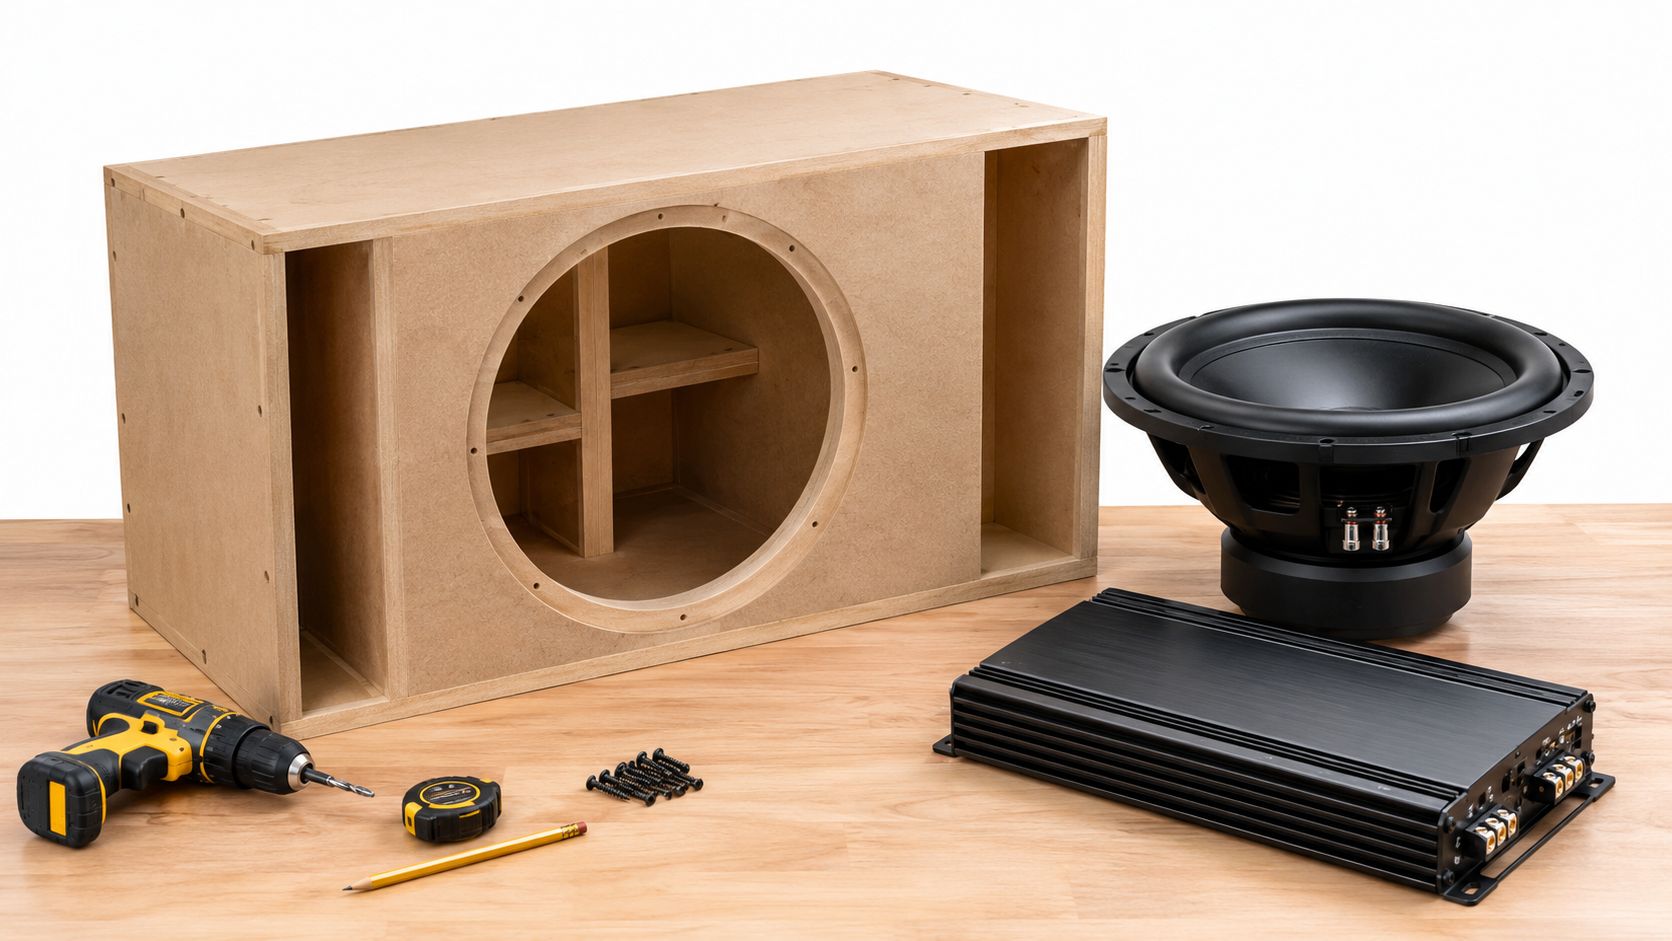
A strong subwoofer installation begins with an enclosure that stays rigid and airtight. Panel movement, loose joints, and leaking terminal hardware can add unwanted noise that sounds like a damaged speaker. Use a dense enclosure material suitable for subwoofer construction, join the panels securely, and brace large surfaces so they don't flex under sustained cone movement.
The front baffle deserves particular attention. It must support the driver without twisting, and the cutout needs to match the manufacturer's mounting specification. Apply a gasket between the driver and baffle, then tighten the hardware evenly. A terminal cup should also seal properly, because a small leak can undermine the behavior of a sealed enclosure.
Build for the truck environment
Truck interiors expose equipment to vibration, temperature changes, and repeated movement of cargo. Seal every joint carefully, reinforce the enclosure where its shape creates wide unsupported panels, and protect the exterior with carpet, coating, or another finish suited to the location. A box under a rear seat needs clearance from the floor and brackets, while a cargo-area enclosure needs protection from shifting equipment.
Internal damping can help control reflections in an appropriate sealed design, but it isn't a replacement for correct volume. Don't pack material into a port or place loose material where the driver can pull it toward the opening. For a ported enclosure, preserve the port's full cross-section and keep the passage smooth.
A useful construction test is simple. Before installing the driver, inspect every seam from inside the enclosure. Look for gaps around braces, corners, and the terminal cup. Pressurize the sealed box gently and listen for air leaks around the joints. For a ported box, inspect the port walls and bends for rough edges or obstructions.
The following visual guide can help you think through the relationship between enclosure construction and the rest of the system.
Match the amplifier to the driver
Choose an amplifier by checking the subwoofer's RMS power requirement, voice-coil configuration, and final load. Peak power figures don't tell you how the system will behave during normal listening. The amplifier must support the subwoofer's impedance after the voice coils are wired, and its clean output should suit the driver's continuous power specification.
Verify the wiring before connecting the battery. Confirm polarity at the amplifier, terminal cup, and subwoofer. Protect the power cable with the correct fuse near the battery, route it away from moving seat hardware, and secure loose cable so vibration can't pull on the terminals. Keep signal wiring separated from power wiring where practical, and mount the amplifier where it has ventilation and protection from cargo.
Diagnostic habit: Set gains with the goal of clean signal reproduction, not maximum knob position. If the subwoofer sounds harsh or the amplifier clips, reducing the gain is more useful than adding a larger box.
A final pre-mount inspection should answer four questions:
- Does the load match the amplifier? Confirm the final impedance and the amplifier's supported range.
- Does the box match the driver? Verify sealed or ported alignment and net volume.
- Can the system be serviced? Leave access to the fuse, terminals, controls, and driver hardware.
- Can the enclosure stay still? Plan brackets, straps, bolts, or other secure mounting before the first drive.
Placement, Mounting, and Integration for Daily Truck Use
Under-seat placement usually protects the enclosure and preserves the truck's cargo area, but the available height and seat movement become strict design limits. A side-panel enclosure can use otherwise wasted cab space and keep the center floor clear, though it may require a custom shape and careful protection from shoes, tools, or cargo. A cargo-area box gives the builder more freedom with volume, but it can reduce storage and needs especially secure mounting.
Subwoofer orientation also deserves attention. Down-firing designs can protect the cone from loose objects and may work well under a bench, but the gap between the driver and floor must remain clear. Forward-firing designs need unobstructed space in front of the cone. Port openings need similar attention, because a seatback or storage item placed too close can restrict airflow and change the audible result.
Use isolation where the enclosure contacts the truck, then secure it against sliding and tipping. Don't rely on its weight alone. Check that bolts, brackets, and straps won't interfere with wiring, seat latches, fuel-system components, or factory safety equipment. Protect exposed edges with a durable finish, and inspect the mounting points after the first drives.
The right 12 inch sub box for truck is therefore a compromise chosen deliberately. A sealed under-seat box may serve a work truck that needs every bit of storage. A ported cargo-area enclosure may suit a driver who prioritizes impact and accepts the space cost. A shallow 12 or dual-10 layout may be the practical middle ground when the cab shape rules out a conventional box.
Audio Jam Inc can help you match a truck-specific enclosure, subwoofer, amplifier, and wiring plan, with installation services for clean integration and reliable daily use. Visit Audio Jam Inc to shop car audio equipment or arrange professional installation for your truck.













