

10 Sealed Subwoofer Box Size and Build Guide

For a 10-inch sealed box, treat 0.60 to 0.75 cubic feet net as a sizing example, not a universal specification; the driver's recommended sealed airspace sets the actual target. Start with the volume table below, but check the displacement allowance before choosing a finished size.
You've found a box that fits the trunk, the mounting hole looks right, and the carpet matches. That still doesn't tell you whether the subwoofer will work properly in it. The useful measurements are the airspace left after installation and the clearance around the driver, followed by how the system sounds from your seat.
Table of Contents
- Net Volume and Outside Size for a 10 Inch Sealed Box
- How Cabin Gain Changes the Same Box
- How to Build the Sealed Enclosure
- Mount Wire and Tune the Box in the Vehicle
- Fixes When the Bass Is Boomy Weak or Rattly
- Build It Yourself or Have It Installed
Net Volume and Outside Size for a 10 Inch Sealed Box
A listing for a “10 sealed subwoofer box” usually tells you the intended speaker diameter, not whether the enclosure suits your particular driver. Net airspace is the usable internal air volume after subtracting the space occupied by the installed components. Outside dimensions tell you whether the box fits the vehicle.
Those are different checks. Pass both before buying wood or a prebuilt enclosure.
Read the dimensions before choosing a row
The dimensions below are geometric examples, not driver recommendations. The rectangular rows illustrate an important trap: their internal dimensions produce the listed volume before displacement, so they cannot deliver that same figure as finished net airspace.
10-inch sealed box net volume and finished size
| Net airspace | Internal W x H x D | External with 3/4-inch MDF | What it sounds like |
|---|---|---|---|
| 0.50 cu ft target; listed shell is 0.50 cu ft before displacement | 12 x 12 x 6 in | 13.5 x 13.5 x 7.5 in | A smaller alignment can sound punchier and more pronounced with the same driver |
| 0.55 cu ft shallow-truck target; verify actual displacement | 14.5 x 14.5 x 4.5 in, calculated from the exterior | 16 x 16 x 6 in | Compact behind-seat layout; requires a suitable shallow driver |
| 0.75 cu ft target; listed shell is 0.75 cu ft before displacement | 12 x 12 x 9 in | 13.5 x 13.5 x 10.5 in | A larger alignment can sound smoother if the driver supports it |
| 1.00 cu ft target; listed shell is 1.00 cu ft before displacement | 12 x 16 x 9 in | 13.5 x 17.5 x 10.5 in | Less air-spring stiffness with the same driver; excursion needs checking |
Dimensions are calculated layout examples using the stated wall thickness, not finished enclosure specifications.
Read the compact row as a packaging exercise. Once the woofer and brace go inside, the remaining airspace is smaller than the empty shell. Increase the shell appropriately if the driver requires the full target volume.
The shallow-truck example needs particular care. Its broad face provides space around the basket, but the short front-to-back dimension may not accommodate the magnet, rear vent, wiring, and cone clearance. A shallow exterior doesn't establish shallow-driver compatibility.
The deeper rectangular examples provide more room for the motor assembly and bracing. They aren't automatically better sounding. Their usefulness comes from matching a driver that needs that airspace.
Bench rule: A correct mounting hole proves that the basket fits the baffle. It doesn't prove that the enclosure fits the driver.
Check the driver before committing to the shell
According to Audio Intensity's sealed subwoofer box design guide, drivers with Qts around 0.4–0.7 are commonly suited to sealed alignments, while an EBP below about 50 generally supports sealed use.
Treat those as screening checks, not a substitute for the manufacturer's enclosure recommendation. Qts describes the driver's damping characteristics; EBP helps assess enclosure suitability. Neither tells you the finished box dimensions without considering the rest of the driver's parameters.
Find the manufacturer's sealed-volume recommendation, driver displacement, mounting depth, cutout drawing, and power rating. If that information is missing, identify the exact model before committing to a cabinet. A generic airspace guess can become an expensive way to discover that the driver wanted a different enclosure.
Work from net airspace back to the panels
Use this worksheet:
- Required net volume: Take the sealed recommendation from the driver documentation.
- Driver displacement: Add the manufacturer's displacement allowance to the required net volume.
- Other occupied space: Add the brace, terminal hardware, and any internal structures.
- Gross internal volume: Size the empty shell to hold both the required air and those components.
- External dimensions: Add wall thickness to establish the vehicle footprint.
For a hypothetical example, suppose a driver requires 0.65 cubic feet net and the installed driver, brace, and terminal hardware occupy 0.08 cubic feet. The empty shell needs 0.73 cubic feet internally. Building an empty shell of 0.65 cubic feet and then installing those parts would miss the target.
Don't subtract all the displacement from the recommended net volume. You add displacement when designing the empty enclosure, then subtract it when verifying the finished assembly.
A smaller sealed enclosure generally raises system Q, producing a more pronounced response around resonance. That can sound punchy, but it can also make different bass notes sound too similar. A larger enclosure reduces the stiffness of the trapped air and may require more excursion for the same low-frequency output.
Neither arrangement guarantees cone safety. Driver limits, signal content, amplifier output, and filtering still matter.
Loose acoustic fill can help refine an otherwise suitable enclosure, but it doesn't create measurable physical space. Don't use it to excuse a major mismatch or assume a fixed percentage of correction.
Before marking the cut lines, confirm these items:
- Alignment suitability: The driver supports sealed use.
- Finished airspace: Displacement has been accounted for.
- Mechanical fit: The motor, vent, terminals, and mounting hardware have clearance.
- Amplifier match: The intended load and output suit the driver.
How Cabin Gain Changes the Same Box
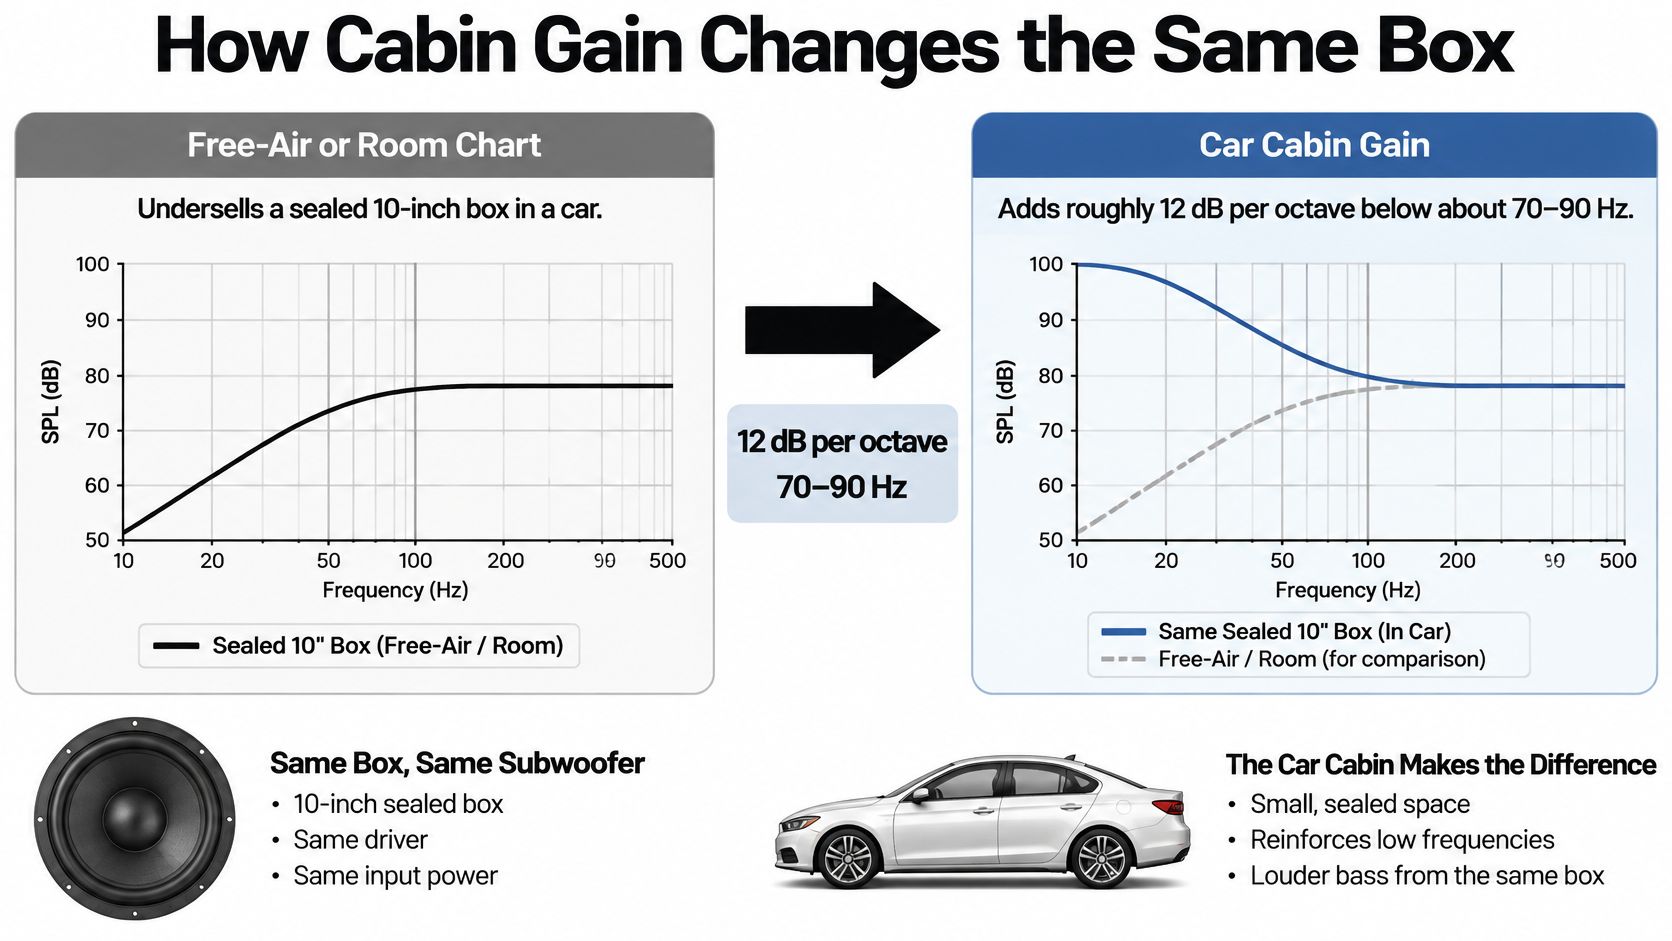
A room-response chart doesn't describe everything you'll hear inside a car. The cabin boundaries, seat openings, and enclosure position all influence the result.
This comparison illustrates why the same sealed enclosure can sound different after installation.
Cabin gain can fill in the bottom end
Audio Intensity's sealed-versus-ported guide explains that vehicle interiors can add roughly 12 dB per octave below approximately 70–90 Hz, potentially offsetting a sealed enclosure's typical 12 dB-per-octave low-frequency roll-off.
That's a useful explanation, not a promise of a perfectly flat response. Cabin leakage, trim, dimensions, and the path from the woofer to the listener affect what arrives at your ears. A low-frequency curve that looks modest outside the vehicle can therefore be entirely satisfactory inside it.
Choose placement around the vehicle
Expected sealed 10-inch result by vehicle
| Vehicle and placement | Cabin effect |
|---|---|
| Sedan trunk, cone toward the cabin | The trunk-to-cabin opening strongly affects coupling; start with the driver's recommended sealed volume and test orientation |
| Hatchback, seats up | Can provide useful cabin reinforcement when the enclosure isn't obstructed |
| Hatchback, seats folded | The changed acoustic space can alter bass balance; compare before assuming a fault |
| SUV or crossover | The larger shared interior can produce a different low-bass balance; use the driver-approved volume rather than automatically enlarging the box |
| Pickup crew cab, behind the seat | Compact placement can work well, but seat clearance and driver ventilation constrain the design |
A sedan's rear seat can restrict sound reaching the cabin. Cabin-facing placement may help, but rear-facing placement can also work well. Don't bolt the enclosure down permanently until you've compared practical orientations.
In a hatchback, test with the seats in their normal position. Folding them changes more than cargo access, so a tuning decision made with the seats folded may not suit the daily commute.
For an SUV, don't compensate for disappointing bass by blindly adding amplifier power. Check the response and integration first. In a pickup, preserving motor ventilation and seat operation matters more than squeezing in the largest possible cabinet.
The video provides another listening and enclosure reference.
A ported enclosure may produce a higher peak output, while a sealed enclosure may be easier to integrate smoothly with factory speakers. For a daily driver, especially a compact car, smooth bass through the listening range can be more useful than a louder peak.
Judge that balance from the driver's seat with a measurement microphone and familiar music, not from the manufacturer's lowest frequency claim.
How to Build the Sealed Enclosure
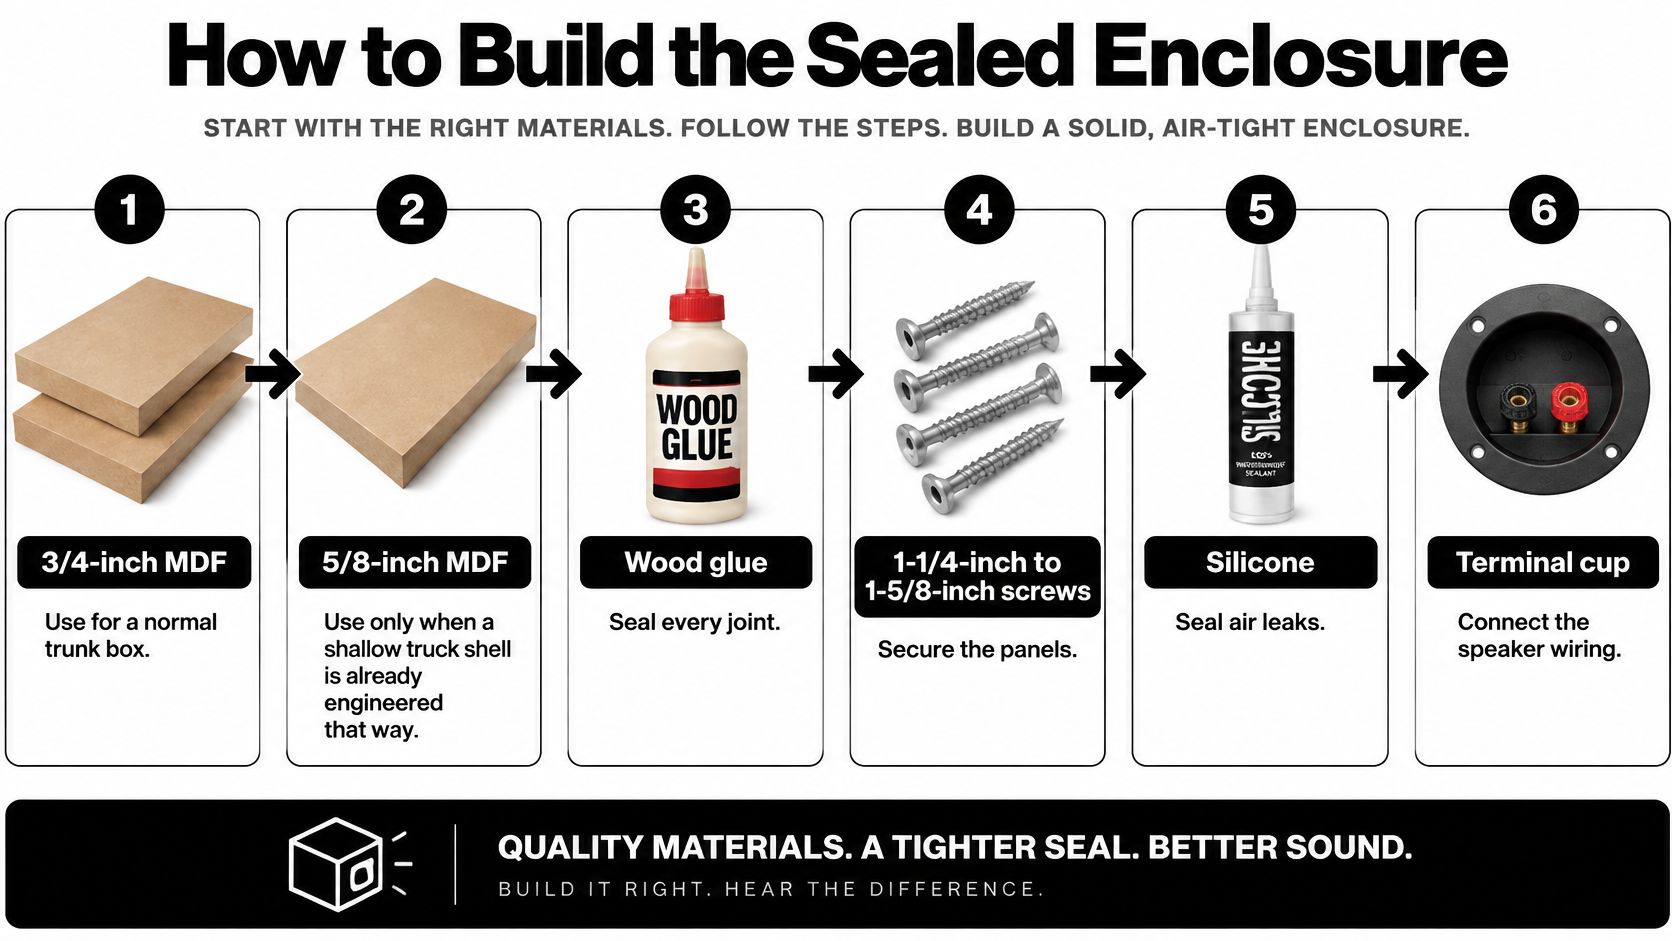
Start with flat sheet material, wood glue, appropriate screws, a gasketed terminal cup, speaker gasket tape, internal wire, acoustic fill, and an enclosure-compatible seam sealant. You'll also need clamps, a square, drill, countersink, and a router with a circle jig or a carefully guided jigsaw.
For a conventional trunk enclosure, 3/4-inch MDF is a practical build choice. Use thinner material only as part of a design that accounts for panel span and reinforcement, not just to recover airspace. The guide to choosing wood for a subwoofer box helps compare material choices before cutting.
This build overview shows the materials and assembly sequence.
Cut and assemble without losing airspace
- Draw the actual joints. Label the front, back, sides, top, and bottom, then show which panels overlap. External dimensions aren't a cut list because overlapping panels must be shortened by the material thickness.
- Transfer the driver manufacturer's cutout drawing to the baffle. Check basket clearance and screw locations before routing. Don't choose the hole diameter from the nominal speaker size.
- Dry-fit before applying glue. Clamp the cabinet together, check it for square, and test the driver's fit. Resolve gaps now rather than trying to close them with screw pressure.
- Glue the mating surfaces and clamp them firmly. Predrill and countersink screws so the MDF doesn't split or mushroom. The glue joint supplies the continuous bond; screws hold alignment while it cures.
- Install the brace while access is open. A window brace connects panels without consuming as much airspace as a solid divider. Keep it clear of the magnet, rear vent, and terminal connections, and include its displacement in the volume calculation.
- Seal the internal seams and terminal opening with a compatible sealant. Follow its full cure instructions before installing the driver, especially when the product releases vapors during curing.
- Finish with wiring, gasket, and driver. Secure internal wire so it can't strike the cone or basket. Apply gasket tape continuously, tighten mounting screws evenly, and keep loose fill away from moving parts and ventilation openings.
Check details before closing the cabinet
The terminal cup needs the same attention as the panel joints. A neatly carpeted box can still leak through a poorly fitted cup, an unused screw hole, or a cable pushed through an unsealed opening.
Use screws long enough to engage the receiving panel without breaking through an exposed surface. Choose their position around the actual joint rather than following a spacing pattern that puts a fastener too close to an edge.
An airtight cabinet starts with fitted joints. Sealant is a backup, not a substitute for wood that meets properly.
If you compare a prebuilt option, check its intended driver size as well as its shape. The Atrend E12ST 12" Single Bass Box Sealed Empty Truck Enclosure is a sealed truck enclosure for a different driver size, not a direct substitute for this build.
Before powering up, inspect the gasket and seams. If the manufacturer permits a gentle manual cone check, apply light, even pressure with the system off and listen for escaping air. Never force the cone or press on a delicate dust cap.
Mount Wire and Tune the Box in the Vehicle
Secure the enclosure to suitable vehicle structure with properly rated brackets or restraints. Check beneath any proposed drilling point for wiring, fuel-system components, and other equipment before making holes.
Keep the cabinet clear of seat tracks, jack storage, restraint components, and moving seatbacks. A box that shifts during braking is a safety problem even if it sounds excellent.
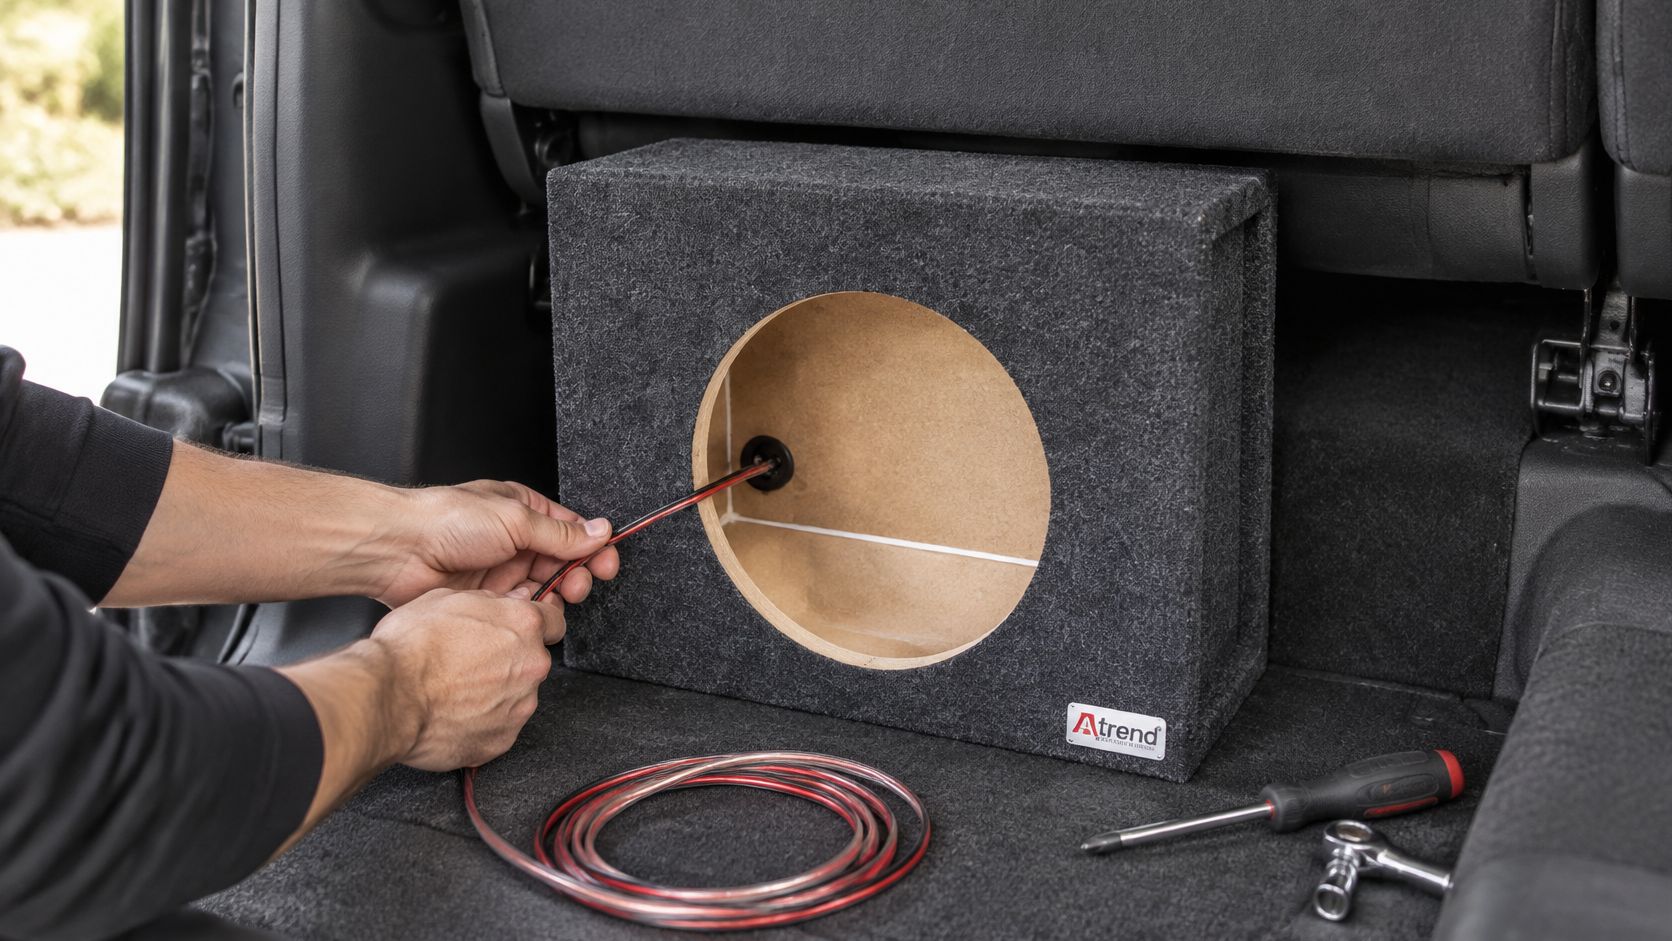
The pictured enclosure is a truck-style packaging reference, not a fit recommendation for the driver being installed.
Confirm clearance and electrical load
For down-firing installations, verify the manufacturer's required cone-to-floor clearance. Carpet, floor mats, and stored cargo must stay outside the cone's travel. Rear motor ventilation needs its own clearance, which isn't necessarily the same as mounting depth.
Wire the voice coils to an impedance the amplifier supports in its intended operating mode. Bridged amplifier ratings may differ from single-channel ratings, so don't assume a load is safe because the amplifier supports it in another configuration.
Use the subwoofer hookup diagram guide to follow the coil connections. Verify the finished wiring with a multimeter before connecting the amplifier, remembering that measured DC resistance won't exactly equal nominal impedance.
- Power cable: Size it for current demand, cable length, and the amplifier manufacturer's instructions.
- Battery protection: Fit the specified fuse close to the battery and protect the cable where it passes through metal.
- Ground connection: Use a sound chassis connection on clean metal, with secure hardware.
- Speaker polarity: Keep connections consistent through the terminal cup and coils.
Set gain before chasing loudness
Turn off bass boost, loudness compensation, and aggressive equalizer settings. Confirm whether the factory system already applies filtering or volume-dependent bass reduction, since those functions can complicate adjustment.
Gain is input matching, not a second volume control. Establish the head unit's clean output level, then set amplifier gain using the manufacturer's procedure and an appropriate test signal. An oscilloscope or distortion detector is more reliable than waiting until music sounds obviously rough.
Set the low-pass crossover to blend with the front speakers without pulling voices into the rear of the vehicle. Use a high-pass or subsonic filter when needed to control content outside the system's useful operating range; the correct setting follows the driver, enclosure, and intended output rather than a universal number.
Stop testing when you hear mechanical contact or smell overheated components. Turning the music down briefly doesn't diagnose the cause.
Finish with a moderate-level listening pass. Compare polarity or available phase settings at the listening seat, then check several tracks rather than tuning around a single bass-heavy recording.
Fixes When the Bass Is Boomy Weak or Rattly
Boomy bass doesn't automatically mean you need another enclosure. Check equalization, crossover overlap, placement, and the actual airspace before cutting new panels.
Sealed 10-inch box problems and fixes
| Symptom | Likely cause | First fix |
|---|---|---|
| Boomy one-note bass | Net volume too small or box too lively | Try loose polyfill; enlarge only if the driver documentation supports it |
| Thin weak bass | Poor orientation, changed seat position, or low-pass too low | Restore normal seat position, compare orientation, and check crossover integration |
| Rattle at moderate volume | Leaky seam, flexing panel, or cargo contact | Reseal, add a brace where needed, and clear contact points |
| Amp protect or overheating | Incorrect final impedance or another electrical fault | Verify coil wiring, supply voltage, and ground |
| Tick or distortion on deep notes | Excess excursion, clipping, or mechanical contact | Stop playback, lower gain, and inspect before adjusting protective filtering |
Separate adjustment from repair
Loose fill, orientation changes, and crossover adjustments are driveway jobs. Sealant repairs also need their full curing time before the box returns to service. A cabinet with the wrong airspace or insufficient mounting depth needs a redesign, not another handful of stuffing.
Don't assume a tick proves the box is too small. Excessive excursion can occur in other alignments, and a loose internal wire can imitate mechanical trouble. Inspect before applying more power.
For a controlled adjustment sequence, use the subwoofer tuning guide. Change one setting at a time so you can identify what improved the result.
A careful leak inspection and gentle, manufacturer-permitted cone check can find a problem that an amplifier upgrade would leave untouched.
Build It Yourself or Have It Installed
A straightforward box is a reasonable DIY project if the driver documentation is clear, the panels can be laid out square, and you can make airtight joints. Check the route into the vehicle before cutting: a cabinet can fit its cargo space and still be too wide to pass through the door or tailgate opening.
Installation help makes sense when a truck's limited space calls for a shallow enclosure, the factory signal needs integration, or the planned wiring load is uncertain. A box that clears the opening but blocks the seat from sliding back is a fit failure, even if its airspace and construction are right.
Bring a complete specification
Before cutting or booking, confirm:
- Final impedance: Record the intended voice-coil configuration.
- Amplifier output: Check the RMS rating at that load.
- Entry clearance: Compare the finished cabinet's largest dimensions with the door or tailgate opening.
- Installed clearance: Check seat travel, cargo access, and access to wiring once the box is in place.
Audio Jam Inc sells car audio products and provides custom enclosure installation in Bear, Delaware. Its installers can help assess a shallow truck enclosure where seat movement and entry clearance constrain the design. Visit Audio Jam Inc with your driver model, amplifier details, and vehicle measurements to discuss a sealed enclosure for your setup.